Mix Recall Remembers Your Instrument Settings

by Dan Gonzalez

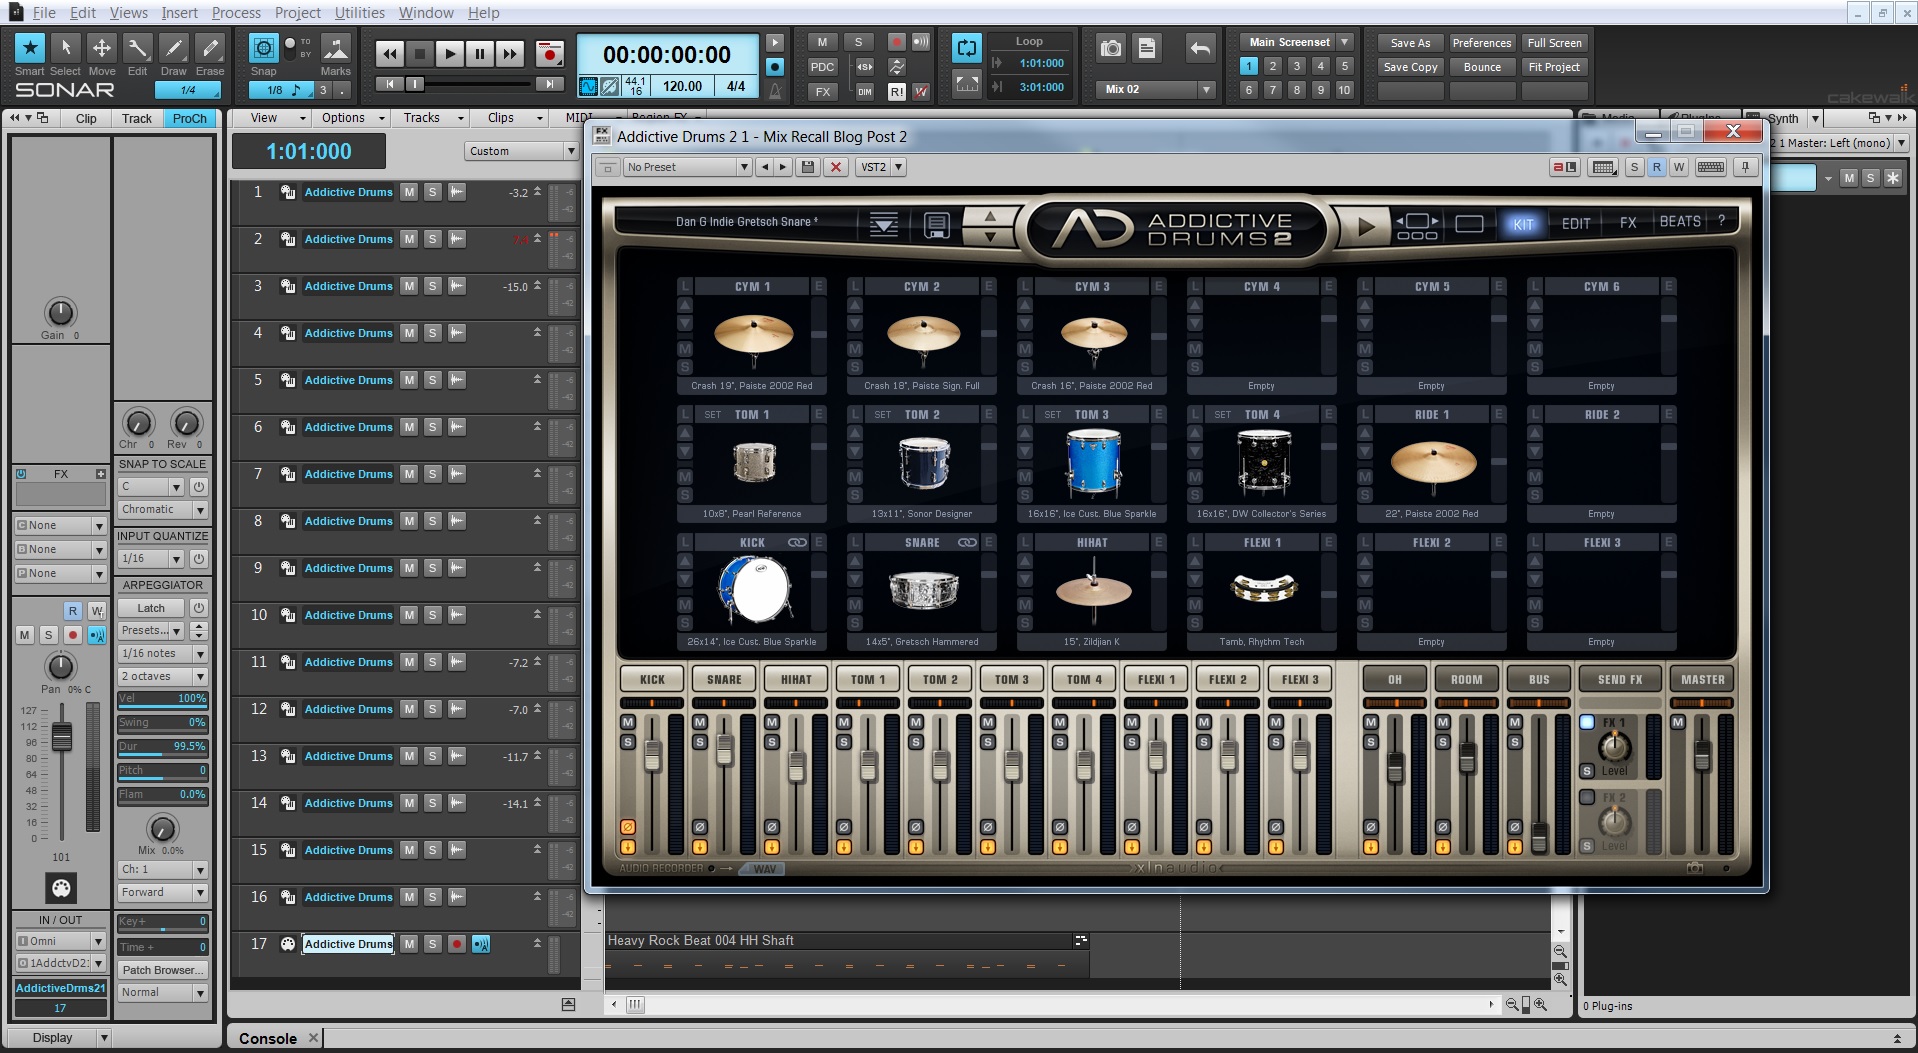
Mix Recall takes your mixing to another level by offering SONAR Artist, Professional, and Platinum users the ability to save different mix scenes of the same mix within a single project. Mix Recall saves track parameters, bus parameters, and even instrument presets. A great way to use this feature is to audition different drumkits using the included Addictive Drums 2.


Instruments these days are full of all kinds of choices, especially ones that are as expansive as Addictive Drums 2. When working on a track I like to take the same pattern and switch between the custom kits that I’ve made. Addictive Drums 2 and Addictive Drums 1 both let the user take pieces of all the different kits that it comes with to make your own. Mix Recall let’s you take this workflow a step further.

Original drum passage

Here we have a simple Indie Kit from Addictive Drums:


Saving the first mix scene

Go to the Mix Recall module in SONAR and click on Continue reading “Mix Recall Remembers Your Instrument Settings”

SONAR: Perfect Your Bus Processing with Mix Recall

by Dan Gonzalez

Large projects yield large mixes. As a mix engineer myself I tend to stack up on mix buses to make it easier to control multi-mic’d instruments or groups of tracks.

As of SONAR X3, experimenting with different types of bus processing is somewhat cumbersome due to a lack of useful A/B switching mechanisms. Mix Recall changes that in the newest version. Elevating your workflow is what SONAR is here for, and SONAR Artist, Professional, and Platinum now offer a goldmine of mixing workflows.

When you first open up Mix Recall make sure to save your project – or else all of the buttons will be inactive.

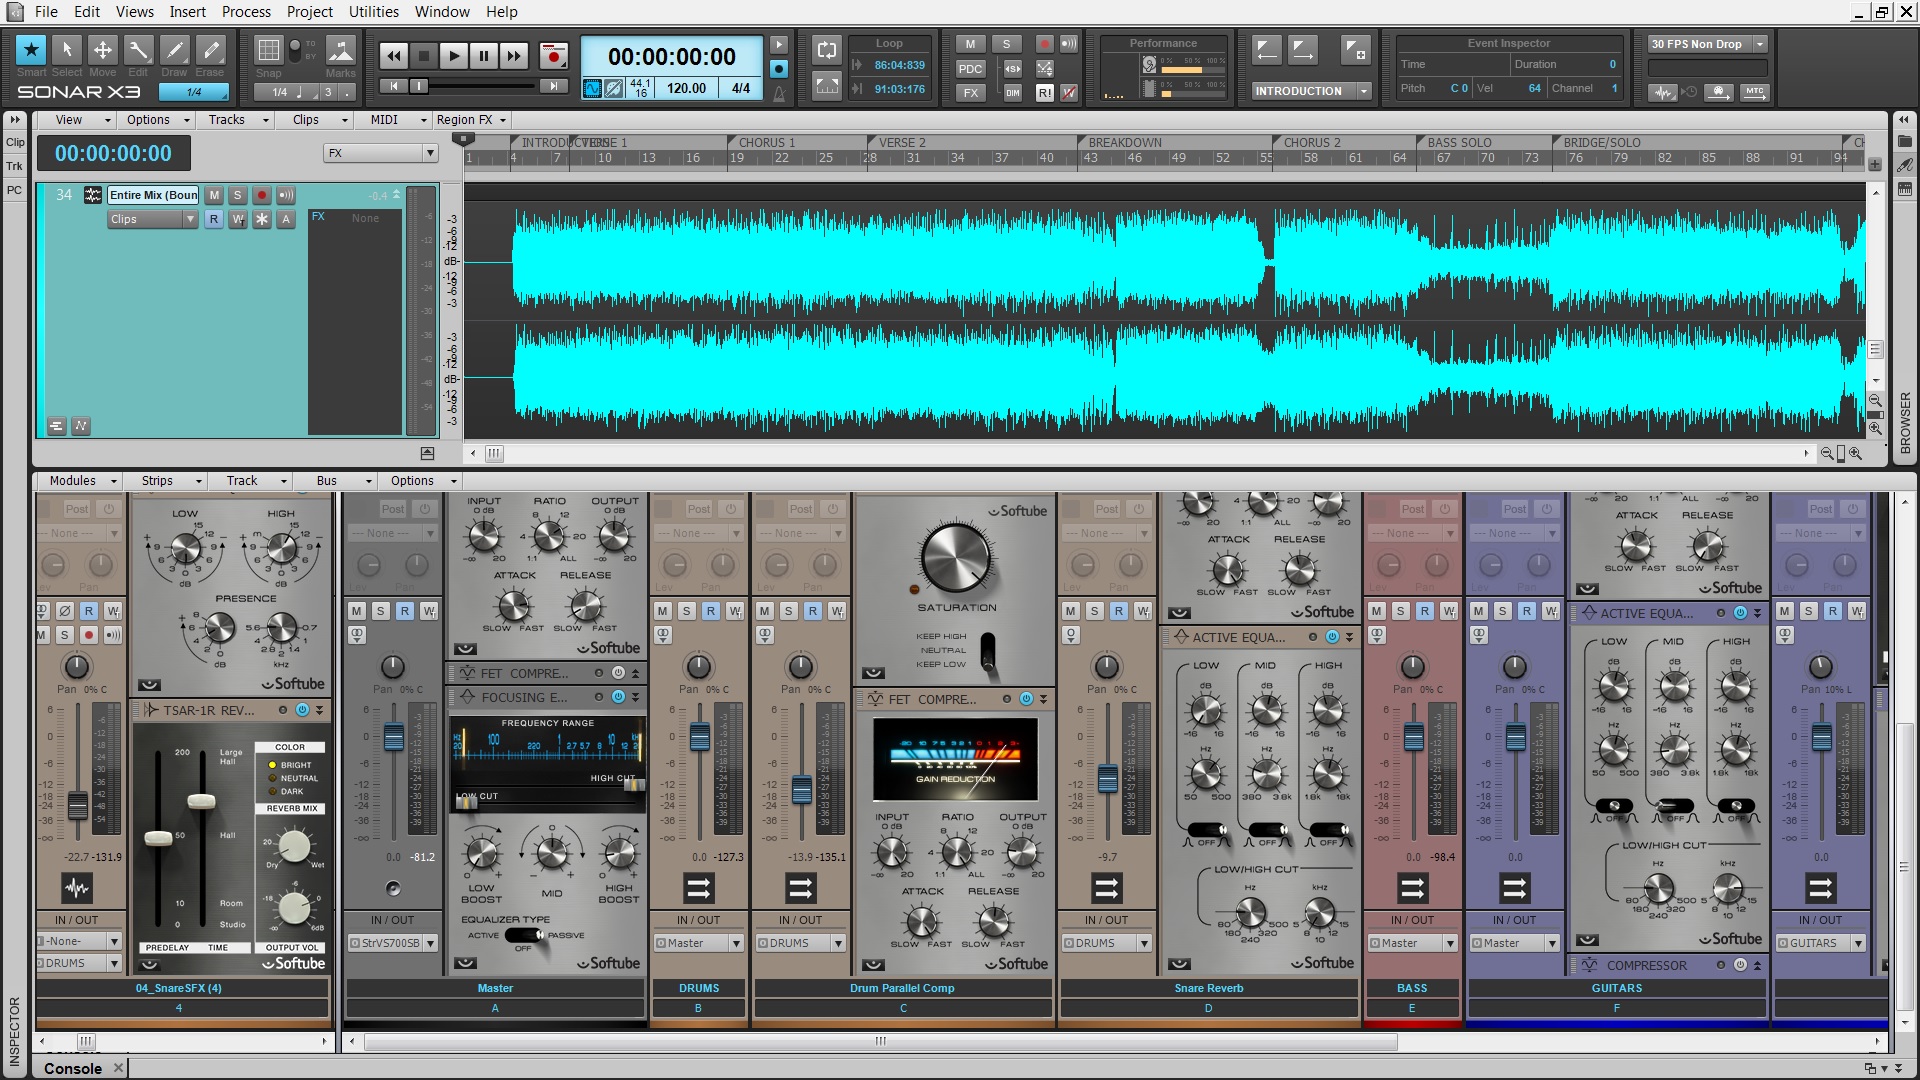
Grab the mix you’re working on and go the Master Bus and select it. Here’s a mix that I’ve been working on for a bit. This song has all different kinds of drums, synths, and other instruments. This first example has no bus compression on it. Continue reading “SONAR: Perfect Your Bus Processing with Mix Recall”

Multi-track Drum Editing – Crossfading and Critical Listening

by Dan Gonzalez

In the past 3 articles we have looked at basic tools for drum editing as well as identifying, splitting, cropping, and aligning clips. All of these techniques can be followed pretty accurately by reading along and performing the functions as I’ve written them. This portion of the blog series will require that you listen intently to what you’re doing as we work through it.

Make sure to wear headphones and get your critical listening ears on so that your drum edits are clean and not full of pops. Previously I mentioned that we would need to monitor our drums as we edit them and that erroneous edits come through the most in the cymbal microphones. In order to make this possible we’re going to mute the tom tracks and lower the volume for the kick and snare tracks. This exposes mostly high hat, ride, and overhead microphone signals. Also, make sure to pan the overhead microphone signals hard left and right too.

STEP 14: Turn on Auto Crossfade

SONAR is known for it’s streamlined feel and quick functions. One of the best examples of this is SONAR’s auto cross-fade functionality. Since we’re  putting this drum pattern back together we’ll need some speedy way of making sure the clips do not pop when overlapping.

Within the track view click on the Options > Auto Crossfade. This feature allows you to crop one clip into another and automatically yield a cross fade. Continue reading “Multi-track Drum Editing – Crossfading and Critical Listening”

Multi-Track Drum Editing – Cropping and Aligning Clips

In this part of the blog series we’ll cover cropping and aligning the clips that we sliced and diced in the previous post.

STEP 09: Cropping Multiple Clips

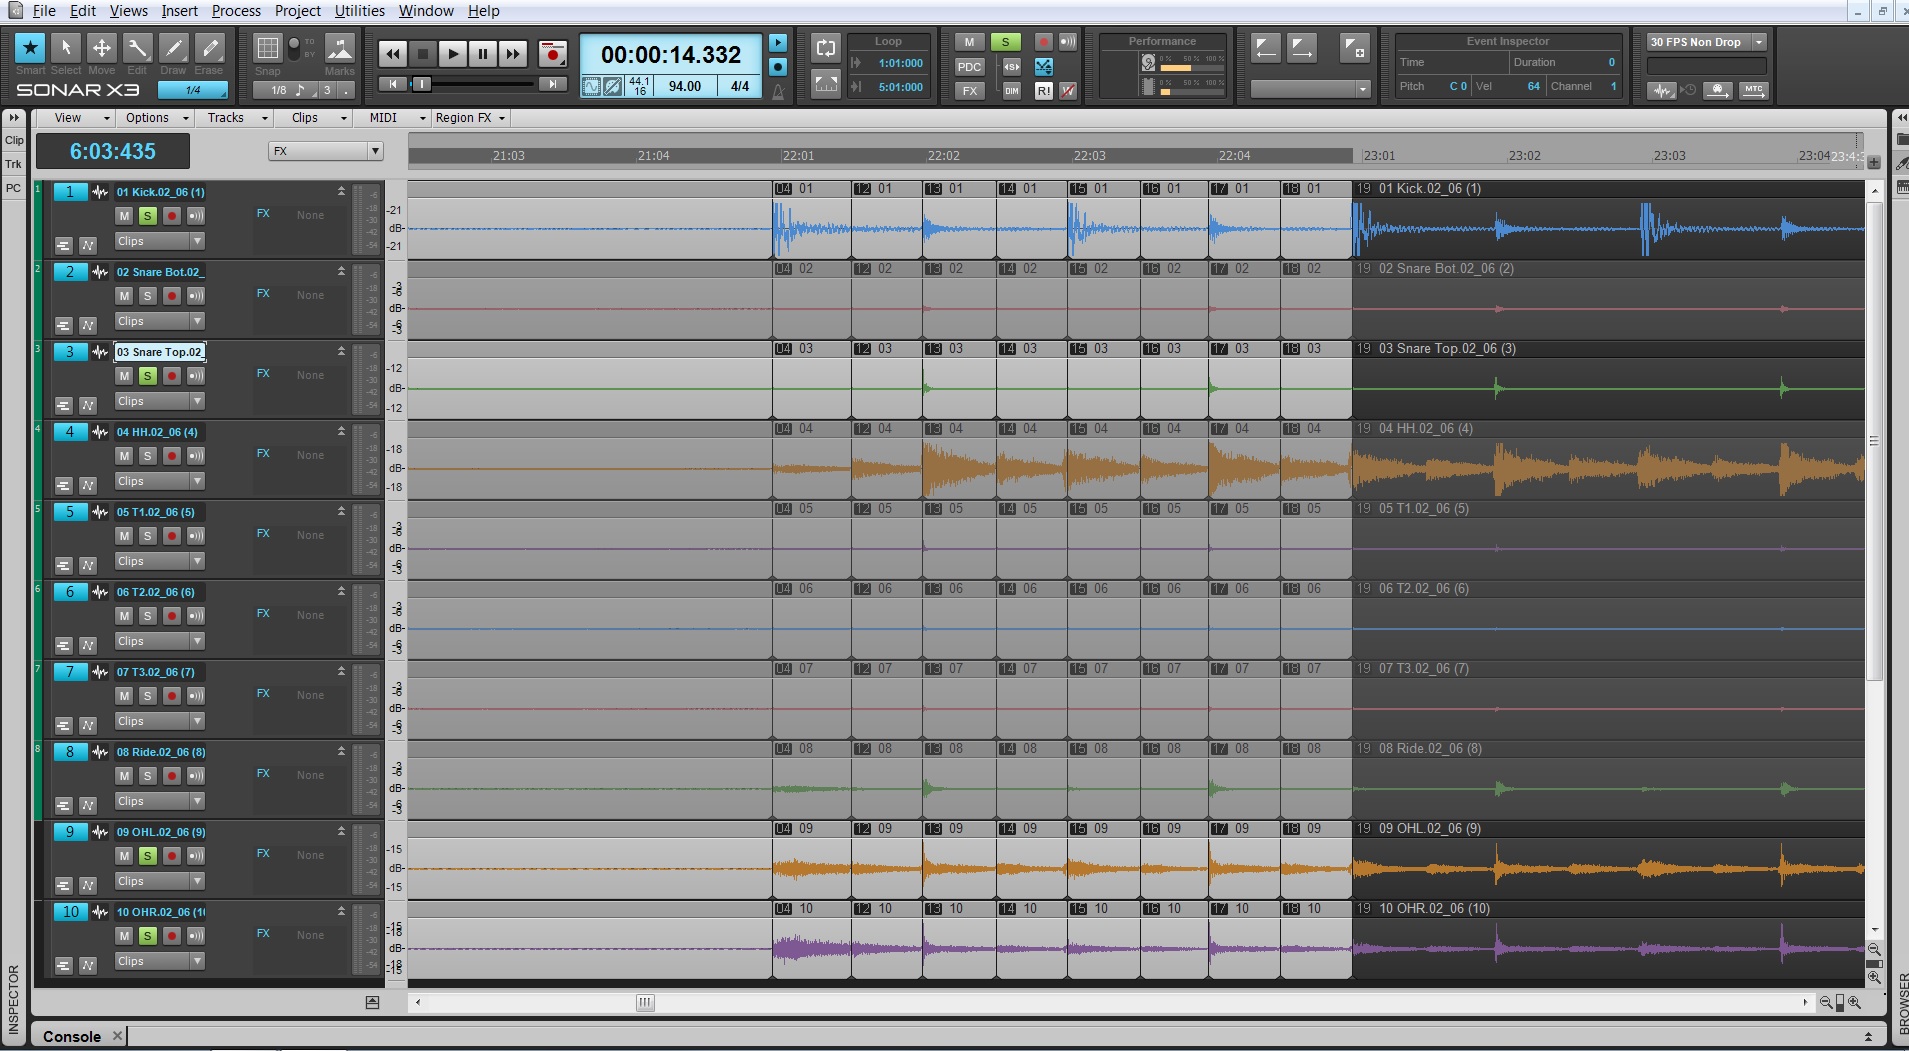
SONAR rocks when it comes to cropping multiple clips at once. Now that we’ve sliced up the first measure, select all the split clips from measure 22 to 23 including the blank waveforms leading up to measure 22. You can select multiple clips by clicking the header of each Clip Group and holding SHIFT.

While holding SHIFT, crop the right side of any of the selected clips.

This will crop all of these clips at once. The end Continue reading “Multi-Track Drum Editing – Cropping and Aligning Clips”

Mixing Heavy Metal with the ProChannel & Softube Mix Bundle

The Softube Mix Bundle is a strong and creative addition to SONAR’s ProChannel strip.  This bundle adds 5 solid effects, great for any mix, to the Softube Saturation Knob already in SONAR X3 Producer.

For this article I’ve mixed a Heavy Metal track from the group Dark Ride using mostly Softube ProChannel effects. You can download the project here and follow along if you have the Softube Mix Bundle. If not then the screenshots in this article should suffice.

Setting up the Mix

Listen & add Markers

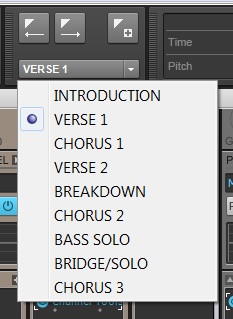
At first listen I put in Markers throughout the entire project to make navigation and looping sections much easier. Using the shortcut M – it’s pretty easy to drop in a Marker wherever your Now Time Marker resides. After that, you can name them accordingly. This paticular song was relatively short and included an introduction, two verses, 3 choruses, bridge, solo section, and breakdown.

Routing, grouping, and track folders

While you’re mixing it’s easy to become slightly overwhelmed by larger projects. What I do in this instance is make a stereo bus for every group of instruments that I have in the project. This allows me to apply mixing effects to the instrument groups as whole before they hit my main mix bus. The tracks route directly to the buses and then the buses route directly to the 2 bus. For each instrument group I also assigned them a color category and a track folder to make things a bit easier to manage within the Track View.

Levels & panning

Metal in general consists of abrasive-wide rhythm guitars, huge-punchy drums, Continue reading “Mixing Heavy Metal with the ProChannel & Softube Mix Bundle”

A SONAR/GIBSON CELEBRATION FOR SHAWN CLEMENT AT GIBSON BEVERLY HILLS

Have you ever been to a show and seen someone on stage that makes you never want to pick up your instrument again? Enter… Shawn Clement.  Hollywood Composer/Producer Shawn Clement graciously unleashed his new composition at the Beverly Hills Gibson Showroom tonight to a warm, yet star-studded group of industry folks from all walks of life.  Billed in half as a pre-AES party, many folks were in town to celebrate Shawn’s new work Raw Fungus, Cakewalk’s new path at Gibson, and hard working music-makers in general.

If you don’t know Shawn, his story is unique.  It stems from a long path of crazy influences, crazy talent, and crazy work ethic which has made him one of the most sought after composers in Hollywood. We would like to think he owes it all to SONAR, but we know that is not the case 😉 Continue reading “A SONAR/GIBSON CELEBRATION FOR SHAWN CLEMENT AT GIBSON BEVERLY HILLS”

Meet the Bakers: Mike L

I began playing Drums when I was 8 years old after my Dad set up his old kit from the 70’s. I played for a few years until I picked up my first guitar at a second hand music shop in New Hampshire. I played for hours everyday until the noise I was making started to sound like a melody. My friends and I started a punk band at the age of 13. We weren’t the best in my neighborhood, but definitely the loudest. At this point I knew I wanted to play music everyday for the rest of my life.

When I got to high school, I tried to find every music class I could. My first class freshman year was an electronic music class. In this class we used a version of Cakewalk Music Creator. I started becoming extremely interested in music production and wanted to learn everything I possibly could. I started to listen to my favorite albums and try to recreate the sounds I was hearing. To gain some experience, I started recording local bands in my basement by hanging mic cables over pipes for overheads. I remember listening to the album ‘Revolver’ over and over trying to copy what I was hearing.  Continue reading “Meet the Bakers: Mike L”

Meet the Bakers: Dave L

How did you get started with music?

The Beatles began my lifelong love and appreciation of music, at the age of 9. I consider myself extremely lucky to have grown up in an era with some of the most iconic bands in history. Being able to see The Beatles, Led Zeppelin, Rolling Stone, Jimi Hendrix, The Who, Ten Years After, Deep Purple .. live! …was simply amazing. Not too mention the ticket prices were only $7.50!

For the past 50+ years, music has been one of the most important aspects of my life. I played flute and clarinet, in the high school band as well as attending Berklee and the University of Lowell, where I taught electronic music labs in my freshman year. At Lowell, they had an ARP 2500, (2) 2600s and one of the first Synclavier commercially produced. Working in several local music stores as well as repairing all sorts of gear also added to my skills. I continue to utilize my technical skills whether its custom designing an on-board guitar preamp or here at Cakewalk.

Continue reading “Meet the Bakers: Dave L”

Meet the Bakers: Jon S

How did you get started with music?

My dad played guitar in a cover band when I was growing up, so right from the start I knew I wanted to pick it up for myself. I played a few other instruments when I was in middle/high school as well, but really got into playing guitar and bass when I was starting high school. I remember the day my freshman year when I had an art class that let us play music- somebody brought in a Jimi Hendrix CD and it absolutely blew my mind. From there I spent most of my high school years listening and playing along with classic rock staples- Beatles, Zeppelin, Cream, Lynyrd Skynyrd, Creedence Clearwater Revival.

I was taking a couple courses on radio, and through that found that I had a real fascination with doing production work/recording. It was then that I bought my first recording software, Cakewalk Guitar Tracks 2. Eventually I decided that music production Continue reading “Meet the Bakers: Jon S”

DAW Best Practices: How to use metering in SONAR

[Originally posted as a daily tip on the SONAR forums and reposted for viewers here on the blog.]

The Overachieving Meters

by Craig Anderton

To change resolution for any audio meter, in any view, right-click on it and choose a range of 12, 24, 42, 60, 78, or 90 dB. Each meter can have its own range. With the Console view, I set the output bus meters to 12 dB to help gauge the approximate amount of loudness maximization that may be required. For example, if the meters make it to 0 but otherwise spend very little time in those upper 12 dB, then the track will probably need to be made “hotter” when mastering. For the Track View track meters, choosing the maximum resolution (90 dB) helps reveal if there’s noise at the lower range of an incoming signal.

Vertical or Horizontal Metering
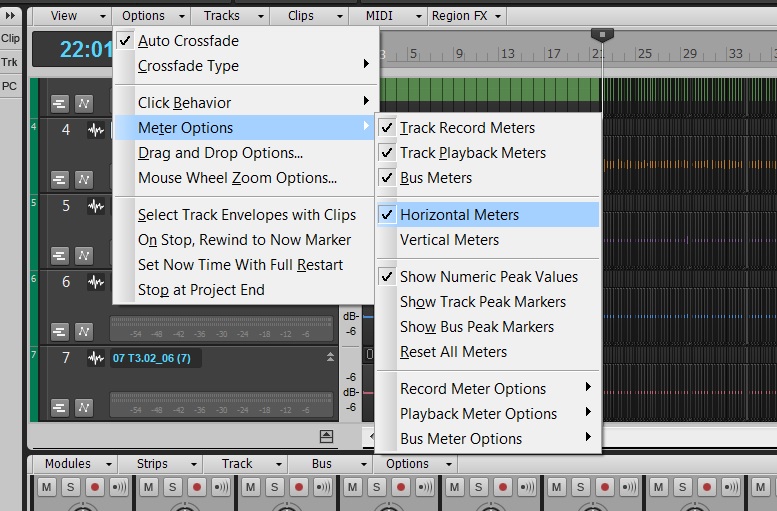
In Track View, the meters can be vertical or horizontal. Choose Options > Meter Options and select the desired option. When vertical, the meters behave more like activity/clipping indicators, because when you collapse the track to a short height, you basically see only activity and clipping. If you use the Console for mixing, this is a good choice because you can see more track parameters in the Tracks Pane, as the vertical meters don’t take up space along the bottom.

If you generally mix using the Track View rather than the Console, then you can extend the width of the Track Pane, enable horizontal metering, set them to a fairly wide playback range, and enjoy high-resolution metering. Also under Options > Meter Options, you can specify the Record, Playback, and Bus meter characteristics. Choose from Peak, RMS, or Peak+RMS (my favorite choice) response, whether playback meters are pre- or post-fader, and whether bus meters are pre-fader, post-fader, or pre-fader and post-FX.
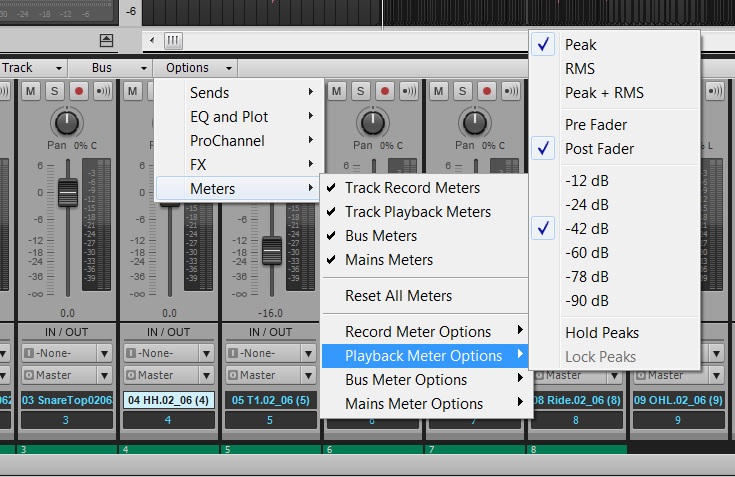

These settings are independent from equivalent meter settings for the Console view. You can also choose whether peaks are held or locked (I recommend checking both), as well as show Peak Markers. These indicate the highest point in the track and can be extremely useful when mastering.

This kind of flexibility allows the Track and Console views to be far more than just two ways to view the same type of material. For example, the Console meters are probably better set to post-fader, so you can see at a glance which tracks are contributing the most amount of level. But in Track view, a pre-fader setting lets you monitor track activity so you can check whether a Track has signal, regardless of the fader position. The metering options are just one more reason why I tend to mix in Console view, but track and edit in Track View.

Want to check our SONAR? Try our 30-day free trial.