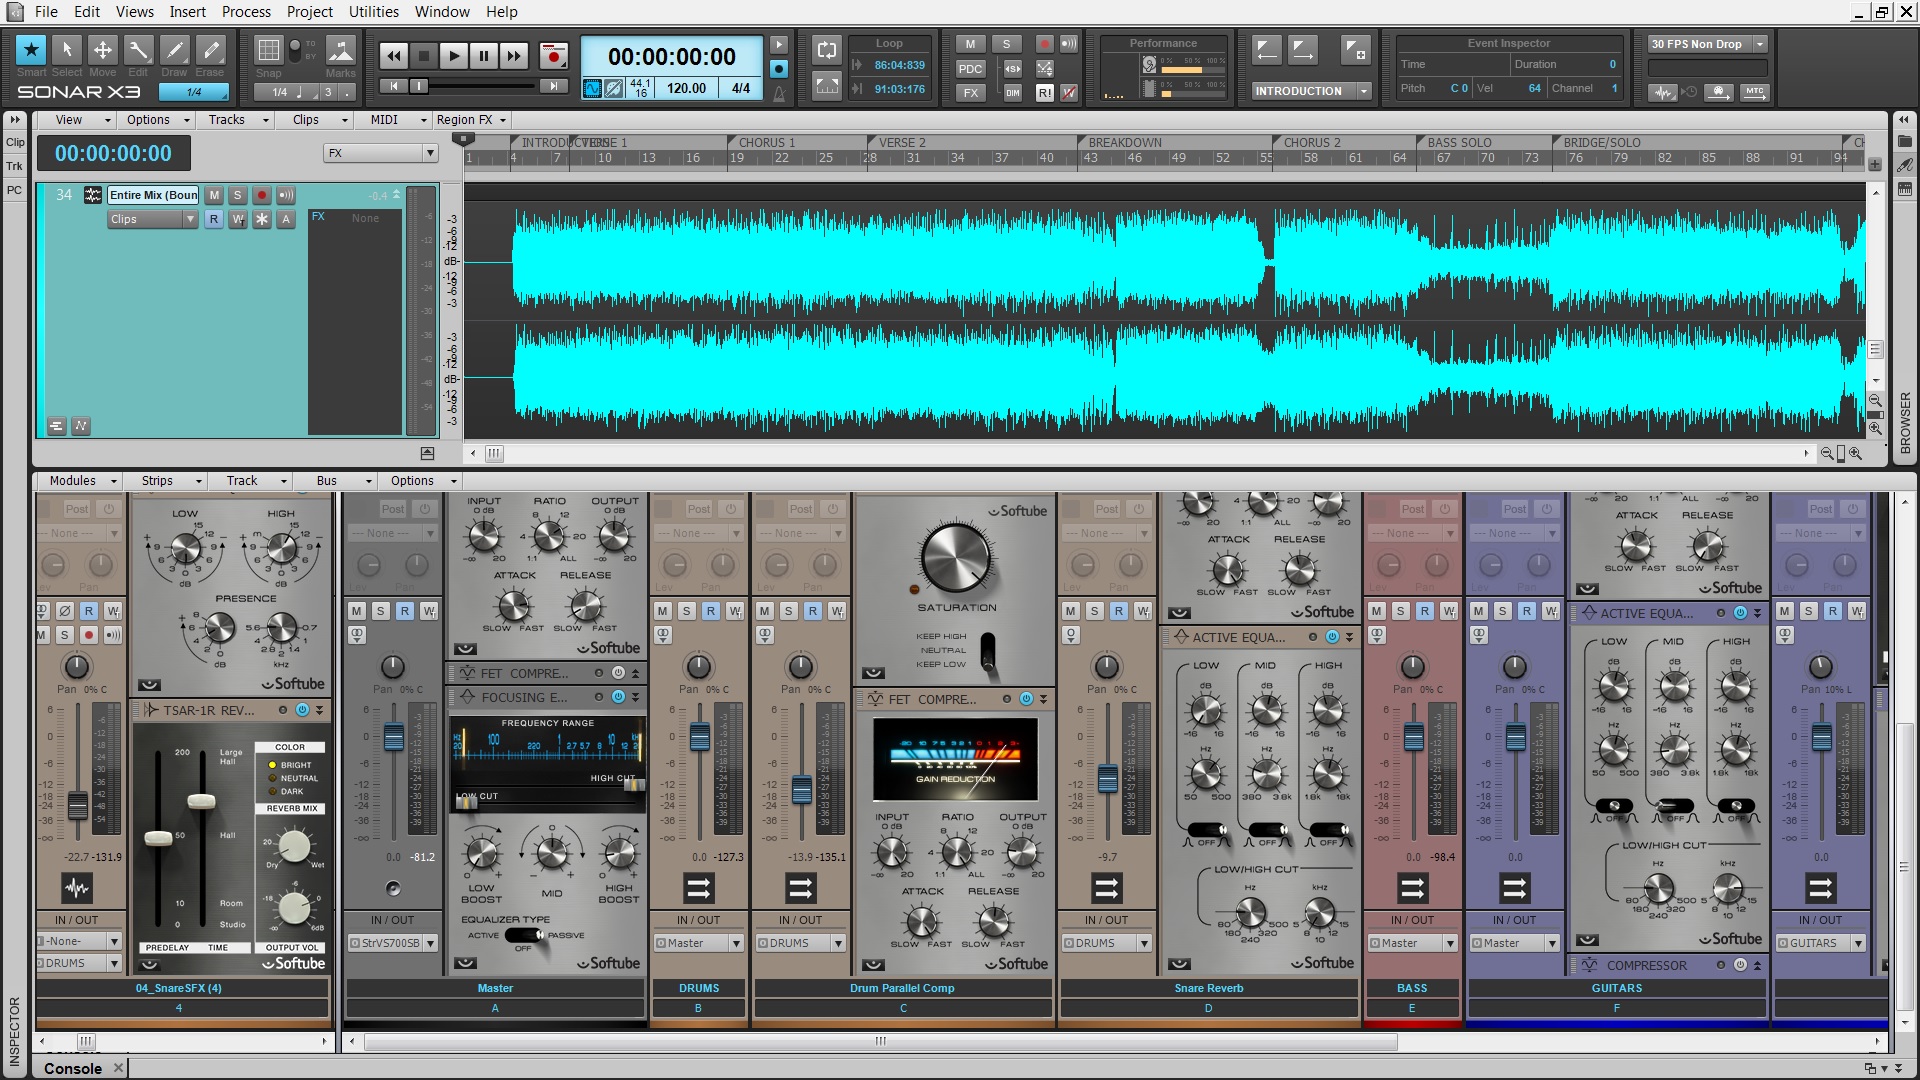
The Softube Mix Bundle is a strong and creative addition to SONAR’s ProChannel strip. This bundle adds 5 solid effects, great for any mix, to the Softube Saturation Knob already in SONAR X3 Producer.
For this article I’ve mixed a Heavy Metal track from the group Dark Ride using mostly Softube ProChannel effects. You can download the project here and follow along if you have the Softube Mix Bundle. If not then the screenshots in this article should suffice.
Setting up the Mix
Listen & add Markers
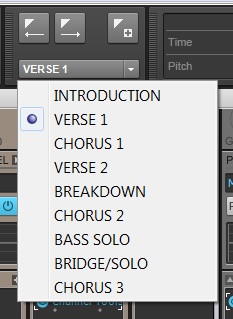
At first listen I put in Markers throughout the entire project to make navigation and looping sections much easier. Using the shortcut M – it’s pretty easy to drop in a Marker wherever your Now Time Marker resides. After that, you can name them accordingly. This paticular song was relatively short and included an introduction, two verses, 3 choruses, bridge, solo section, and breakdown.
Routing, grouping, and track folders
While you’re mixing it’s easy to become slightly overwhelmed by larger projects. What I do in this instance is make a stereo bus for every group of instruments that I have in the project. This allows me to apply mixing effects to the instrument groups as whole before they hit my main mix bus. The tracks route directly to the buses and then the buses route directly to the 2 bus. For each instrument group I also assigned them a color category and a track folder to make things a bit easier to manage within the Track View.

Levels & panning
Metal in general consists of abrasive-wide rhythm guitars, huge-punchy drums, thick bass tone, and searing vocals. That’s what we’ll be going for in this short mixing tutorial. Kick drum, Snare, Bass, and Vocals tends to stay mostly in the center of the stereo image. Guitars often are panned outward pretty far. Drum Overheads and Rooms are slightly less wider depending on how they sound. I panned these as far as they went to keep with the image that the room created but I kept the Channel Tools plugin inserted in case I wanted to make some last minute adjustments to these.
Mixing the kick drum
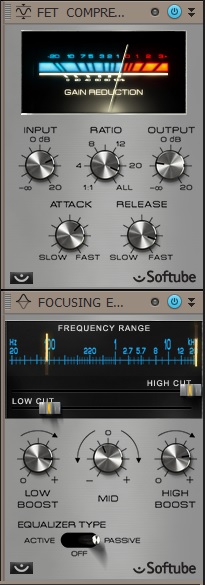
In soloing the kick on first listen without any effects on it I knew I had two options – replace the kick drum all together or find a way to shape the transient of the kick to be more dynamic. I chose to experiment with the FET Compressor to give the kick more attack and sustain. This effect takes after other classic FET compression modules in that it has a heavy duty ratio, fast attack, fast release times, make up gain, and input gain. Since these compressors can react within microseconds of a signal passing through them they make perfect companions to hard hitting drum-sets.
Compression – settings the ratio
I essentially crushed this kick drum with the compressor by setting the Ratio to 20:1 and by driving a lot of the signal into the compressor using the Input Gain. Afterwards, I compensated for the amount of gain I added by reducing the Output gain knob.
Attack and release
Here’s where the magic happens. Now that the signal is getting hit hard by the FET compression we can adjust how the gain reduction is getting applied to the signal. Setting the attack to 1 o’clock and the release to about 4 o’clock will apply an extreme amount of the compression to the signal in a very short amount of time. You’ll see the Gain Reduction meter move drastically each and every time the compressor is hit. Bypass and unbypass this module and you’ll hear how much less dynamic the signal has become.
Adding focus with Softube EQ
The Softube Focusing Equalizer is a prime EQ to reach for if you aren’t looking to dive heavily into a parametric EQ. The three different bands interact dynamically with the Low Cut and High Cut filters making broad or minute adjustments very simple. This creative plugin gave me the right amount of boosted Low, scooped Mid, and boosted High that I needed to get the Kick Drum to a place where it sounds good for Metal. I adjusted the Low Cut filter to just under 100Hz so that the low end didn’t become too mushy as well. In this genre the kick drum must be heard – just like the ride cymbal in swing music.
 Mixing the snare drum
The snare drum is the back beat and the back bone of most music. For this track I aimed to crush the snare top signal about as much as I did with the kick drum signal. This time I set the FET Compressor to ALL (All buttons IN mode) which is a massive amount of a gain reduction. Setting the attack to 1 o’clock and the release to 10 o’clock allows the initial crack of the snare to get through and then adds a bit of sustain. This – just like the kick – gives the snare some more dynamics and makes the signal a bit more fitting for the track. Compression is all about level control and adding dynamics.
Snare bottom
I chose to apply the same amount of gain reduction to the SnareDown (Snare Bottom) track but I eased up on the attack. The attack barely seems like it’s doing anything to the signal – but when you solo the SnareDown track and bypass the FET Compressor you’ll hear how the signal has less sizzle to it. This is because I’m completely smashing this signal dynamically and adding a bit more sustain to it. This brings out the snares that sit and rattle underneath the drum.
Applying the FET Compressor to toms
Metal toms are supposed to sound huge with tons of attack. The toms in this track need some more punch – much like the snare and kick drum tracks. The trick with these toms is to keep the the release of the FET Compressor from interacting with the natural sustain of the toms. Toms tend to resonate so if the release isn’t right it will cause the the signal to jump up and down in volume. This doesn’t work well for mixing.
As you can see toms 1 – 3 have a pretty drastic Ratio setting of 20:1. Tom 1’s attack setting is rather slow. This is the highest pitched tom out of the bunch and it’s attack comes through the mix rather well on it’s own. I kept the release pretty fast to attenuate the natural sustain of the drum slightly. Toms 2, 3, and 4 needed some love with their natural attack so that’s why these attacks are cranked up to a little past 3 o’clock. The release is equally as fast.
The last tom is a much deeper in tone. Sometimes lower frequencies get lost in the mix so I added a slightly faster attack to this drum.

Cymbals
Cymbals can react to compression in a strange way due to how resonant they are. If the release time on your compressor is not set correctly then you’ll actually hear an unwanted amount of compression on them. This isn’t ideal.

These cymbals are crushed pretty hard to bring out the detail in them and the ambient snare and kick drum. After that I set a relatively fast attack and dialed in a fitting release setting.
Carving rooms with the Softube EQ
The room microphones are all very different. Drum Room 1 is a very close room microphone that only includes the kick, snare, and toms. For this I whipped out the Softube Active Equalizer to shave off some of the bass frequencies with it’s Low Cut Filter. Low frequencies that are ambient make the mix muddy and not very tight.
Next I crushed this room microphone with the FET Compressor. I eased up on the release on this room because I didn’t want there to be too much of a pumping sound from the compressor. After that I used the Focusing EQ to emphasize some of the frequencies in the high mid range and completely cut just about everything leading up to the high mid range. This actually makes this drum room sound farther away than it actually is.
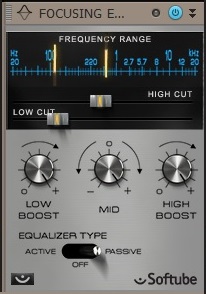
Drum Room 2 is basically a tom and snare reverb that sounds a bit too much like digital reverb. There is a crispy high end that I dislike. Using the Focusing EQ I carved out a nice small area between 500Hz and 110Hz to work with.
Lastly, Drum Room 3 is where I caused some damage. Using the FET Compressor, I smeared this signal’s attack and applied a lot (maybe too much) gain reduction with the ALL setting. The moderate release setting works for most of the song and then adds a bunch of pumping and distortion in the really busy parts. After that I filterd out everything above 5k and below 90Hz to keep the sound of this under some sort of control.
Bass
For the Bass I wanted to give it some aggression that the original signal just didn’t have as well as make it nice and thick to sit directly under the rhythm guitars. The Bass player did a really good job performing on this rack. It’s probably because he used a pick to play it instead of his fingers. This automatically makes the sound more even. I added some crunch to the signal with TH2. This gives it a nice bite.
Serial compression and parallel processing
After that I used the FET Compressor twice. Both are pretty aggressive except that one has a slower attack time and the other is much faster. Between the two of them this adds just a bit of attack that I need to push this bass signal up under the rhythm guitars. Once this was done, I wanted to experiment with some parallel processing. To do this I duplicated the Bass signal (by cloning the track) and applied the Softube Active Equalizer. This killer parametric EQ’s clean filters are great for really in depth EQ tasks. After spending some time with the cloned Bass I decided to shave off everything above 5k, boost some mid range, and boost a lot of the low end. I also crushed this signal with the Nomad Factory Brickwall Limiter. This – in a way – makes the low end super thick and compressed which is what you want sitting under the heavy distortion guitars.
Guitar
What’s great about distortion guitars is that they are already super compressed from the overdrive in the amp signal. So compression isn’t really needed directly on them.
 The Softube Passive EQ is great for very small adjustments to your frequency spectrum. For the guitars I increased the Presence substantially and then boosted a bit around 5k to add some crispyness. Then on the guitar bus I recruited the Active EQ to do some additional tone shaping. For a while the guitars were in the way of the vocals due to his lower register. So, by chopping out some of the low mid range I was able to make room in the mix. The next step was to widen the rhythm guitars even more so that they had a larger than life feel to them. Inserting the Stereo Imager helped achieve that.
Screaming Leads
 The TSAR-1R Reverb holds it’s ground next to Breverb. Just putting the effect on the leads created the right amount of distance from the rest of guitars – especially in the section where these leads start to take over the mix. The TSAR-1R is a modern digital reverb that allows you to mimic Halls and Room algorithms, adjust pre-delay, color, and wet/dry amounts. This is quite the powerful device packed all into one small ProChannel module. Compressing the signal with the FET Compressor was also key in keeping this reverb from jumping out at the listener when overloaded.
Vocals
What’s great about receiving stems is getting stems that are decently processed. For this vocalist the engineer passed off the stems with some really great compression added to the track. With some very minor automation I was able to get these to a level that sounded killer.
 For the vocals, I dropped in the Focusing EQ to scoop out the gross mid range in the singers voice and bring out the lush low and high end. He’s singing with some serious power too so there is some raspiness in the higher frequencies that gets into the mid range. Once that was gone it was like a brand new performance. Again, adding some nice reverb, EQ, and compression helped develop a solid Room sound for his voice to sit back in during the mix.
After that, I added some of the classic Softube Saturation – making some of those really aggressive notes a bit more crispy.
At long last, Bus Compression
Bus compression is one of those things that can go wrong real fast. For this entire post I’ve been talking about how to shape a transient with a compressor – but now we’re talking about a slightly different beast. Yes, you want to shape the entire mix as a whole – but the catch is that you’re compressing EVERYTHING.
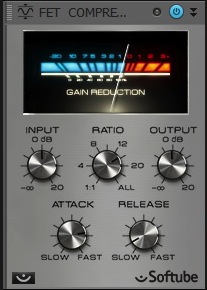 If you’re not too careful you could key your compressor a bit too much and cause some strange sounds to come out of your mix. For this mix my goal was to apply a small amount of glue to the main bus. By glue, I mean just a little bit of something that locks everything together. My bus compression is much lighter – around 14:1 Ratio with a bit of a faster attack and a really slow release. This avoids that unwanted pumping that occurs when a bus compressor is key’d incorrectly. This kind of issue is especially noticeable between sections that are quieter and louder.
Once I got the bus compression dialed in correctly I applied just the slightest bit of high-end to the overall mix using the Focusing EQ and voila, we have a mix.
Without a doubt, the Softube ProChannel Mix Bundle makes a huge difference in your mixing. You have everything you need in a simple pack of 5 plugins and not only that – they are in your ProChannel! This takes mixing to a whole new level in SONAR.
This session was brought to you by The ‘Mixing Secrets’ Free Multitrack Download Library. You can download more stems here.


