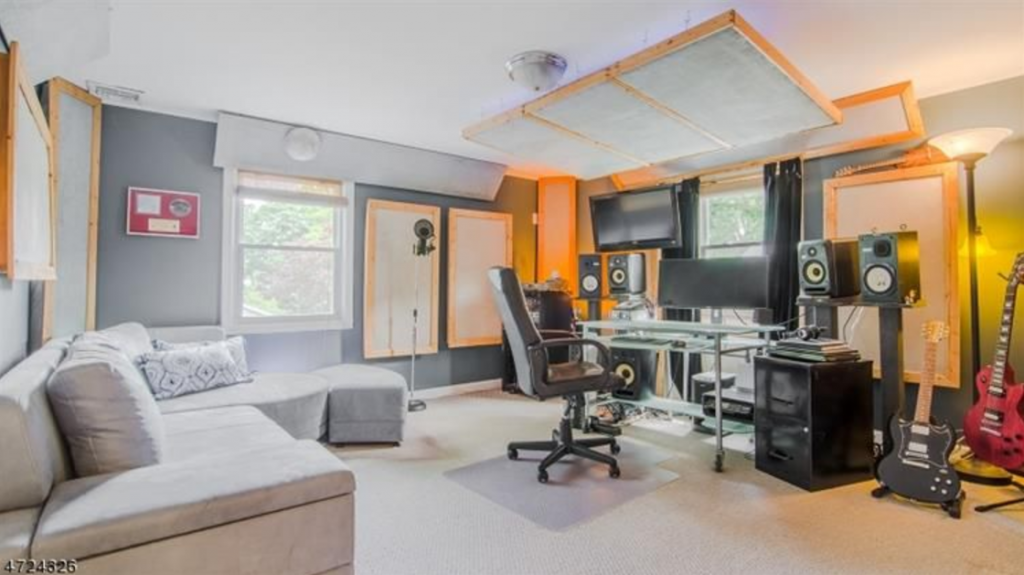
Time flies when you’re having fun the old cliché saying goes. For me, five years ago, I was in the trenches for a good week going down a rabbit hole not knowing exactly where I would end up. I’m talking about sound panels – building sound panels that is; and if you’re anything like me, you’ve been in a few studios and loved the look and feel of those expensive looking ones on the walls.
When I moved into our new house, my goal was to create a project studio where I could plain and simply put, have fun. My jobs before Cakewalk at Elektra Records and Capitol Records allotted me enough pressure-cooker studio situations to last a lifetime, so this studio was about doing things I wanted to do, when I wanted to do them, and maybe also making some college money on the side for my boy Mack (now 8). Continue reading “Building Your Own Professional Sound Panels – 5 Years Later”
Every producer and mixer knows the struggle; the infamous car test. You know the drill. You print a near-perfect mix in your home studio and then bounce it with the label, “FINAL MIX_wav” and send it to your phone. You can feel the excitement, energy and anticipation of releasing your masterpiece into the world…and then you step into your car.
The nervous sweat drips down your back and your ears are clogged from hours of non-stop mixing. You press play and immediately regret not going to law school. OK…maybe it’s not that bad but straight from the bat you know your mix isn’t translating well in your car stereo or even the cheap earbuds that came with your phone. You are not alone.
Producer/Songwriter/Mixer Murray Daigle out of Toronto concludes a successful short run of Mixing clinics this evening at Long & McQuade stores in Canada. Murray Daigle is a Toronto based Music Producer, Songwriter and Mixer with a long illustrious career in the Canadian and international music industry. His songs and productions have earned him Certified Gold and multiple Socan #1 Awards. He has extensive experience in developing and launching many successful music careers, including his consulting work with the Vic Park Group, developing Canada’s pop sensation Neverest.
His most recent success includes Producing, Mixing and Co-writing “Together We Are One”, The official theme song of the 2015 Pan Am Games (Performed by Serena Ryder). His list of hit records spans two decades, beginning with hit making bands like Not By Choice and US Billboard charting acts like Cauterize, selling numbers well into six figures. Murray has worked for all the major labels and numerous indie labels around the world, producing, engineering, mixing and mastering hundreds of tracks, all from his home base MDS Recording.
"The new SONAR is like a music partner for me. I rely on it daily for so many different things relating to what I do to deliver radio-ready tracks. There are so many different ways to approach music with SONAR, and the inspiration it generates is creative and effortless."
Sure, the LP EQ is a great linear-phase, stereo EQ. But it was designed for mid-side processing as well as conventional stereo, so let’s explore what mid-side processing is about, and why it’s so important.
LP EQ BASICS
You can add up to 20 nodes, and each can have one of the following responses:
Low shelf
High shelf
High pass
Low pass
Peak boost/cut
The LP EQ allows up to 20 nodes, which can choose from five responses.
However, there’s some intelligence when adding nodes; for example if you double-click to enter a node close to the highest possible frequency, the LP EQ will insert a lowpass filter. At a somewhat lower frequency, there’s a shelving response (although you can of course change these default responses to whatever you like). Drag nodes horizontally to change the frequency or up/down to vary amplitude; a right-click + drag on a node alters the width, as does using the mouse scroll wheel on a selected node.
You can ctrl+click, or draw a marquee around, multiple nodes to select them, but there’s an interesting twist. Suppose a node is set to boost, and another to cut. If you select both, then click on the one that boosts and drag it downward, the amount of boost will decrease. However the one that’s cut will start boosting. This complementary motion allows increasing or decreasing the overall emphasis easily; for example, if you think you went too far with the amount of EQ and want to pull it back, this reduces all aspects equally.
If all the selected nodes either boost or cut, then their amplitudes vary together.
These basics give a flavor of the features, but there’s much more—so click on the UI to give the LP EQ the focus, then press F1 to call up the comprehensive documentation.
MID-SIDE EQ PROCESSING
Mid-side processing encodes a stereo track into two separate components: the center becomes the “mid” component in the left channel, while the stereo track’s right and left elements become the “side” component in the right channel. You can then process these components individually, with automatic decoding back into stereo.
To get started with mid-side processing, click on the LP 64’s Expert button and under Mode, choose Mid/Side. For best results, set the precision to High. This results in the most latency but the highest accuracy, which is important because with mid-side processing, you don’t want any phase shift or sample misalignment—that will interfere with the decoded stereo imaging.
The LP EQ’s Expert Mode is the key to doing mid-side processing with EQ. Also note the Mix control for parallel processing.
Processing can be independent for the mid and side components (as it is for the left and right channels in conventional stereo applications). You assign a node to the appropriate component by clicking on the node, and then clicking on M or S (toward the LP EQ’s upper right corner). Here are a few possible applications.
With mastering, you can get “inside the file” to do pseudo-remixing on a stereo track. One typical application is giving a slight boost to the higher-frequency side components to provide a bit more “air” and a wider stereo image.
If you’ve been seduced by vinyl’s comeback, remember that it’s crucial to center the bass and minimize bass excursions in the sides. With mid-side EQ processing, you can reduce the bass in the sides, and if needed, increase bass a bit in the center. Even if you’re not mastering for vinyl, taking this technique further can give a super-anchored, “center-channel” bass sound.
Drums with lots of room ambience can benefit from a bit of upper mids in the sides for extra definition, and a little bit of lower mids in the center to accent the kick.
If a synth bass has a wide image that “steps on” other instruments, you can bring down the bass in the sides.
For taming reverb, set a node to Mid, select the high pass curve, and slide it all the way to the right to take out essentially everything. Then you can shape the remaining reverb with the side EQ, while chasing the away from the center, where it can muddy the bass and kick.
THE VALUE OF THE MIX CONTROL
But…how do you know whether you’re really making an improvement to the sound or not? The LP EQ includes a Mix control (accessed in the Expert section) so you can vary the mix from full EQ to no EQ. Yes, parallel processing for EQ…very handy, and even better, the Mix control can be automated (like virtually all other parameters, including display characteristics and bypass).
You can also switch quickly between two different EQ settings with the A/B comparison function.
Granted, there’s no shortage of EQ plug-ins, but the LP EQ truly brings something new to the party. If you’re not familiar what mid-side processing can do with EQ, there’s no better way to find out than with the LP EQ.
Gates are wonderful processors that can clean up background noise and bleed in your audio tracks. They’re a bit tricky to understand because the key to successfully using one is often a specific feature that’s hidden or buried in the interface. The feature I’m referring to is called the sidechain. It’s a powerful element of my mixing workflow and I’d like to show you why.
In its simplest form, a gate allows a signal to pass through it only when its decibel level is above a set threshold. This means the gate is ‘open’. If the signal falls below the threshold then no signal is allowed to pass. This means the gate is ‘closed’. The sidechain becomes an integral part of this entire process because it’s what the gate uses to detect whether or not the signal is above or below the set threshold.
Top Left to Bottom Right: Kick In Gate, Kick Out Gate, Snare Top Gate, Snare Bottom Gate
Here at Cakewalk we are fortunate to have an external team of rocket scientists who help test out SONAR beta releases. This team is dedicated, passionate and most of all appreciated by all of us internally here at the Cake shop. Recently I received a general email from one of my esteemed colleagues mentioning that one of our trustworthy beta soldiers was jumping off the beta-battlefield in lieu of another SONAR related activity. Huh? This peaked my curiosity and I felt obliged to dig a bit deeper on the subject. What could “another SONAR related activity” involve? SONAR Olympics? SONAR CPU Racing? SONAR Academy?
Featured Music Placements on Discovery Channel, History Channel, CBS, Bravo Network
Just a few short years ago, we learned of a new up-and-coming artist who was using SONAR. After introducing ourselves and learning more, the one thing that kept resonating were the infectious melodies and counterparts embedded into his tracks. We were delighted to witness him working in SONAR, but at the same time very intrigued that he was using SONAR 8.5.
Soon after being in touch with iLan, we were able to catch up with him face to face in his studio just north of London for a night where we introduced SONAR X3 to him. It was a fun night and very interesting to watch a pro’s reactions going from 8.5 to X3 considering that undoubtedly the platforms are truly different. There were some moments of, “Whooaaah… that will save me a ton of time,” and there were moments of, “Ummm…that will take a while to get used to.” Leaving iLan to his own devices we were really unsure where he would take it.
Toggling back and forth from 8.5 to X3 for a while, iLan finally found his stride with SONAR Platinum. He told us, “After working on both 8.5 and X3, once I was on Platinum there was no going back. The basic features alone like the smart tool and Mix Recall not only save me a lot of time, but allow me to create things I could not create in 8.5. With the amount of tracks I create and pace of my workflow, the fact that Platinum is rock solid and really fast means everything to me. 8.5 always allowed me to ‘not’ sound like everyone else in my genre, and Platinum just continues that path for me.” iLan’s first full production in SONAR Platinum titled “Bigger Than Love,” a collaboration with singer/songwriter/artist Giuseppe de Luca was recently released on Anjunabeats and quickly found its way up the charts to the #1 spot on Beatport.
Check out the latest episode of Cakewalk Talk, where Dan Gonzalez interviews audio engineer Daniel Rowland (Adrian Belew, StudioBelew, Accept) about LANDR and his role at the company.
“Is it World Music?” “Is it Spanish Music?” “Is this Jazz?” “Is this in the Acoustic Genre?” Fortunately for guitar virtuoso and now-Pro D.I.Y’er Eric Hansen, the simple answer to these questions he faces regularly about his music is, “YES.” Eric is another longtime SONAR user who depends on SONAR daily for his livelihood. He is based out of Southern Florida which might just be where his Spanish and Latin influences come from, where at a young age he had a unique fondness for Flamenco infused Pop music.
Eric began studying the guitar at age 14 and was performing professionally with local rock groups by the age 16. He then attended Florida Atlantic University where he studied Classical and Jazz guitar and was the first actual guitarist to complete the Honors Performance Program at F.A.U. He went on to graduate with academic honors while simultaneously studying Flamenco and Latin American music with musicians from Spain and Peru.
In his professional career, Eric is no stranger to the Billboard Charts with 6 records under his belt all crafted in different versions of SONAR spanning over 15 years. Eric is in the final stages of another record, but this one is being tracked, mixed and recorded all in SONAR Platinum. After Eric getting Cakewalk an exclusive preview to 3 of the new songs on the record, we were interested in finding out more about how all these great tracks are coming together in Platinum [DEMO PREVIEW]:
SONAR and other DAWs are used heavily to produce high-quality recordings, while other people use SONAR as part of a compositional process. I find that most of my SONAR usage is a little different, processing live recordings tracked in a concert or club setting. This usage presents various problems that aren’t as apparent in a controlled studio setting. This blog will present a workflow and various SONAR features I have found valuable when processing live recordings.
Objectives
In most cases, my primary objective is to produce a recording that the musicians can study in order to improve their performance.
In some cases, the performance and production quality will be high enough to serve as demo material to promote the group.
I try to deliver a mixed and mastered copy to the musicians within 48 hours, while the event is still fresh in mind, so speed and efficiency are very important.
Often a musician will ask for a further edit on one of the songs, for example, to include in their personal résumé. Flexibility and ability to recall settings are important.
Changing Expectations
Years ago, I did such projects using Audacity, which seemed adequate at the time. However, expectations have changed radically.
Today many musicians have a low-cost stereo field recorder such as the TASCAM DR-40.These recorders are the equivalent of point-and-shoot cameras. For around $100, they can produce remarkably good quality under ideal circumstances.
This has become the baseline against which many musicians judge other live recordings. Even though I want to produce quick results, if I can’t do substantially better than a TASCAM DR-40, for example, then I am wasting my time (I should note I love those small field recorders and often use them too, but that is not the subject of this blog).
Fortunately, with SONAR I have found a work flow and a set of “go-to” features that allow me to do much better than a stereo field recorder almost every time, using only the microphones that are already placed for the live PA system.

 Time flies when you’re having fun the old cliché saying goes. For me, five years ago, I was in the trenches for a good week going down a rabbit hole not knowing exactly where I would end up. I’m talking about sound panels – building sound panels that is; and if you’re anything like me, you’ve been in a few studios and loved the look and feel of those expensive looking ones on the walls.
 When I moved into our new house, my goal was to create a project studio where I could plain and simply put, have fun. My jobs before Cakewalk at Elektra Records and Capitol Records allotted me enough pressure-cooker studio situations to last a lifetime, so this studio was about doing things I wanted to do, when I wanted to do them, and maybe also making some college money on the side for my boy Mack (now 8). Continue reading “Building Your Own Professional Sound Panels – 5 Years Later”


