TH2 Producer: Not Only Guitars

TH2 Producer amp sim can do more than you might think

By Craig Anderton

Overloud’s TH2 Producer offers amp modeling with multiple amps and cabinets, as well as several effects. So while it’s a perfect subject for guitar month, and hopefully the following will give some inspiration to guitarists, let’s also consider what non-guitarists can do with a processor designed for guitar.

The power of parallel. Parallel processing is one of my favorite techniques. Fortunately TH2 not only accommodates parallel processing (the signal path follows a serial—> parallel—> serial  protocol), it also provides different “flavors” of parallel processing.

The parallel section starts with a crossover, so the parallel split can:

  • Provide “bi-amplification,” and send highs to one path and lows to the other
  • Enable a Bandpass filter mode, where one path has a bandpass-style boost, while the other has a complementary notch. A separate “spread” control determines the notch bandwidth
  • If neither is enabled, both paths are simply a parallel connection with no filtering

For extra flexibility, a “swap” button reverses the outputs (e.g., if one output was highs and the other lows, swap reverses that).

The output mixer sums the parallel paths back together again, with Phase Inverse, Delay, Width, Pan, and Level controls, as well as a Balance slider. The TH2 Producer manual can fill you in on the details.

Bass wah. Let’s start off by not straying too far from guitar, and looking at how to use TH2 Producer with bass. A problem with putting any kind of filtering or distortion on bass it that it thins out the sound. You can solve this problem by using the crossover to separate the low end and keep it clean, while adding wah to the midrange frequencies (Fig. 1).

Fig. 1: Parallel processing can keep the low end clean, but process the highs (click to see the entire image).

Again, we’ll use the Normal Splitter mode, with 490Hz as the split frequency. The Crying wah pedal handles the higher frequencies. The rest of the controls are straightforward Continue reading “TH2 Producer: Not Only Guitars”

A Holiday Miracle: 24 Hours To Write, Record, Produce, Mix A Commercial Track in SONAR X3

“Audio Production Jobs” come in all shapes and sizes these days;-)  Yes, the music industry in general has shrunken to an all-time low in terms of major label budget projects, but the flip side is that there are many nooks and crannies out there to stay creative while making money.  I think the key these days is getting into as many industry circles as possible, and then over-delivering.  If you’re handed a job for writing, mixing, producing or even recording, and you knock it out of the park the first time with low-no hassles to the client, you will certainly come to mind on the next round.  I would also be willing to bet that your name will be referred to other folks outside of that job’s “circle.”  You just never know to where things are going to lead.

Stemming from this theory, I have been fortunate enough to work on some pretty diverse projects ranging from title tracks for Pokémon DVD’s to Major Label artists and just about everything in between in one form or another.  For the work I do now, the one thing that gives me an edge using SONAR X3 Producer over other DAWs is the quickness of the workflow; which contributes to music creation diversity.  Sounds deep right? …well it kind of is.  Here’s a real-world example with italicized words in red representing why SONAR X3 features are crucial to me when facing tough audio jobs.

Just a few weeks ago I was contacted by NYC singer-songwriter Jodi Good’s music attorney Steven Beer on a Friday night to discuss an opportunity for a “Holiday Song” to be placed with a major publication [for Monday].  Now usually, “Holiday Songs” are recorded around August or September and we were already at the end of November, so I knew this was going to be a tough one to accomplish especially since the song had to be written, recorded and mixed fast.  The other strike against me was that this one was a bit out of my rock, and pop-rock comfort zones, but I knew the challenge would be a good experience on many different levels, so I decided to fire up the eggnog and go for it.  Plus I had the comfort of knowing that Jodi is a great songwriter especially in the lyric department, so it was “weekend on.”
Literally that night Jodi was sending me vocal-only words and melodies as text messages on my Samsung S4.  She doesn’t play an instrument and we didn’t have the benefit of time, so we had to start writing via virtual and digital means.  I instantly forwarded them via email to my HP Z400 main rig where I drag-and-dropped them into a session for reference where they automatically created audio tracks.  The next move was simply pulling them down to a midi track where Melodyne’s ARA technology kicked in instantly giving me the notes in Midi.  This helped me to figure out the best chord structures for the verses and pre-chorus and also allowed me to see where I could go writing the chorus melody.  After about a half hour on my trusty acoustic, I had the bones to send back to Jodi via text.

[I’m going out on a limb here for your laughing pleasure 😉 Here’s the actual writing file on my phone which is what I texted back to Jodi when we were writing the melody – so you can hear how the song started, and where it ended.] Continue reading “A Holiday Miracle: 24 Hours To Write, Record, Produce, Mix A Commercial Track in SONAR X3”

Knowing Your Effects in Addictive Drums Part 2 (SONAR X3 Producer)

Quick Review

In the first part of this article we went through some of the primary effects every user should be aware of inside of Addictive Drums. To review, these effects were the Sampler, Pitch, Volume, and Snare sections of the EDIT section. Read Knowing Your Effects in Addictive Drums Part 1.

As I’ve stated in Part 1, Addictive Drums is a power-house when it comes to the amount of mixing options that are available within it’s mixing engine. Don’t let the small interface deceive you.

What is Compression?

Compression is a tool that has two main uses – controlling levels, and dynamically shaping the volume of a signal over time. Within Addictive Drums there is a compression section that outlines four basic parameters for compression: Threshold, Attack, Release, and Ratio.

Threshold

This parameter is the first part of the compressor that the signal hits Continue reading “Knowing Your Effects in Addictive Drums Part 2 (SONAR X3 Producer)”

SONAR X3 Quicktip: Focus the Low end of your Kick and Snare with a Program EQ

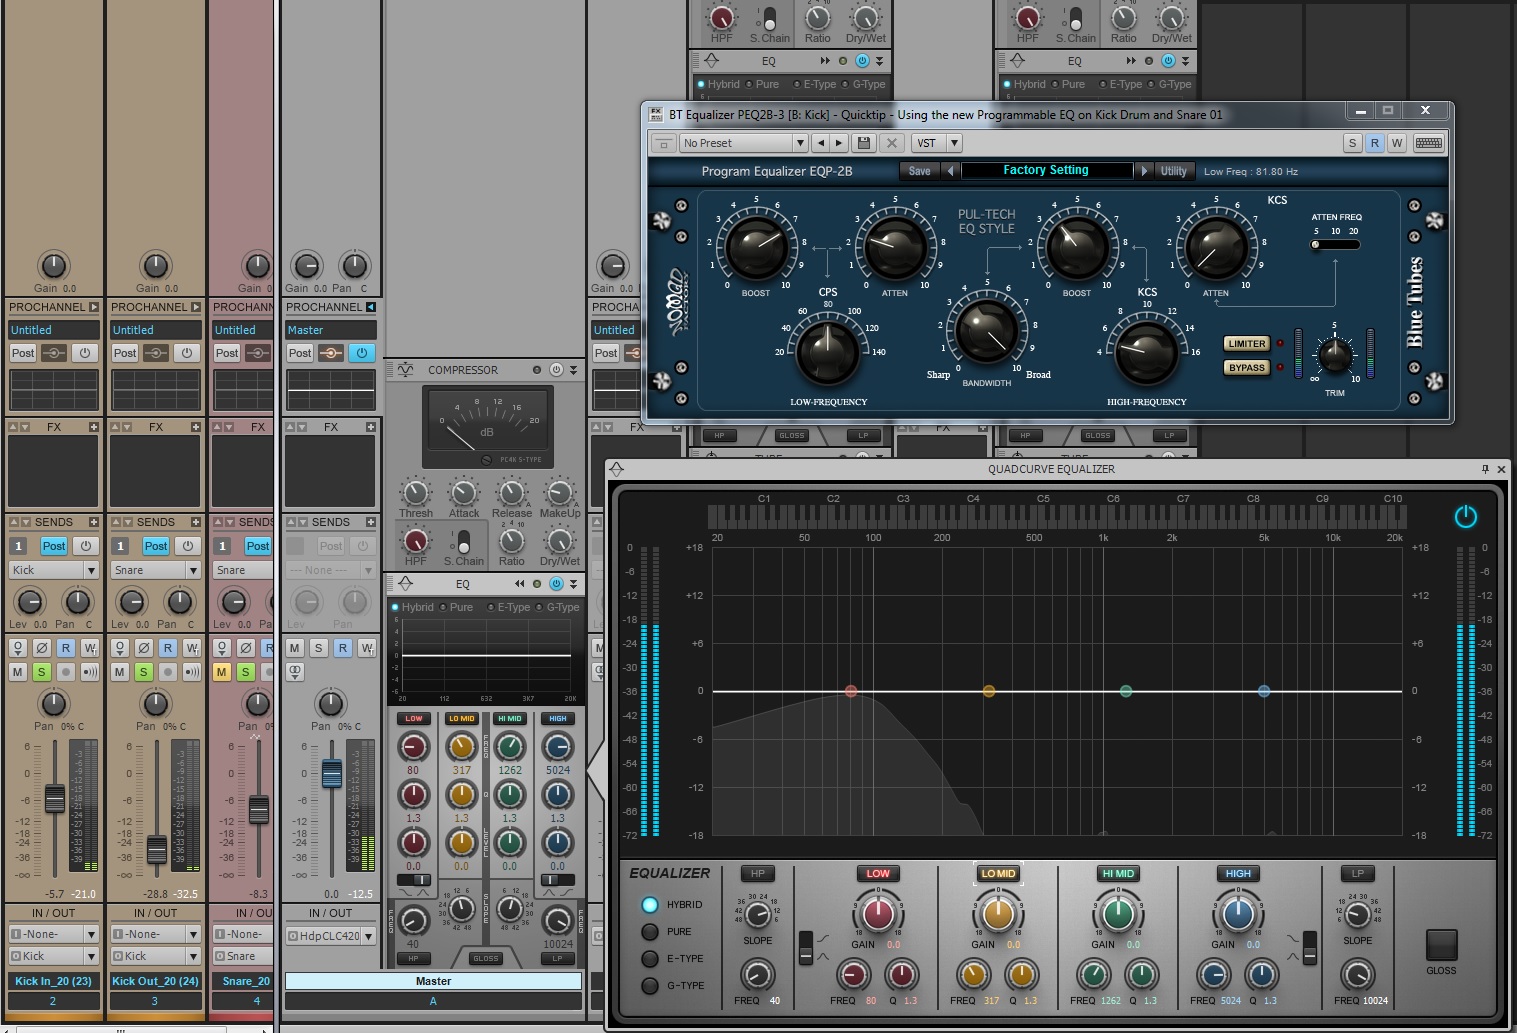
Program Equalizers have been around since the 1950’s and in SONAR X3 Studio and Producer users will receive two of these incredibly emulated modules.

Let’s take a look at what the new Program Equalizer EQP-2B can do for our kick drum. You’ll notice that we have the ability to both boost and cut the same frequencies on this EQ. Choose a low frequency from the variable adjustment and then begin increasing the Boost parameter.  Increase it all the way and your kick drum signal will become quite overpowering. Adjust the Attenuate knob and the signal will begin to smooth out and focus your signal a bit better.

For this country kick drum I picked 80Hz for the low end and boosted the signal to it’s ceiling.  Next, I adjusted the Attenuate knob to it’s lowest setting. This effectively sharpens out the boosted signals and gives the signal a unique focus in the lower spectrum. After that, I adjusted for clarity and the end result is very useable.

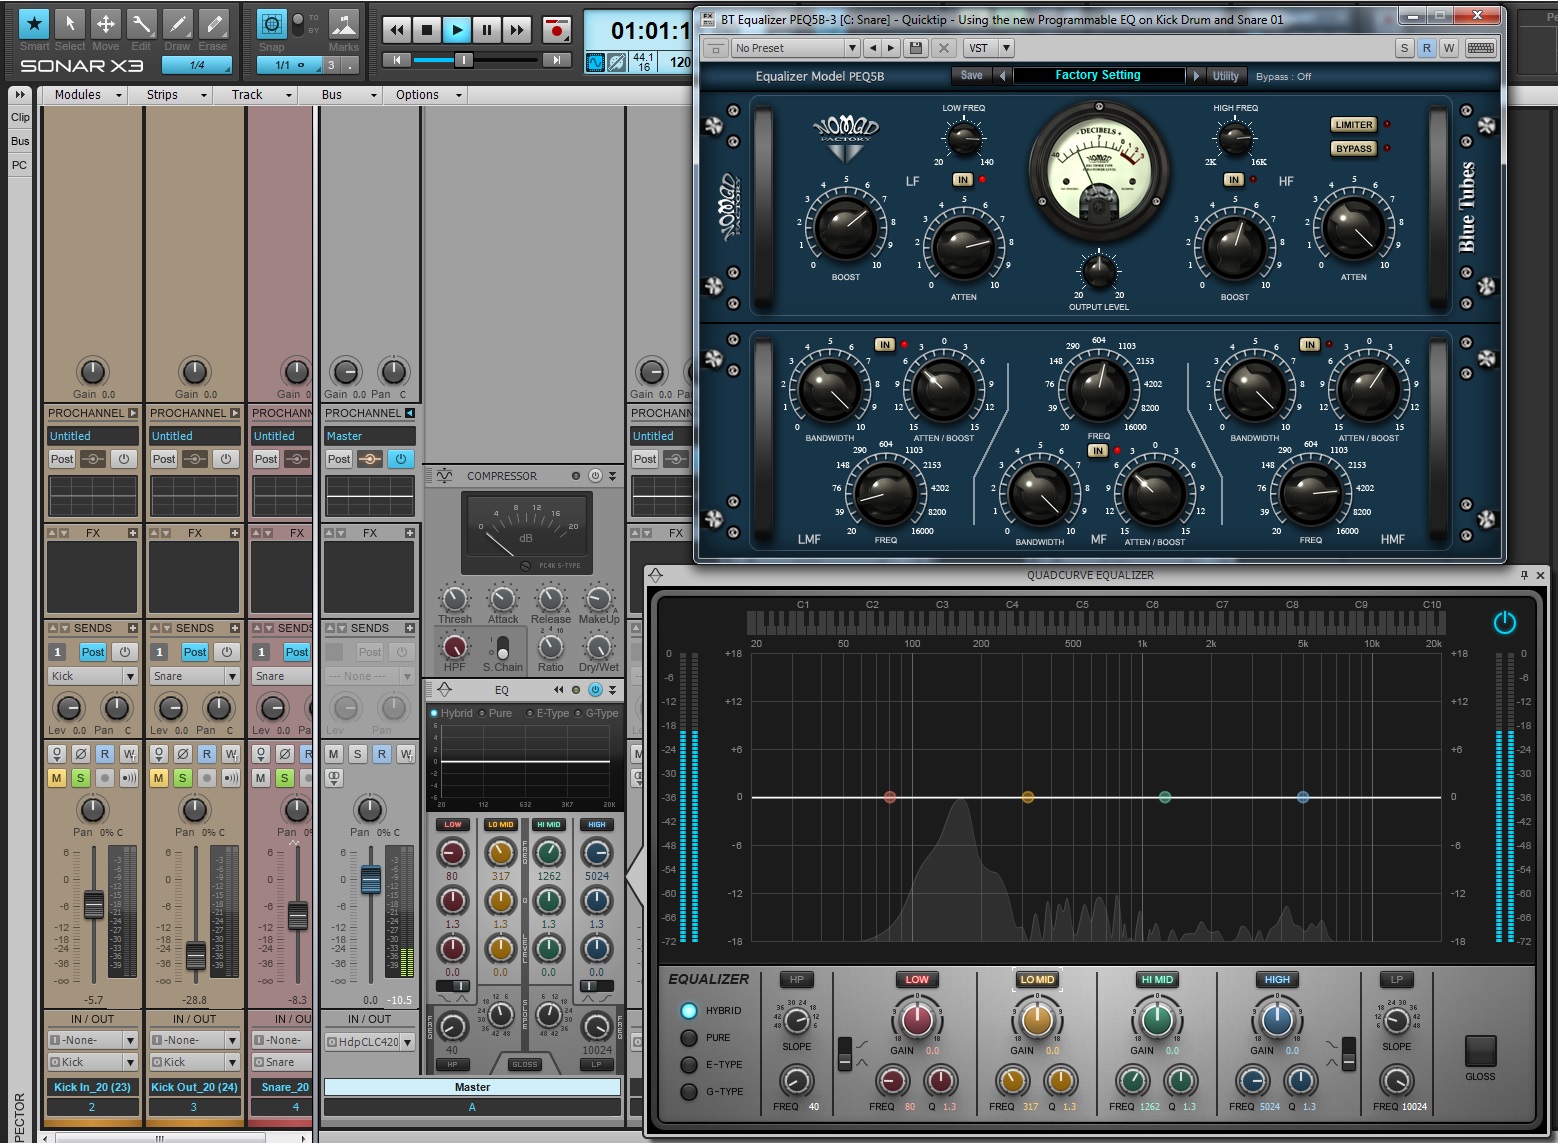
Moving to the snare, user’s can get the same effect using the PEQ5B.  This has some of the same algorithms as the EQP-2B but with an added EQ section in the bottom of the plugin. At first listen the Snare sounds a bit boxy and grainy in the low and mid-range.

I applied a sharp reduction around 50HZ with the Low Shelving EQ and then another sharp cut around 800Hz.  This seemed to make all the difference. Afterwards, I moved to the upper half of this EQ and applied the same thinking that I did to the Kick but instead I focused the EQ to around 122HZ.  This will allow the snare to get out of the way of the Kick.  Next, boosting and then attenuating the signal seemed to focus the shape of the Snare right where I needed it.

Learn more about these plugins and SONAR X3 here.

EDM Production Tip: Ducking Synth Melodies using Sidechaining

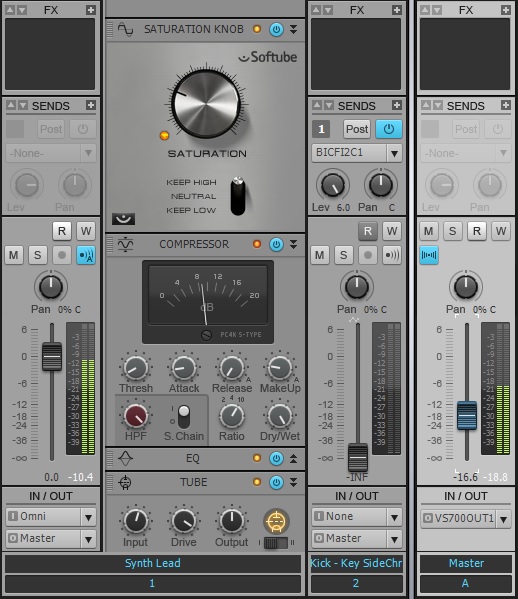
Ducking is a popular technique used in EDM music to apply percussive processing to pads, leads, and bass lines using side-chains on compressors. This technique is also used as a method for getting bass and drum passages to subtly fit together in mixes. In order to successfully apply ducking to your track you must have the following:

  • Compressor inserted on a pad or lead track with side-chain capabilities
  • Percussive source to key the side-chain

First, grab a kick drum sample and align it to the desirable rhythm you need.  Next, insert a compressor onto your synth lead or pad track.  Afterwards insert a send on the sampled kick drum track and set the send to “Pre-fader”. In SONAR, deselecting the [Post] button enables pre-fader sends.  Mute the kick drum sample and turn up the gain on the send.

Once you have the signal flow set, enable the Sidechain on the Compressor.  Now, every time the kick drum sample plays the Side-Chain will trigger the compressor and “Duck” the signal.  You can set the compressor using the Threshold, Attack, and Release settings to shape the kind of effect you want.

Try it yourself with the SONAR X2 Producer free 30-Day trial.

The Distance Effect: How to make audio sound far away using Reverb

Creating distance in a mix or sound design project often results in the use of a distance effect.  This effect can make anything sound as if it’s 50 ft away, and is quite easy to setup.

1) Insert a pre fader send onto an audio track. Within just about every DAW and/or mixing board there is a setting on the Sends sections called “Pre”.  Within SONAR this setting is enabled when the “Post” button on the send is deactivated.

2) In SONAR, I right-click on the Sends area in the console view and select “New Stereo Bus”.

3) Rename the bus “Distance Effect”. Now my audio is routed to this Bus. It’s often good practice to label your buses, or else mixes become confusing to work with.

4) Insert an instance of Reverb onto that bus. In this example I used BREVERB SONAR and called up a Plate preset.

5) Mute the audio track and hit play.


To read more about BREVERB SONAR check out Breverb: A 2013 Sound Design Odyssey on our Knowledge Base.

Try the BREVERB ProChannel Module for free – Download the SONAR X3 Producer Trial

Blue Cat Audio Analysis Plugins – Worth A Closer Look

The highly flexible, unique Blue Cat Audio plugins are now available at the Cakewalk Store. Find out how these critically-acclaimed plugins make comparing your audio tracks to reference material and to each other a breeze and how nearly any component—peaks, RMS, crest factor, even isolated frequency bands—can become a key signal for advanced sidechaining.

Blue Cat’s Analysis Pack
At first glance, the plugins in the Blue Cat Analysis Pack seems fairly self-explanatory: Blue Cat’s DP Meter Pro is a digital peak meter, Blue Cat’s FreqAnalyst Multi and Blue Cat’s FreqAnalyst Pro are spectrum analyzers, Blue Cat’s Oscilloscope Multi renders waveforms and Blue Cat’s StereoScope Multi and Blue Cat’s StereoScope Pro are stereo image visualizers. Their included histograms, 3D and 2D spectrograms, envelope graphs, XY and different views may be no surprise, either. However, what their names do not make clear is their capability to generate control data from the dynamics and spectra of your audio. Use them with a dynamics processor to get nearly infinite sidechaining possibilities.

Blue Cat Analysis Pack
Image © Blue Cat Audio

You may be wondering what the difference Continue reading “Blue Cat Audio Analysis Plugins – Worth A Closer Look”