Basics: Five Questions About Panning Laws

By Craig Anderton

It’s not just a good idea, it’s the law…panning law, that is. Let’s dispel the confusion surrounding this sometimes confusing topic.

What does a panning law govern? When a mono input feeds a stereo bus, the panning law determines the apparent and actual sound level as you sweep from one side of the stereo field to the other.

But why is a “law” needed? Doesn’t the level just stay the same as you pan? Not necessarily. Panning laws date back to analog consoles. If a pan control had a linear taper (in other words, a constant rate of resistance change as you turned it), then the sound was louder when panned to center. To compensate, hardware mixers used non-linear resistance tapers to drop the level, typically by -3 dB RMS, at the center. This gave an apparent level that was constant as you panned across the stereo soundstage. If that doesn’t make sense…just take my word for it, and keep reading.

Okay, then there’s a law. Isn’t that the end of it? Well, it wasn’t really a “law,” or a standard. Come to think of it, it wasn’t a specification or even a “recommendation.” Some engineers dropped the center level a little more to let the sides “pop” more, or to have mixes seem less “monoized” and therefore create more space for vocalists who were panned to center. Some didn’t drop the center level at all, and some did custom tweaks.

Why does this matter to a DAW like SONAR, which doesn’t have a hardware mixer? Different DAWs default to different panning laws. This is why duplicating a mix on different DAWs can yield different results, and lead to foolish online discussions about how one DAW sounds “punchier” or “wimpier” than another if someone brings in straight audio files and sets the panning and faders identically.
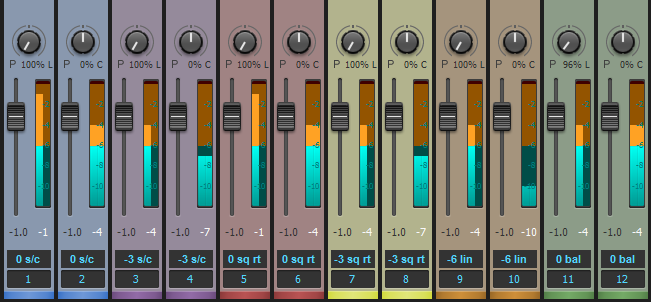
A mono signal of the same level feeds each fader pair, and each pair is subject to different SONAR panning laws. Note the difference in levels with the panpot panned to one side or centered. The tracks are in the same order as the descriptions in SONAR’s panning laws documentation and the listing in preferences. Although the sin/cos and square root versions may seem to produce the same results, the taper differs across the soundstage between the hard pans and center.

This sounds complicated, and is making my head explode—can you just tell me what I need to do so I can go back to making music? SONAR provides six different panning law options under Preferences, so not only can you choose the law you want, the odds of being able to match a different DAW’s law are excellent. The online help describes how the panning laws affect the sound. So there are really only two crucial concepts:

  • The pan law you choose can affect a mix’s overall sound if you have a lot of mono sound sources (panpots with stereo channels are balance controls, which is a whole other topic). So try mixes with different laws, choose a law you like, and stick with it. I prefer -3 dB center, sin/cos taper, and constant power; the signal level stays at 0dB when panned right or left, but drops by -3 dB in each channel when centered. This is how I built hardware mixers, so it’s familiar territory. It’s also available in many DAWs. But use what you like…after all, I’m not choosing what’s “right,” I’m simply choosing what I like.
  • If you import an OMF file from another DAW or need to duplicate a mix from another DAW, ask what panning law was used in creating the file. One of SONAR’s many cool features is that it will likely be able to match it.

There, that wasn’t so bad. Ignorance of the law is no excuse, and now you have answers to five questions about panning laws.


Basics: Five Questions About Using Stompboxes with SONAR

by Craig Anderton

Plug-in signal processors are a great feature of computer-based recording programs like SONAR, but you may have some favorite stompboxes with no plug-in equivalents—like that cool fuzz pedal you love, or the ancient analog delay you scored on eBay. Fortunately, with just a little bit of effort you can make SONAR think external hardware effects are actually plug-ins.

1. What do I need to interface stompboxes with SONAR? You’ll need a low-latency audio interface with an unusd analog output and unused analog input (or two of each for stereo effects), and cords to patch these audio interface connections to the stompbox. We’ll use the TASCAM US-4×4 interface because it has extra I/O and low latency, but the same principles apply to other audio interfaces.

2. How do I hook up the effect and the interface? SONAR’s External Insert plug-in inserts in an FX bin, and diverts the signal to the assigned audio interface output. You patch the audio interface output to a hardware effect’s input, then patch the hardware effect’s output to the assigned audio interface input. This input returns to the External Effect plug-in, and continues on its way through the mixer. For this example, we’ll assume a stompbox with a mono input and stereo output.

3. What are correct settings for the External Insert plug-in parameters? When you insert the External Insert into the FX bin, a window appears that provides all the controls needed to set up the external hardware.

  • Send. This section’s drop-down menu assigns the send output to the audio interface. In this example, the send feeds the US-4×4’s output 3. Patch this audio interface output to your effect’s input. (Note that if an output is already assigned, it won’t appear in the drop-down menu.)
  • Output level control. The level coming out of the computer will be much higher than what most stompboxes want, so in this example the output level control is cutting the signal down by about -12 dB to avoid overloading the effect.
  • Return. Assign this section’s drop-down menu to the audio interface input through which the stompbox signal returns (in this example, the US-4×4’s stereo inputs 3 and 4). Patch the hardware effect output(s) to this input or inputs.
  • Return level control. Because the stompbox will usually have a low-level output, this slider brings the gain back up for compatibility with the rest of the system. In this example, the slider shows about +10 dB of gain. (Note: You can invert the signal phase in the Return section if needed.)

4. Is it necessary to compensate for the delay caused Continue reading “Basics: Five Questions About Using Stompboxes with SONAR”

Basics: Five Questions about Latency and Computer Recording

Get the lowdown on low latency, and what it means to you

By Craig Anderton 

Recording with computers has brought incredible power to musicians at amazing prices. However, there are some compromises—such as latency. Let’s find out what causes it, how it affects you, and how to minimize it.  

1. What is latency? When recording, a computer is often busy doing other tasks and may ignore the incoming audio for short amounts of time. This can result in audio dropouts, clicks, excessive distortion, and sometimes program crashes. To compensate, recording software like SONAR dedicates some memory (called a sample buffer) to store incoming audio temporarily—sort of like an “audio savings account.” If needed, your recording program can make a “withdrawal” from the buffer to keep the audio stream flowing. 

Latency is “geek speak” for the delay that occurs between when you play or sing a note, and what you hear when you monitor your playing through your computer’s output. Latency has three main causes: 

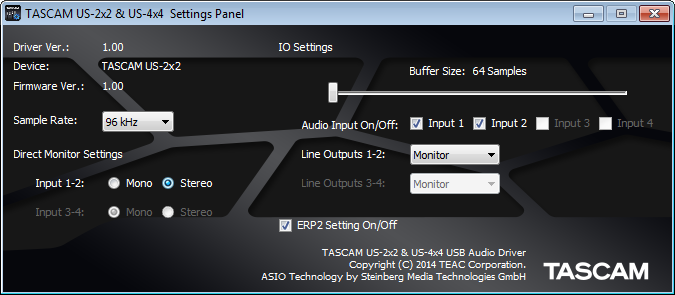
  • The sample buffer. For example, storing 5 milliseconds (abbreviated ms, which equals 1/1000th of a second) of audio adds 5 ms of latency (Fig. 1). Most buffers sizes are specified in samples, although some specify this in ms. 

 Fig. 1: The control panel for TASCAM’s US-2×2 and US-4×4 audio interfaces is showing that the sample buffer is set to 64 samples. 
  • Other hardware. Converting analog signals into digital and back again takes some time. Also, the USB port that connects to your interface has additional buffers. These involve the audio interface that connects to your computer and converts audio signals into digital signals your computer can understand (and vice-versa—it also converts computer data back into audio).
  • Delays within the recording software itself. A full explanation would require another article, but in short, this usually involves inserting certain types of processors within your recording software. 

2. Why does latency matter? Continue reading “Basics: Five Questions about Latency and Computer Recording”

6 Tips for Songwriters in SONAR

by Dan Gonzalez

SONAR helps songwriters improve their creativity and workflow by offering tons of features that are engineered specifically for them. In this video we’ve outlined some of our favorite tools to that save you time while you’re developing your next musical idea.

 
Try SONAR X3 free for 30 Days.

Highlights from April: Tips to Help You "Mix it Right"

Cakewalk presents “Mix it Right” month
We have been busy this month creating new resources to help you craft better mixes. Check out all the tips, tricks, and video from experts like Craig Anderton, Dan Gonzalez, and Jimmy Landry who have all worked professionally in studios and bring decades of mixing knowledge to the table (and console)
.

EQ: Carving Out The Right Sound For Your Mix
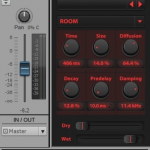
One of the most important aspects of mixing is using EQ to “carve out” a specific frequency range for instruments so they don’t conflict with each other. If instruments have their own sonic space, it’s easier to hear each instrument’s unique contribution, which increases the mix’s clarity. Learn more

When To Break The “Rules” Of Digital Mixing
Sometimes you need a mix to have a certain sound and the so-called rules of digital mixing go out the window. Recently Cakewalk’s Jimmy Landry was hired to produce a song with some “grit” and “acoustic-oriented authenticity,” so he grabbed his 5-Year Old’s harp out of a toy chest, his acoustic guitar, and got to work in SONAR X3. Learn more

“Object-Oriented” Clip Mixing in SONAR
When you need to get really detailed, object-oriented mixing is a convenient solution. Craig Anderton explains how to approach this in SONAR. Learn more

How to Use Reverb to Create Depth
Applying the proper Reverb requires more time than just scrolling through the presets of the basic Hall, Room, and Plate algorithms. Cakewalk’s Dan Gonzalez covers the dos-and-don’ts of Reverb for guitars, vocals, drums, and more. Learn more

Video: How to Use Compression
Mixing with Compression is an essential part to shaping and creating a great sounding track. In this video series Dan Gonzalez shows you how to use compression on various types of instruments in SONAR X3 with the CA-2A T-Type Leveling Amplifier. Learn more Continue reading “Highlights from April: Tips to Help You "Mix it Right"”

“Object-Oriented” Clip Mixing in SONAR

When you need to get really detailed, object-oriented mixing is a convenient solution

by Craig Anderton

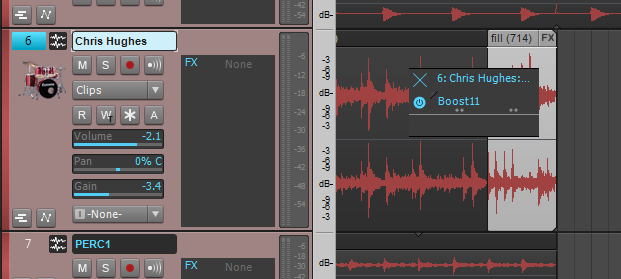
Many times when mixing, you’ll want to apply an effect or volume change to a small, specific section. Clip Automation makes it easy to handle Gain or Pan changes, but you can also work with effects by isolating specific “objects” in a track, then processing them individually. This is different from the usual method of applying effects to an entire track, but can come in really handy for detailed work. Also note that object-oriented effects processing works with any type of clip—audio, MIDI, or groove.

Here’s a step-by-step example of how to apply object-oriented mixing by adding maximization to one drum fill to make it really stand out. Download SONAR X3 to give this a try.

1. To isolate the object from a selected track, alt-click with the Smart tool at the beginning of the section you want to isolate, or place the Now time at this point and type “S.” Do the same at the end of the section.

2. Right-click on the object, and select “Open Clip Effects Bin” from the context menu (keyboard shortcut: Alt+K).

3. An effects bin opens up that’s similar to the standard track effects bin.

4. Right-click on a blank part of the effects bin, choose Audio FX from the context menu, then drill down to find the effect you want.

5. The effect will now appear in the bin. Like a standard effects bin, the small “power symbol” circle (blue for enabled, gray for disabled) appears to the effect’s left. To insert more effects Continue reading ““Object-Oriented” Clip Mixing in SONAR”

TH2: Using Guitar Amp Software Live

Turning this powerful amp, cab, mic & pedal modeler into a MIDI-controlled effect for live use.

Original article posted on The Cakewalk Knowledgebase

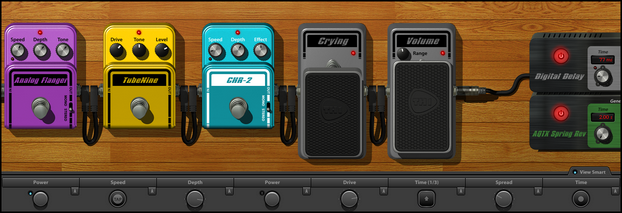
TH2 is the guitar amp modeling software included in SONAR X3 and Music Creator 6 Touch, and while it deserves all the high praise it’s received as a guitar processor, one aspect that is often overlooked is its deep MIDI routing capability. More specifically, it’s possible to adjust the settings of TH2’s amps and effects pedals and even switch between separate banks, sounds and variations by using a hardware MIDI controller or a MIDI CC message in a track. With this setup, TH2 can become your full-time pedalboard and let you take the sounds of your studio recording to the stage.

Wait, what’s that sound? Oh, it’s all the groaning from the people who think that mixing “MIDI” with “stage” will only lead to wasted time and headaches. Fear not, TH2 is smarter than usual software and the flexibility you’ll gain—even if you don’t make TH2 your Continue reading “TH2: Using Guitar Amp Software Live”

DAW Best Practices: Migrating SONAR to a New Computer

So you just brought home your shiny new dream machine computer with the most powerful CPU, loads of drive space and more RAM then you know what to do with. First thing you do is fire up SONAR to work on a project but wait – you can’t find any of your favorite plug-ins. It’s time to migrate all of your favorite settings, and this handy article will show you how.

Set-up
The first thing you will need is a way to move files from your old computer to your new one. The easiest method is with GobblerContinue reading “DAW Best Practices: Migrating SONAR to a New Computer”