So you just brought home your shiny new dream machine computer with the most powerful CPU, loads of drive space and more RAM then you know what to do with. First thing you do is fire up SONAR to work on a project but wait – you can’t find any of your favorite plug-ins. It’s time to migrate all of your favorite settings, and this handy article will show you how.

Set-up
The first thing you will need is a way to move files from your old computer to your new one. The easiest method is with Gobbler. You can also back up all your files to the cloud and then open them up on your new computer. Alternatively you can also use a USB hard drives or memory stick or burn the contents to a CD.
Once you know how you’re going to move them, put them all together in one place. To do this create a new folder on your Windows desktop, make sure you give it a name that you can recognize later. We named ours ‘SONAR Settings’ for this exercise
Exporting plug-in & control surface presets
If you have created any custom presets for your VST, VST3, DirectX, or Control Surface plug-ins those can all be backed up using the Cakewalk Plug-in Manager. To do this, do the following:
- Click Utilities | Cakewalk Plug-in Manger, the Plug-in Manager will open
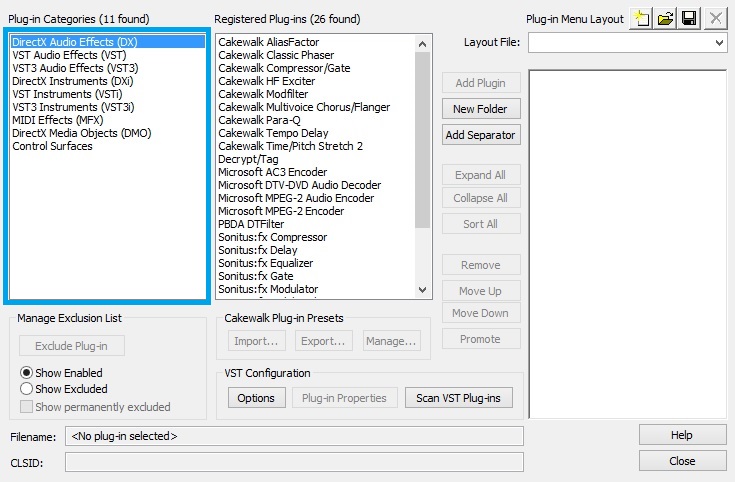
- From the ‘Plug-in Categories’ pane on the left select the type of plug-in you would like to back up
- Then under the ‘Registered Plug-ins’ pane in the middle hold down SHIFT on your keyboard to select each plug-in you would like to copy presets for
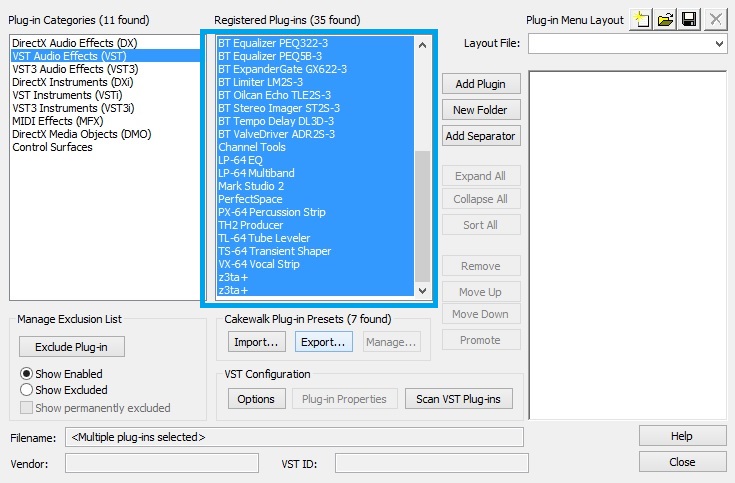
- Finally click the Export button to save a settings file
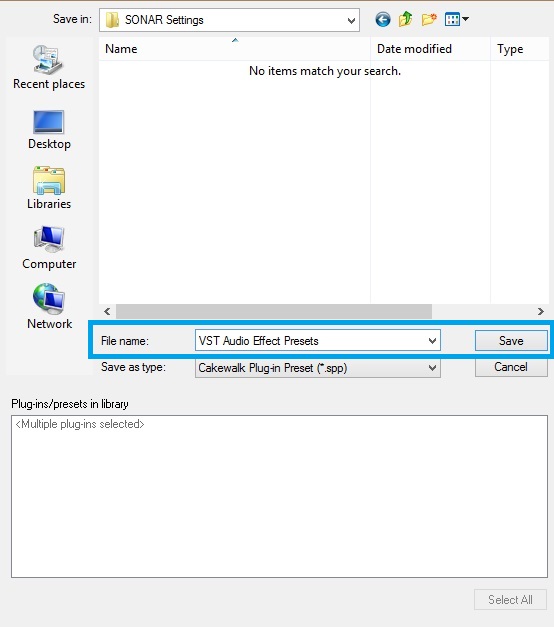
- Be sure to save it in the folder you created earlier on your desktop or a place that you can find easily. If you need to back up multiple types of presets, give it a name you can easily recognize, such as ‘VST Audio Effects Presets’
- Click Save to export your presets
- Repeat for each type or category of plug-in presets you will need to move to your new computer
Exporting plug-in menu layouts
Backing up your plug-in menu layouts can also be done from the Cakewalk plug-in manager and is also very easy to do it:
- Click Utilities | Cakewalk Plug-in Manager, this will open your plug-in manager
- From the ‘Layout File:’ drop down menu select the layout you would like to back up
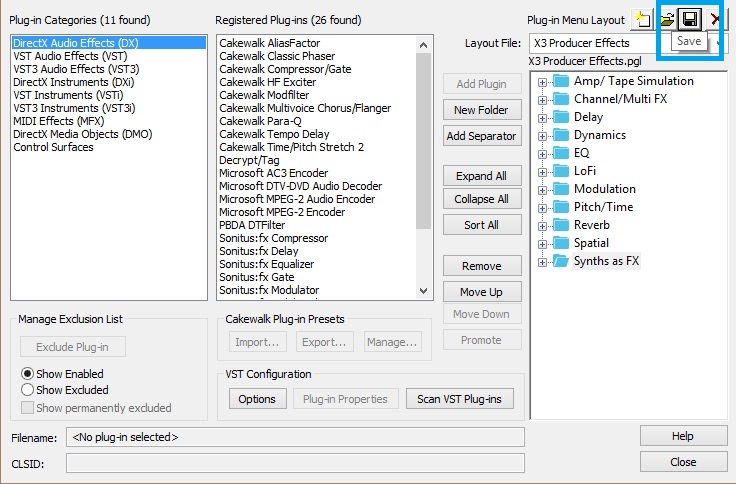
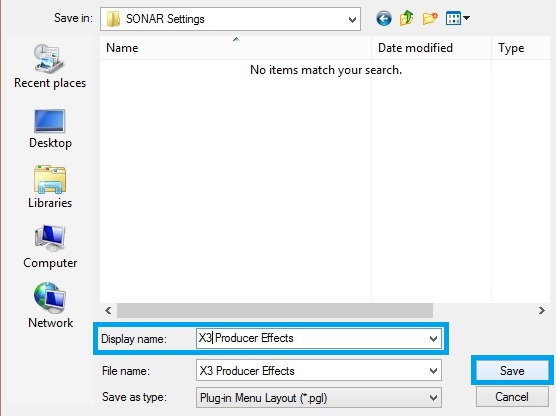
- Click the Save button in the upper right corner to to bring up the save dialog, this is very similar to the save dialog we looked at earlier
- Give it a name and save it to the same folder you created earlier by clicking the Save button
Exporting key bindings
Like most power users, you may have configured custom key bindings for your most common SONAR tasks. Thankfully you can bring these over to your new DAW.
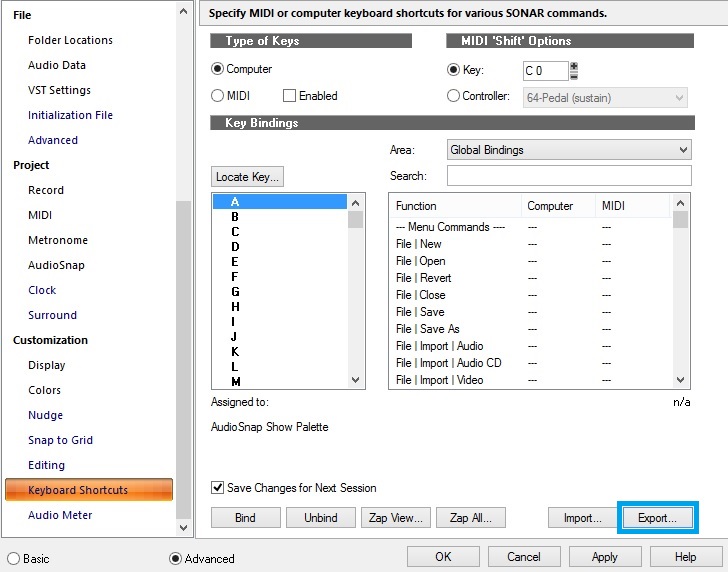
- Click Edit | Preferences (Advanced) | Customization | Keyboard Shortcuts
- Click the Export button to bring up the Export Key Bindings dialog, this is just like the save dialogs we used earlier.
- Navigate to your settings or back up folder, name the file and then click Save
Locating Your Templates & ProChannel Presets
Many of us have custom project templates and track templates for different environments including Mixing, Recording, Composing, and Mastering. Without this stuff you may find yourself making tons of new template when you could have just transferred all of your old templates over to your new computer.
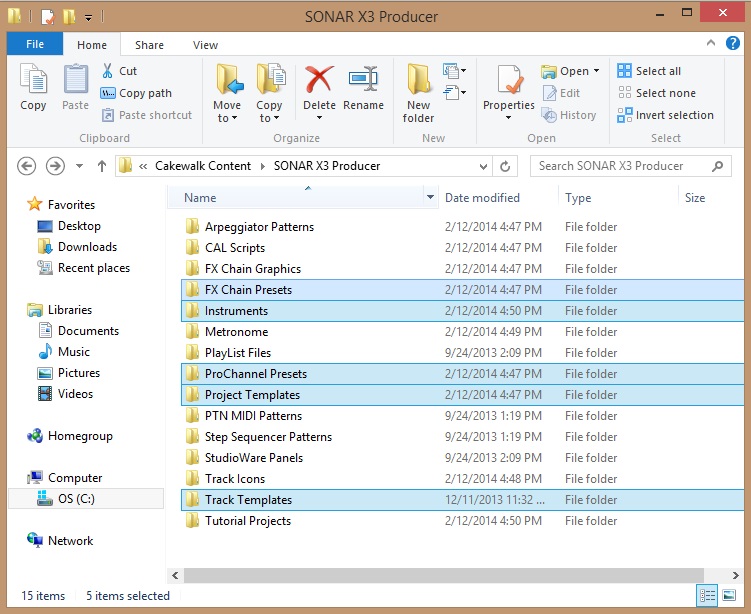
Within your computer simply navigate to C:\Cakewalk Content\(Your SONAR Version)
Highlight the following folders:
- FX Chain Presets
- Instruments
- ProChannel Presets
- Project Templates
- Track Templates
Transferring & importing your settings
Now that you have backed up your settings its time to move them. First you will need to copy your folder with all of your SONAR settings to either a hard drive you can connect to your new DAW or burn the files to a CD or DVD.
To import key bindings:
- Open the appropriate dialog either Edit | Preferences (Advanced) | Customization | Keyboard Shortcuts
- Click the Import button, a dialog will open asking you which file to load – select the file you previously exported and then click Open
- Your settings will now be restored!
To import plug-in presets:
- Open the Plug-in Manager by clicking Utilities | Cakewalk Plug-in Manager
- Importing presets is almost the opposite of exporting them, first select the Plug-in Category from the left pane
- Next, hold down SHIFT and select each plug-in from the Registered Plug-ins list
- Finally, click the Import button, a dialog will open asking you which file to load – select the file you previously exported and then click Open
- Your presets will now all be restored, repeat this process for each type of plug-in presets you need to import
To import plug-in menu layouts:
- Open the plug-in manager by clicking Utilities | Cakewalk Plug-in Manager
- In the Plug-in Menu Layout pane click the Open button
- A file browser will open similar to the import dialogs, browse to your plug-in menu layout and then click Open
To Import Your Templates & ProChannel Presets
- Go to C:\Cakewalk Content\(Your SONAR Version)
- Drag your folders to this file location
- Windows should prompt you to merge the folders, make sure to do this
GOBBLER CLOUD SAVING & SHARING IN SONAR X3
SETTING UP GOBBLER IN SONAR X3
8 REASONS WHY GOBBLER CLOUD COLLABORATION IS AWESOME FOR MUSICIANS

