Take Control of Your Mix with Mix Recall

Mix Recall is a powerful way to organize mixes within a project—Whether you want to have a mix without vocals or a version of the song using a different processing chain on the drums—Mix Recall is the perfect solution for these types of situations, but it can do more than that. Say you are handed a project from someone else using SONAR or you got a new plug-in you want to try out using a previously recorded song, Mix Recall can help you handle this as well by getting your project reset back to a neutral position.

Adding the Mix Recall Module

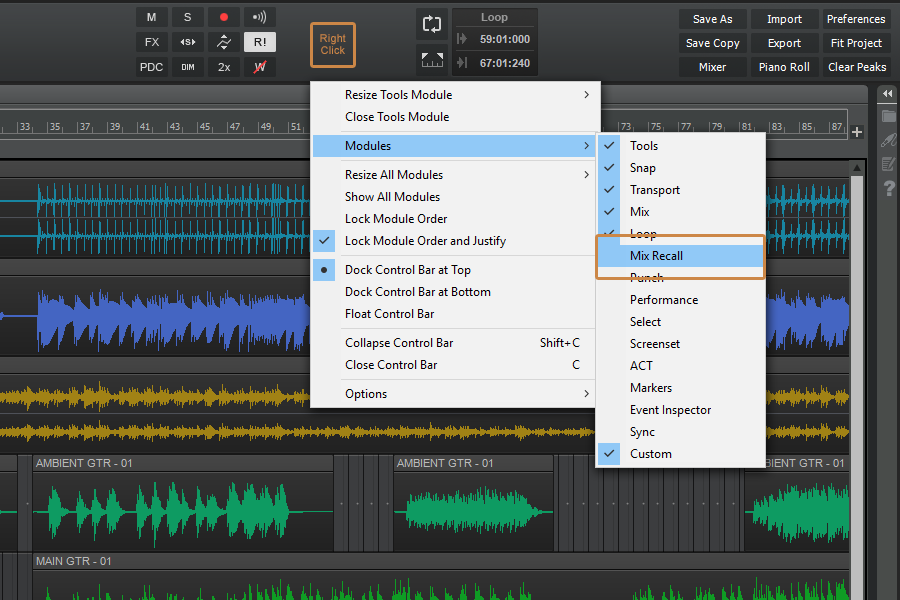
Check that you have the Mix Recall module available in the Control Bar. You can add it to the Control Bar if it’s not already there by right-clicking in a blank space and adding it from the menu.

Creating a Mix Scene

Start by creating a new Mix Scene with the current project setting using the [Save As New Scene] button.  This will allow us to make a change and then come back to the original point to see the difference.

Make a change to the mix by adjusting the volume on a couple of tracks or muting a track previously un-muted.

Click the [Save As New Scene] button on the Mix Recall module again to save these changes into another mix scene. Give this mix a unique name and save it. Now you can reload your previous mix and see the changes reverted back to where we started. Selecting the second mix scene with bring us back to the present state of the mix. You can also use the [Recall Previous Scene] button to toggle back and forth between 2 mix scenes or simply go back to the last mix scene you were at.

Resetting a Mix

Using a project you want to reset, click the drop down arrow on the Mix Recall module and select “Reset Mix…” from the menu. This will remove all automation envelopes, plug-ins, and reset the ProChannel back to the default modules along with any controls in SONAR.

That’s It! Now you can get back to working on your mix instead of trying to manage multiple saved versions of the same song or trying to manually remove each plug-in or automation envelope.

Advanced Techniques

  • Create a save point as you begin your mix once you have basic levels and panning so you can always go back and hear your project from the start.
  • Create save points within your mix to go back and see how it has progressed.
  • Save several iterations of a mix and bounce each when sending it to a client or friend. Here are some common iterations to save as Mix Scenes.
    • Vocal Up Mix (Plus 1-3dB)
    • Vocal Down Mix (Minus 1-3db)
    • No Vocals
    • Radio Edit Mix
  • Time box your mix by only giving yourself an allotted amount of time and dividing that up over what you need to do.  Save each stage as a Mix Scene to go back and look at your progress and how you did at each stage.

Mix Recall is available in SONAR Artist, Professional and Platinum

Creating Your Own Guitar Tone with TH3 in SONAR

TH3 Cakewalk edition allows for anybody with SONAR to have access to amazing guitar tones. It comes with loads of amps, cabinets, effects and even allows for changing the position of the mic. If you want to do stereo processing of effects to create a stereo delays or parallel processing by mixing two amps together, you can do that as well.

Where to start?

Insert TH3 on to your guitar track and make sure you are using the correct input and have the Input Echo button enabled to hear what is plugged into that input.

A good place to start after inserting TH3 on to your guitar track is to check your level into the plug-in and the tuning of your guitar.

Check your level:

Strum a big chord on your guitar to see how much signal is coming into the plug-in. There should be a healthy amount of signal coming in and no clipping in the red.

Tuning:

Play each string and adjust until you see the tuning pin is in the center for each string.

Auditioning Amps

Open the [Components] section on the right if it is not already open and select the amps category from the list. Once you have that selected, you can then drag in the first amp at the top. You’ll be asked if you want to insert a matching cab, click [YES PLEASE!].

Give it a try! To audition other amps and cabs click the up and down arrows on the top left corner of the amp head or cab. Depending on what you are going for this is where you’ll want to pick out an amp that has some of the characters you are going for.

Here is a list of the included amps in TH3 Cakewalk along with the units they are modeled after.

  • Bassface ’59 – Modeled after the ’59 Fender Bassman
  • Darkface ’65 – Modeled after the ’65 Fender Twin
  • Modern – Modeled after the Mesa Boogie Dual Rectifier
  • Overloud Custom Power – Overloud Custom amp
  • Randall T2 – Official model of the Randall T2 head
  • Rock ’64 – Modeled after the Marshall JTM45
  • Rock 900 – Modeled after the Marshall JCM900
  • Slo 88 – Modeled after the Soldano x88r
  • THD Univalve – Official model of the THD Univalve Single- Ended Class A amplifier
  • Top30 – Modeled after the Vox AC30
  • Tweed Deluxe – Modeled after the Fender Tweed Deluxe
  • Bass SuperTube VR – Modeled after the Ampeg SVT-VR

Spice It Up Now

I’m going for a pretty classic tone that is mostly clean with a little bit of grit on it. I picked out the Top30 type head with a matching cab and will add an overdrive going into the amp. Go to the Components section again and select overdrive category. Drag in the TUBE NINE over before the amp. Dial in a some gain to taste using the “Drive” control and give it a whirl.

There are many other effects included with the TH3 Cakewalk edition, here is a compete list of everything you get.

  • TUBE NINE Overdrive
  • FatMuff Fuzz
  • FUZZRACE Fuzz
  • CHR-2 Chorus
  • Digital Delay
  • RSS Compressor
  • ANALOG FLANGER
  • Rich Flanger
  • 9-0′ Phaser
  • AQTX Spring Reverb
  • AmpTrem Tremelo
  • Auto-Wah
  • cry maybe Wah
  • Gate Expander
  • Volume

Mastering Space

Using spacial type effects like reverb and delay are critical in getting many of the classic guitar tones from the past. Here are some good rules to live by when getting started using reverb, delays and other spacey effects.

  1. Use modulation type effects like Chorus, Phasers, and Flangers toward the middle of your chain after distortions & overdrives.
  2. Use Delays after the Modulation type effects.
  3. Place reverbs at the end of your chain.

TH3 Cakewalk edition is included in SONAR Home Studio, Artist, Professional, and Platinum.

Q&A with True Sound Studios

Ryan Wiesner “Weezna” is the owner and operator of True Sound Studios outside of Buffalo, NY. He chooses SONAR Platinum to produce a range of music including Hip Hop, EDM, Pop, and Rock. We discovered Ryan from his YouTube channel and were impressed with his studio and with the videos he’s creating using SONAR. We got him to take a break from his rigorous recording and video creation schedule to talk to us about why he uses SONAR and how he’s integrated it into his hybrid digital / analog productions. Continue reading “Q&A with True Sound Studios”

Cakewalk and Synchro Arts Announce VocALign ARA Integration with SONAR

Synchro Arts‘ legendary automatic time-alignment software, VocALign Project, now integrates with Cakewalk SONAR via the ARA (Audio Random Access) protocol. Compared to non-ARA DAWs, ARA provides instant access to the host’s audio data—simply drag and drop Guide and Dub audio events into VocALign Project 3, and it edits the Dub audio instantly to match the Guide’s timing.

Cakewalk is currently running a special direct promotion for 20% off VocALign Project 3 until May 31, 2017 in our online store at shop.cakewalk.com.

Continue reading “Cakewalk and Synchro Arts Announce VocALign ARA Integration with SONAR”

New Comping Features in SONAR

As you may know by now, the Bakers at Cakewalk are constantly on a mission to improve upon SONAR. Whether that’s a bug fix, a new feature, or a feature enhancement, we’re giving you the tools to be creative and get the job done. In 2016 we brought you workflow improvements for comping such as improved copy and paste functionality, keyboard shortcuts (adjusting stretch and crossfades), as well as visual improvements and customization options for take lanes. With the 2017.02 release we take things to a whole new level, with a host of new features based on your feedback. Don’t forget, if you have features or enhancements you’d like to see, drop us a line at bakery.cakewalk.com and let us make SONAR even better! For now, let’s dig in:

Continue reading “New Comping Features in SONAR”

The Miracle of Mid-Side EQ: Rock Your Mixes and Masters

by Craig Anderton

Sure, the LP EQ is a great linear-phase, stereo EQ. But it was designed for mid-side processing as well as conventional stereo, so let’s explore what mid-side processing is about, and why it’s so important.

LP EQ BASICS 

You can add up to 20 nodes, and each can have one of the following responses:

  • Low shelf
  • High shelf
  • High pass
  • Low pass
  • Peak boost/cut


The LP EQ allows up to 20 nodes
The LP EQ allows up to 20 nodes, which can choose from five responses.

However, there’s some intelligence when adding nodes; for example if you double-click to enter a node close to the highest possible frequency, the LP EQ will insert a lowpass filter. At a somewhat lower frequency, there’s a shelving response (although you can of course change these default responses to whatever you like). Drag nodes horizontally to change the frequency or up/down to vary amplitude; a right-click + drag on a node alters the width, as does using the mouse scroll wheel on a selected node.

You can ctrl+click, or draw a marquee around, multiple nodes to select them, but there’s an interesting twist. Suppose a node is set to boost, and another to cut. If you select both, then click on the one that boosts and drag it downward, the amount of boost will decrease. However the one that’s cut will start boosting. This complementary motion allows increasing or decreasing the overall emphasis easily; for example, if you think you went too far with the amount of EQ and want to pull it back, this reduces all aspects equally.

If all the selected nodes either boost or cut, then their amplitudes vary together.

These basics give a flavor of the features, but there’s much more—so click on the UI to give the LP EQ the focus, then press F1 to call up the comprehensive documentation.

MID-SIDE EQ PROCESSING

Mid-side processing encodes a stereo track into two separate components: the center becomes the “mid” component in the left channel, while the stereo track’s right and left elements become the “side” component in the right channel. You can then process these components individually, with automatic decoding back into stereo.

To get started with mid-side processing, click on the LP 64’s Expert button and under Mode, choose Mid/Side. For best results, set the precision to High. This results in the most latency but the highest accuracy, which is important because with mid-side processing, you don’t want any phase shift or sample misalignment—that will interfere with the decoded stereo imaging.

the LP EQ's Expert Mode access Mid-Side processing
The LP EQ’s Expert Mode is the key to doing mid-side processing with EQ. Also note the Mix control for parallel processing.

Processing can be independent for the mid and side components (as it is for the left and right channels in conventional stereo applications). You assign a node to the appropriate component by clicking on the node, and then clicking on M or S (toward the LP EQ’s upper right corner). Here are a few possible applications.

  • With mastering, you can get “inside the file” to do pseudo-remixing on a stereo track. One typical application is giving a slight boost to the higher-frequency side components to provide a bit more “air” and a wider stereo image.
  • If you’ve been seduced by vinyl’s comeback, remember that it’s crucial to center the bass and minimize bass excursions in the sides. With mid-side EQ processing, you can reduce the bass in the sides, and if needed, increase bass a bit in the center. Even if you’re not mastering for vinyl, taking this technique further can give a super-anchored, “center-channel” bass sound.
  • Drums with lots of room ambience can benefit from a bit of upper mids in the sides for extra definition, and a little bit of lower mids in the center to accent the kick.
  • If a synth bass has a wide image that “steps on” other instruments, you can bring down the bass in the sides.
  • For taming reverb, set a node to Mid, select the high pass curve, and slide it all the way to the right to take out essentially everything. Then you can shape the remaining reverb with the side EQ, while chasing the away from the center, where it can muddy the bass and kick.

THE VALUE OF THE MIX CONTROL 

But…how do you know whether you’re really making an improvement to the sound or not? The LP EQ includes a Mix control (accessed in the Expert section) so you can vary the mix from full EQ to no EQ. Yes, parallel processing for EQ…very handy, and even better, the Mix control can be automated (like virtually all other parameters, including display characteristics and bypass).

You can also switch quickly between two different EQ settings with the A/B comparison function.

Granted, there’s no shortage of EQ plug-ins, but the LP EQ truly brings something new to the party. If you’re not familiar what mid-side processing can do with EQ, there’s no better way to find out than with the LP EQ.

Free Impulse Responses For Your Convolution Reverb

by Daniel Gonz
We’d like to release an impulse pack that we created last year in New York City. This free impulse response pack captures the simple ambience of two fantastic live rooms for drums, vocals, and pretty much any acoustic instrument you can imagine. Drop them into your choice of any convolution reverb to add depth to the elements of your mix.

Download the FREE Impulse Response pack here

Free Impulse Responses for Convolution Reverbs

The Dynamic Gate | A Cleaner Way To Mix Drums

by Daniel Gonz

Gates are wonderful processors that can clean up background noise and bleed in your audio tracks. They’re a bit tricky to understand because the key to successfully using one is often a specific feature that’s hidden or buried in the interface. The feature I’m referring to is called the sidechain. It’s a powerful element of my mixing workflow and I’d like to show you why.

To follow along with this post, you can download the audio examples here.

In its simplest form, a gate allows a signal to pass through it only when its decibel level is above a set threshold. This means the gate is ‘open’. If the signal falls below the threshold then no signal is allowed to pass. This means the gate is ‘closed’. The sidechain becomes an integral part of this entire process because it’s what the gate uses to detect whether or not the signal is above or below the set threshold.

Sonitus Gates On Kick and Snare in SONAR
Top Left to Bottom Right: Kick In Gate, Kick Out Gate, Snare Top Gate, Snare Bottom Gate

Continue reading “The Dynamic Gate | A Cleaner Way To Mix Drums”

Smart Swipe in SONAR's 2016.06 Release

Smart Swipe


Here’s another workflow enhancement that becomes downright addictive once you start using it. With Smart Swipe Track Controls, you can quickly enable/disable buttons on multiple tracks by clicking a button in one track, then dragging across adjacent tracks without releasing the mouse button. Smart Swipe is also an extremely effective complement to Quick Grouping.

Smart Swipe works in the Track and Console Views with mouse gestures. The following controls support Smart Swipe:

  • Mute
  • Solo
  • Record
  • Input Echo
  • Send knobs within individual track strip (Console View only)
  • Phase (Console View only)
  • Interleave
  • Archive (Track View only)
  • Automation Read
  • Automation Write
  • FX Bin Enable
  • ProChannel Enable (Console View only)
  • ProChannel Pre/Post (Console View only)
  • Waveform Preview (Track View only)

HOW The Duke Western USES SONAR TO CREATE MUSIC FOR DUCK DYNASTY (AND MORE)

Here at Cakewalk we are fortunate to have an external team of rocket scientists who help test out SONAR beta releases.  This team is dedicated, passionate and most of all appreciated by all of us internally here at the Cake shop.  Recently I received a general email from one of my esteemed colleagues mentioning that one of our trustworthy beta soldiers was jumping off the beta-battlefield in lieu of another SONAR related activity.  Huh?  This peaked my curiosity and I felt obliged to dig a bit deeper on the subject.  What could “another SONAR related activity” involve?  SONAR Olympics? SONAR CPU Racing? SONAR Academy?

Featured Music Placements on Discovery Channel, History Channel, CBS, Bravo Network

Continue reading “HOW The Duke Western USES SONAR TO CREATE MUSIC FOR DUCK DYNASTY (AND MORE)”