SONAR Quick Tip: Save time tweaking levels with Quick-Grouping

Grouping is one of the most powerful tools you can use during both the tracking and mixing process, but SONAR X2 offers up Quick-Grouping as an alternative method for making quick adjustments to your levels.

Let’s say you have mic’d up a drum set and you have been working diligently on the balance.  Without realizing it you are completely clipping your Master Bus, don’t worry this happens to the best of us. The first thing that comes to mind is making a group to correctly adjust all your levels at once. This involves assigning each parameter to a group and then eventually turning that group off and on again when you need to make small adjustments.

Instead of doing that, try the following Quick Groups feature:

  • Select all of your tracks using CTRL+A
  • Hold CTRL
  • This makes a temporary group of your selected tracks
  • Move 1 fader
  • The rest will follow suite and keep the fidelity of your balance

Try SONAR X2 free for 30-days and check out this easy-to-use feature.


Testing the CA-2A in the Real World: Three Reasons it's a Must-Have Plugin for Mixing

I was recently hired to burn the ole midnight oil and produce, mix, co-write and play just about every instrument on an EP for an artist out of NYC.  The record is pretty cool, definitely fun to make, and it falls somewhere between Fiona Apple and Taylor Swift.  Considering the genre, I figured it was a great time to try out our new CA-2A T-Type Leveling Amplifier in the field and in a practical situation.

From testing the beta out briefly during development, I knew I was going to like the outcome of using the CA-2A, but what I didn’t expect was the versatility of the plugin.  I ended up using it on a lot more than what I expected.  From smoothing out vocals to arpeggiated guitars to piano tones, I really loved what I was getting from the CA-2A.  I also had the benefit of A/B’ing it with another branded Leveling Amplifier that I use, and I found the Cakewalk CA-2A thicker sounding in general and also more versatile due to the R37 screw [knob.]   Here are the reasons I found myself going to the CA-2A instead of my other comparable leveling amplifier.

1.)    R37 Adjuster on Vocals – This adjustable screw is interesting.  The physical appearance of the screw does not give off the importance of its usefulness.  Basically, this parameter allows you to adjust the compression on the high frequencies.  Since my other Leveling Amplifier does not have this adjustment, I always started out by keeping the screw all the way to the left (0%) and then dialing it in until I found the sweet spot.  The result was amazing especially on vocals.  I was able to always get a warm yet transparent sound but without the harshness on most of the “ess” words.  Since this project is with a female vocalist, I found it especially helpful.  I was also able to work the QuadCurve EQ into the mix and combine it with the CA-2A nicely.  By tweaking the hi-end frequencies on the EQ along with the R37 screw, I was able to get a more present vocals without any harshness.

2.)    “Limit” Mode on Bass Guitar – I’m not sure if it will be like this for every song, but for this track the CA-2A on the bass guitar in “Limit” mode was a magic bullet.  I always run the bass into its separate bus, so I ended up using the limiter on that stage.  I played the bass guitar (as you can hear from the track on this post) with a pick for this song.  The CA-2A in limiting mode on the bass bus really allowed me to fatten up the sound of the low end, but also kept the attack of the pick in focus.  It leveled out the attack of the pick hitting the string but also kept it present.  I had the EQ running on the bass track, and then the limiter on the bass hitting the peak reduction at about -3db.  I kept the R37 at 0% as you can see from the image.

3.)    “Compress” Mode on Piano and Whirlie – fortunately for this track I had the benefit of having David Cook (keyboardist and MD for Taylor Swift) play on the track – the guy is a genius.  I’m pretty much a hack at keyboards so my usual piano editing (to make myself sound decent enough) was not going to cut it.  As you can hear from the attached track, there is a lot going on in the song, so I had to figure out a creative mixing strategy to make room and carve frequencies.  To say that the CA-2A helped me achieve this on the track would be an understatement.  Using the plugin in compress mode on the piano enabled me to really place it in the mix correctly.  It also helped dial in the frequencies to get it out of the way of all the other things that were in the same frequency range.  To get the piano to sit correctly, I hit the compressor pretty hard, used the R37 at 50%, and then notched up the highs of the QuadCurve EQ.  I also used the Channel Tools plugin to give it some more width and depth and get it out of the way of the guitars.  The more I use this, the more I understand the importance of the R37 screw.  It’s almost an oxymoron, but by combining the R37 with the high-end frequencies on the QuadCurve EQ it seems like I am able to get a warm top end sound out of instruments.

On the rest of the track I also ended up using the CA-2A on some acoustic guitar tracks as well as one of the clean electric guitars.  I’m psyched about the performance and versatility of this plugin – instantly you can hear the difference wherever you use it.  I also think this is a plugin that would be a great benefit to folks who are just getting into mixing.  The simplicity of the unit basically makes it fool proof for obtaining professional results without a lot of technical worries – basically just use your ear and turn the knobs;)

Try the CA-2A T-Type Leveling Amplifier for free

Thanks for reading and be sure listen to the mix posted below.

The song on this post uses the CA-2A on exactly the following tracks:
Lead Vocal track (Compress Mode)
Bass bus (Limit mode)
Piano track (Compress Mode)
Whirlie track (Compress Mode)
B3 track (very lightly) (Compress Mode)
Left acoustic guitar track (both mics)  (Compress Mode)
Arpeggiated Electric Guitar track (Compress Mode)
1 of the backing vocal tracks (Compress Mode)
Tom drums bus (Limit mode)
Hi Hat (Compress Mode)
Mandolin track (Compress Mode) (doubled – CA-2A only on 1 of the tracks)

CakeTV Live: SONAR X2 Webinar

Last week was our fourth installment of CakeTV Live, which we broadcast bi-monthly, live, from Center Staging in Burbank, CA. In this latest episode we showed over 450 live viewers the new features of SONAR X2. In case you missed it, the webinar is now available for viewing on CakeTV (or right from this web page, below).

During the webcast we did our best to cover all of X2’s new features like Smart Grid, ProChannel FX Chains, and R-MIX SONAR. However, there were a few new features that we didn’t have time to demo that we think are worth mentioning.

Continue reading “CakeTV Live: SONAR X2 Webinar”

SONAR X2 Feature Peek: ProChannel FX Chains

Like many of you, we’re all fired up about SONAR X2. And we’re pretty sure you’d like to know more about what makes it so delicious. So, take a closer look at the newly refined, ever smarter, SONAR X2.

What’s an FX Chain?

FX Chains are an answer to a long standing feature request; to have FX bin presets, or a way to recall an FX bin on an existing track in SONAR. In SONAR X1 Producer we introduced FX Chains, which are essentially an FX bin, or group of FX, saved as a preset.

In SONAR X1 Producer Expanded we upped the ante and upgraded the feature to version 2.0 which added assignable controls and a custom user interface to FX Chains. Later on in the free X1d update we added a Mod Matrix to FX Chains allowing up to four parameters to be mapped to a single control on an FX Chain, which I wrote about in an earlier blog post.

In X2 we’re including FX Chains in SONAR X2 Essential and Studio, as well as Producer. But In SONAR X2 Producer we’ve taken FX Chains one step further having added them to the Producer exclusive feature, the ProChannel.

Continue reading “SONAR X2 Feature Peek: ProChannel FX Chains”

How Tim Wynn used SONAR X1 to Create the Music for THE DARKNESS II

SONAR X1 user Tim Wynn is the Quintessential modern day composer/producer, and a rising Hollywood name whose diverse portfolio includes feature films, television series, documentaries and video games for major clients such as ABC, Activision, Electronic Arts, Fox, Fuji, Marvel, Sony, THQ, Universal and Warner Bros.

With several globally successful franchises already to his credit ranging from blockbuster video games such as Command & Conquer, Dungeon Siege, GUN, The Punisher, Red Faction, The Simpsons and Warhawk to adding to the sound of the hit television series Supernatural, Tim Wynn is gaining international recognition as a leader in a new generation of highly talented and versatile composers.  His recent releases include Fox Digital’s debut release, the comedy-horror web series Wolfpack of Reseda; the world’s first 3D television series Tokyo Control; the hit drama series Lucky Seven for Fuji TV, and 2K’s The Darkness II, the action-horror video game based on the best-selling Top Cow comics.

The Darkness II is the sequel to the critically acclaimed 2007 release The Darkness. Inspired by the popular comic book series produced by Top Cow Productions, Inc., The Darkness II is an intense first person shooter that puts you in the role of Jackie Estacado, don of a New York crime family and wielder of an ancient force of chaos known as The Darkness. Continue reading “How Tim Wynn used SONAR X1 to Create the Music for THE DARKNESS II”

Get hands on control of SONAR X1's ACT functionality with the Roland A-300PRO

SONAR X1′s Active Controller Technology (ACT) allows for full control over your mix and effects via hardware MIDI controller. Not only can you control mix settings like volume and pan on tracks, ACT lets you control parameters on effect and synth plugins in real time!

Coupled with the Roland A-300PRO MIDI Keyboard Controller you can fully immerse yourself in your mixes. No more “mousing around” to draw automation for a filter sweep on a synth, grab a control and get interactive.

ACT has templates for most MIDI controllers so setup is a breeze and hardware controls are already mapped to the most common parameters in all of your plugins. Want to customize the mapping? It’s as simple as pushing one button, clicking the parameters and moving the desired hardware controls. No menus needed!

Watch ACT and the A-300PRO in action Continue reading “Get hands on control of SONAR X1's ACT functionality with the Roland A-300PRO”

EMI Publishing and SONAR X1: Some Recent Sessions in the Project Studio

Why are Major Publishing Companies such as EMI seeing such great success with project studios?  Because with modern technology, top talent and a good set of ears, a demo may turn into a master at any given time.

Over a year ago I had the pleasure of setting up a studio at the EMI building in the meat packing district of NYC after they chose SONAR X1 for their project studio.  Since then, according to Creative VP EMI Jake Ottmann “the room has been a tremendous success” with an array of well known and developing artists from all over the world engaging in music creation.

The EMI project studio facility was primarily created for the roster of EMI artists who found themselves temporarily working in New York City.  “When you’re a hit songwriter, you are traveling quite a bit and find yourself in different cities at different times,” stated Jake Ottmann.  “We built this room up for top-notch artists and songwriters that are in town and need a great place to relax and write music.  It’s been an awesome experience since its inception and we have seen some great success.  SONAR X1 and the PC Audio Labs machine which are both the heart of the room have been rock solid for these artists and writers.”

Some of the recent artists who have been working in the audio lounge include Jay Trill, Lana Del Rey, Mathew Koma, and The Glory Days.

“Sometimes it’s a few hours here and there with the X1 room just for basic writing, and other times it’s a full on technical writing/producing session that could end up on a master, just like a recent session that went down with an affiliated artist/writer/producer who was working out of here last month.”

~Jake Ottmann (VP Creative, EMI Publishing)

When putting this writing room together, EMI made a calculated decision to go with SONAR X1 and a V-Studio 100 all powered by a tailored PC Audio Labs machine.  “We were looking for a solution that covered all,” explained Richard Reuss who is head of the technical team for EMI.  “We wanted something that covered it all delivered in one box.  We didn’t want to get into purchasing plug-ins from one company, and then synths from another; we decided on SONAR X1 Producer not only for everything it comes with, but also for the way the workflow exists in the program.”  “Our writers are very unique and diverse,” added Jake Ottmann.  “SONAR X1 is not only a cutting edge recording tool, but also an amazing writing tool as well, and that was very important to us in our decision; not to mention the fact that the stock plug-ins, synths and drum modules are just as good as, if not better than anything else on the market.  It’s been working so well for us that our in-house audio team has been using it for post-house related projects as well – we’re pretty psyched to get this much mileage out of the system.”

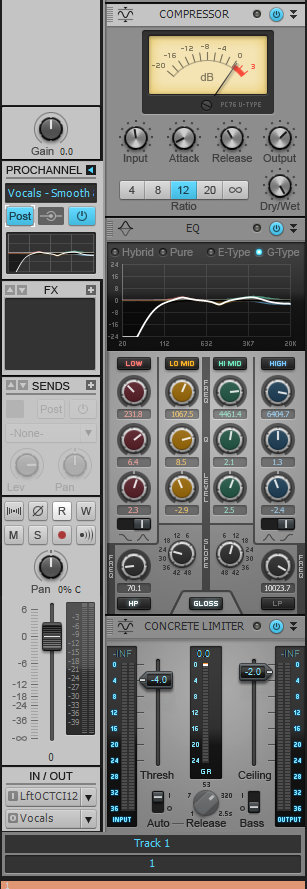
Although EMI Music Publishing has a huge facility for office space, it was obvious to the staffers that there was not going to be a lot of square footage allocated to this music room.  “I think one of the selling points for us was the fact that we don’t have a ton of room in this spot [the room itself], so having the Pro Channel on every track to get a big console sound without the console is huge for us,” explained Richard Reuss who has been a longtime SONAR user.

SONAR X1 continues to be the choice for leading creative institutions such as EMI Publishing.  It’s also the go-to D.A.W. for many creative producers, songwriters and artists who want to be inspired by their system.  Right now, you can get a great deal with the SONAR X1 First Class Upgrade promotion that will help you to create radio-ready tracks.


Mixing and Mastering a Song Using only the Z3TA+ Effects Engine in SONAR

One of the great aspects about SONAR X1 is that it’s a very diverse D.A.W.  There are so many different ways to create music and it’s great for people who like to experiment with sounds and develop unique sonic pallets.  One of the main reasons why many pro users choose SONAR is because there are a lot of veiled jewels and tools that help musicians to sculpt a unique and individualized sound.

Similar to the Beatscape Content articles that were posted, I decided to dive into another one of my favorite hidden treasures of SONAR of which some people may not be aware; the pristine and fat FX engine of Z3TA+ that can be used as a standard VST effects unit.

When I first started using SONAR I loved the fact that it came with so many great VST plugins.  It wasn’t until 6 months into using the program when someone pointed out to me that you could use the Z3TA+ synth as an actual VST effect anywhere you use regular plugins – on clips, in bins, on busses… etc.  After dragging Z3TA+ onto a track I was instantly surprised at what I heard. Continue reading “Mixing and Mastering a Song Using only the Z3TA+ Effects Engine in SONAR”