Parallel Compression: Now Easier Than Ever

A few years back, we showed you a bit about Parallel Compression in SONAR. Now that we’ve introduced Patch Points in the Jamaica Plain update, you can do these same things with a much more efficient workflow.

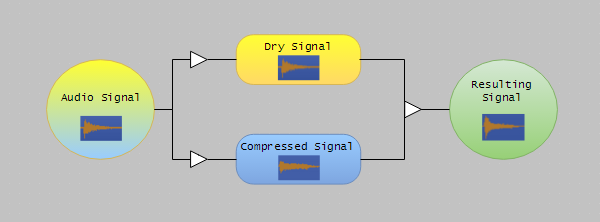
Let’s quickly define parallel processing: In parallel processing, a signal is duplicated into two or more signals. Each copy of the signal is processed differently but plays back simultaneously with the original. The copy/copies are then mixed together.

Parallel Compression Diagram_600x222

Parallel Compression, aka “New York Compression,” is most commonly used on drums to add body to the drum mix without flattening the snappy transients.

Check out the video below to see just how easy (and great sounding) this technique can be:

You might also like…
Tape Emulator Gif SONAR Patch Points Multiband Processing
5 TOOLS TO GET “THAT ANALOG SOUND” FROM SONAR UNIVERSAL ROUTING TECHNOLOGY 202: THE AUX TRACK

Anatomy of a SONAR Project: Replacing the Placeholder

DELIVERING MUSIC FOR THE FILM “FOR BLOOD” (COFFEERING ENTERTAINMENT LOS ANGELES, CA)

Sometimes I am fortunate enough to have the time to take on a project outside of Cakewalk, and I love that those projects let me put our current SONAR Platinum “Rolling Update” to the test in the field. Recently, the LA-based production company Coffee Ring Entertainment asked me to write, produce and deliver three tracks for their new movie, For Blood. This article describes highlights of the process involved in writing and producing one of those tracks for a specific scene in the film.

My first question to the director was, “Do you already have placeholder music in the rough cut?” When producers and directors have placeholder music they like already set into the cut, it speeds up and simplifies writing and producing the music. Fortunately the answer was “yes,” so all I needed to do was replicate what they liked about their placeholder tracks using the array of instruments and plug-ins in my home project studio rig.

A primary objective in writing music for film is to forget about yourself and your own emotional agenda. And oddly enough, for me at least, this notion really speeds up the workflow because you are writing/producing for someone else’s purpose other than your own thoughts. Adamantly keeping this in mind throughout the writing/producing process helps to stay focused on what the client wants. For this song, it’s exactly what I had to do because the producers had a Tarantino-ish type track set into the scene, and my innate production style tends to lean more towards big, clean commercial pop rock. Luckily, I could go to YouTube and analyze suitable styles of music but even luckier for me, SONAR’s Addictive Drums and TH2 plug-ins were  ideal for dialing in the kind of music that was needed. Continue reading “Anatomy of a SONAR Project: Replacing the Placeholder”

How LA Producer Luigie Gonzalez is Using Patchpoints in the Jamaica Plain Release

In-demand LA Producer Luigie “Lugo” Gonzalez is in the trenches on a daily basis depending on SONAR to deliver radio-ready masters to major labels.  As an advocate of this year’s Rolling Updates, and especially the new Universal Routing Technology [URT] in SONAR, Luigie told us how he is initially using URT:

CW Artist Relations:     What are you currently working on?

Luigie:     Right now I am in the middle of a few projects as always. Universal artist Ah Moon is being released right now and thankfully turning some heads.  It’s actually Burmese which is very interesting.  I am also working tracks with DJ Shift and the new single “Painkiller” is dropping at radio in the next month depending on the label.

CW Artist Relations:     In general, what are your thoughts on SONAR’s updates this year?

Luigie:     Every release has been rock solid.  Honestly though, at first, I was reluctant.  I have to have a stable platform because I am constantly delivering, and one technological mishap could be disastrous.  Cakewalk is onto something with the monthly updates.  Every release has been better and more efficient.  I haven’t had any problems with stability, and I really look forward to the new features every month.  Every release so far has been great, but this month’s Jamaica Plain release was a game-changer for me with the new Patch Points and Aux tracks

CW Artist Relations:     How are you using Patch Points and Aux Tracks?

Luigie:     I’m already using them a lot, and I am already hearing a difference in my mixes from the different ways I can control things.  The possibilities of what I am going to be able to do creatively will be endless really, but right now I am primarily using them for control in a few different ways.  I use VCA’s, and I do a lot of layering in general, so having the ability to route kick layers and synth layers helps me balance signals so that I don’t overload my channels.  It’s basically giving me a lot more control in general.  One specific example using Patch Points is when I use Turnado, Stutter edit or any other special effects.  Now I can use Patch Points to affect only the signals I want without affecting a whole bus; but rather just the tracks I route to the new patch point.

CW Artist Relations:     What else comes to mind for new features that you are using?

Luigie:     I have to say, upsampling is one of my favorite features as well!  Now having it on playback is even better!   Sometimes you hear the difference, and sometimes not… But that’s because not all plugins support up-sampling, and some already do by default.  There are instances where it actually helps a lot and you can certainly hear it especially when I use fancy EQing on the reverb returns.  In some cases, I’ve noticed about a 20% improvement on my mixes.  They tend to have more air, depth and clarity when I take advantage of upsampling. 

Click here for more information on SONAR Jamaica Plain Release

Click here to try SONAR for fee


Improving Your Synth Sounds With Real-Time Upsampling

By Craig Anderton

Some plug-ins and virtual instruments sound better when recording at sample rates higher than 44.1/48 kHz because high audio frequencies can interfere with lower clock frequencies, which causes foldover distortion. This adds a “wooliness” at lower frequencies, and can also compromise high-frequency response. Plug-ins that include internal oversampling do not have this problem, but not all plug-ins—particularly older ones—use oversampling.

The Foxboro update introduced Upsample on Render, which provides the benefits of using higher sample rate processing even in 44.1 kHz or 48 kHz projects by internally 2X up-sampling plug-ins of your choice, rendering them as audio, then down-sampling the rendered audio back down to the original sample rate. While it may seem counter-intuitive that the audio quality from rendering at 96 kHz is preserved at lower sample rates, the lower sample rates have no problem reproducing signals in the audio range, and by rendering at 96 kHz, the problematic frequencies no longer exist.

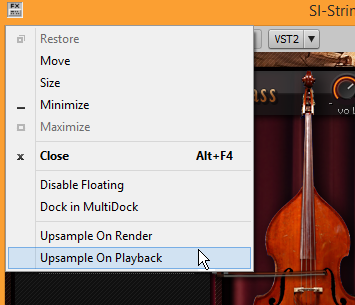
The Jamaica Plain update now offers Upsample on Playback, so you can preview and compare the difference in real time. To enable either Upsampling on Render or Upsampling on Playback on a per-plug-in basis, click the FX button to the left of the instrument name in the virtual instrument interface.

SONAR Upsample On Playback Option

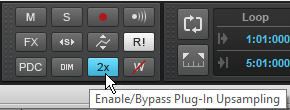
To turn Upsampling on or off globally for plug-ins that have Upsampling enabled, use the 2X button in the Control Bar’s Mix module.

SONAR Plug-in Upsampling

Universal Routing Technology 202: Unlocking the Creative Potential of the Aux Track

By Craig Anderton

Here are some representative applications for using Patch Points and Aux Tracks. There are often several ways to accomplish the same functionality, so use whichever is most comfortable. For example, if you already have existing tracks that you want to connect to Patch Points, it’s probably easier to assign their inputs to Patch Points than create new Aux Tracks. However, if you’re setting up a new recording scenario, it will probably be easiest to create an Aux Track as that will create both a track and a Patch Point assignment.

Application #1: Recording the Metronome to a Track

Note: If your project already contains a Metronome bus, skip to step 7.
  1. Choose Insert > Stereo Bus to create a new bus for the audio metronome.
  2. Rename the new bus to Metronome.
  3. Choose Edit > Preferences > Project – Metronome.
  4. Select the Recording check box and clear the Playback check box (you will hear the recorded metronome instead during playback).
  5. Select “Use Audio Metronome.”
  6. Click the Output drop-down menu and select the bus named Metronome, then click OK to close the Preferences dialog box.
  7. Click the Metronome bus’s Output control and select New Aux Track on the pop-up menu.
  8. Arm the Aux Track for recording.
  9. Begin recording.

Continue reading “Universal Routing Technology 202: Unlocking the Creative Potential of the Aux Track”

Universal Routing Technology 101: Improving Your Workflow With Patch Points

By Craig Anderton

Cakewalk has been quietly developing a Universal Routing Technology that gives tremendous flexibility when routing signals within SONAR. One of the first examples was the FX Chain, which provided a “container” for routing effect inputs and outputs together, and had the intelligence to disconnect controls if the effects being controlled were removed. The ProChannel and FX Racks are a basic example of taking the “insert jacks” on mixers to a more flexible level by providing two ways of inserting effects, where one block could be pre or post compared to the other.

Synth recording took the concept another step further by allowing real-time recording of synth outputs, but now Patch Points and Aux Tracks introduce a mind-boggling level of flexibility: you can feed tracks (audio or instrument) into tracks, buses into tracks, sends into tracks, or even (get ready!) tracks, sends, and buses into the same track—and much more. It’s even possible to do something like feed track outputs and bus outputs into an Aux Track, when can then feed with other Aux Tracks and a Send into a different track. This may sound complicated enough to make your head explode, but it’s all implemented in a smart, intuitive way that not only adds no clutter to the Track or Console view, but even cleans up unused patch points if the routing changes.

Please note: Projects that contain Patch Points and Aux Tracks cannot be opened in SONAR versions prior to SONAR Jamaica Plain (Update 9). If you need to open a project in an earlier version, first back up the project, unassign any patch points, then re-save the project.

For detailed Patch Points information, see the New Features section in SONAR’s online Help.

Creating, Choosing and Assigning Patch Points

When you open a track input or output picker, or a send or bus output picker, you’ll see the option “New Patch Point.” Select this to create a Patch Point. This is also how you pick an existing Patch Point. Continue reading “Universal Routing Technology 101: Improving Your Workflow With Patch Points”

Five Reasons Why Patch Points Rock

By Craig Anderton

Looking for some advanced, interesting, or downright weird ways to use the new Patch Points feature? Here you go:

Signal Splitter

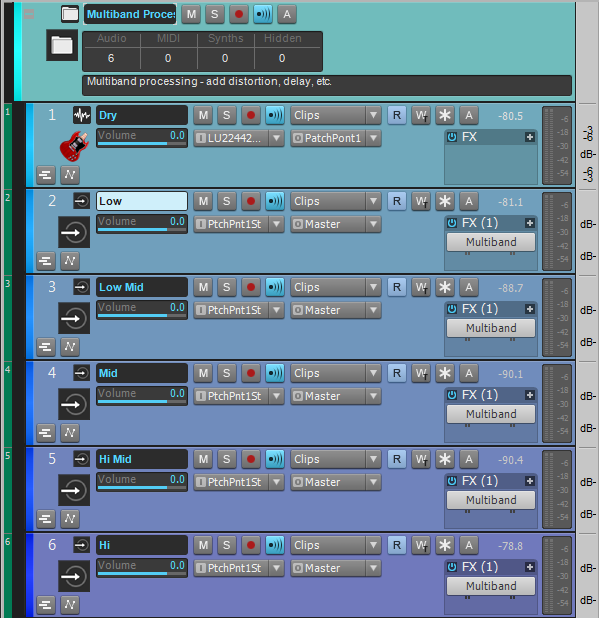
Suppose you want to split one track to several outputs, for example to do multiband processing. Here’s how:

SONAR Patch Points Splitter

The Dry track output goes to Patch Point 1 instead of the master bus. Five tracks, each of which filters a different band of frequencies, have their inputs set to Patch Point 1. The Dry track now feeds all five channels simultaneously. Placing all these tracks inside a track folder makes it easy to fold them up when you want a tidier setup.
Continue reading “Five Reasons Why Patch Points Rock”

SONAR Professional Giveaway on Equipboard

Equipboard SONAR Professional Giveaway

This month, Equipboard will be giving away a copy of SONAR Professional to 4 lucky winners.

Equipboard is a community of musicians and music fans, building the world’s largest database of artists and the gear they use. For a chance to win, just submit music gear for any artist on Equipboard between October 1 and October 14. Each submission will count as its own entry, so you can improve your chances with ease! The first 2 winners will be selected on Thursday, October 8, then the next 2 winners a week later on Thursday, October 15.

If you win, you’ll not only receive SONAR Professional – unlimited and highly powerful recording and mixing software – you’ll get all the bells and whistles too! That means a fully unlocked copy of Melodyne Essential, Addictive Drums 2 Solo, the Nomad Factory BlueTubes plugin bundle, and more! For a comprehensive list of everything included in SONAR Professional, click here.

Well, what are you waiting for? Go Sign Up or Log In to Equipboard and start submitting!

5 Tools To Get "That Analog Sound" From SONAR

With the advent of digital audio, some feel a certain quality associated with the analog signal path has been lost. While that may have been true at one point, analog emulations have come a long way since first introduced. Let’s find out how to add that “analog sound” using some of SONAR’s plugins. (Note: Many of the following examples use features are exclusive to SONAR Platinum, so if you don’t already have this version, you can try a free demo by clicking here.)

#5 – ProChannel Tape Emulation

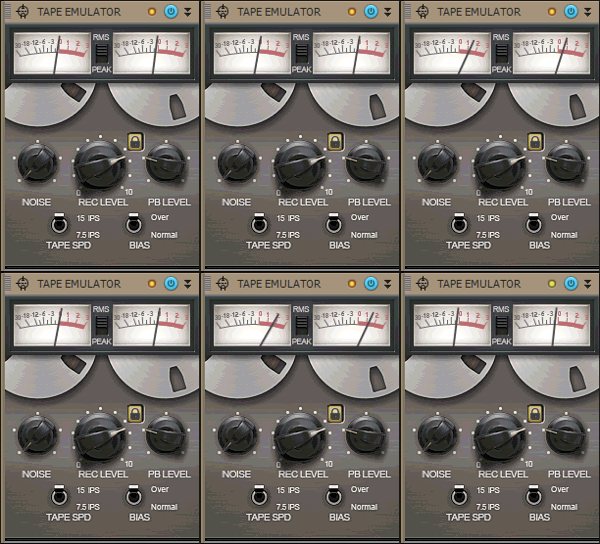
Tape Emulator Gif

Tape does some pretty magical things to audio, so SONAR Platinum includes tape emulation as a ProChannel module. Best  of all,  you can use it as much as you like without having to clean the heads!

Here’s how tape emulation enhances the sound:

  • Emulates the “head bump” of analog tape to enrich the low end, adding subtle warmth
  • Smooths response by slightly rolling off lowest lows and highest highs
  • Increases sustain by smoothing peaks
  • Saturates the signal in a non-linear, analog manner
  • Optionally introduces high-frequency hiss

For a basic application, insert the Tape Emulator in the Master Bus ProChannel. You’ll immediately hear a more cohesive mix. Increasing the REC LEVEL increases the overall saturation. The REC LEVEL knob, TAPE SPD switch, and BIAS switch all interact in unique ways, so try out different combinations to hear how they affect each other.

After hearing how the Tape Emulator affects your sound, try applying it to individual tracks (your drums will sound particularly fabulous). This will be a more subtle effect, adding a sense of depth to the overall mix.

Continue reading “5 Tools To Get "That Analog Sound" From SONAR”

Using Cakewalk Drum Replacer: The “Right” Way and The “Other” Way

The “Right” Way:

There’s more than one way to use Drum Replacer to trigger your drum sounds. Which of these you choose will depend on the material, as well as your preferred outcome and workflow. First, let’s take a look at some of the intended, more traditional uses of Drum Replacer.

A mixed drum track or loop

A fairly standard Drum Replacer use is to augment or altogether change the drum sounds on an already-mixed drum track. The examples below play an unprocessed SONAR drum loop, followed by the same loop reinforced by Drum Replacer.

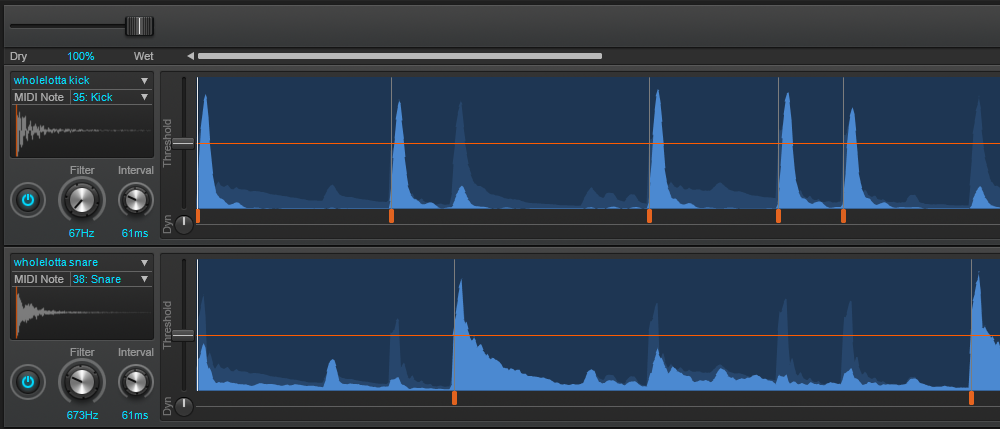
Filtered Drum ReplacerWith the built-in filter mechanism, it’s easy to isolate each piece of the drum kit and replace it individually. For this particular loop, focusing the filters to 67 Hz for the kick and 673 Hz for the snare ensured replacing the right sound. I wanted to soften this already-punchy loop by replacing the kick and snare sounds with something a little more “airy,” then blending these with the original. I chose the included WholeLotta Kick and WholeLotta Snare samples for their lighter, more pillowy qualities and blended them roughly 70/30 with the original drum track. Combined, they create a pleasantly complex, tight-yet-sustained sound.
Continue reading “Using Cakewalk Drum Replacer: The “Right” Way and The “Other” Way”