Introduction
Equalization is one of the most powerful tools that an audio engineer can get their hands on. Live engineers, post-production engineers, and recording engineers all have their specific uses for it. It’s so powerful that some beginner engineers habitually reach for it without understanding what it can ultimately do to a mix.
Overview
Let’s resonate on the concept of volume momentarily. It is in our human nature to enjoy music at high volume levels. Concerts are a great examples of this. Outdoor festivals and the like tend to blast our eardrums with massive amounts of volume that we cannot experience in any other format. To most, increasing volume directly correlates to better sound. In a mix setting, dramatically boosting various frequencies can be a crutch for inexperienced mix engineers. By increasing the gain of a specified frequency band on an EQ one can subsequently add unwanted gain to the overall mix. Typically the problem that follows is a battle to keep your master fader from clipping and you all of sudden feel stuck in a gain-staging paradox. This can happen to best of us.
In Use
Apply subtractive EQ techniques to your instruments. Instead of boosting your favourite signals try limiting yourself to cutting. We can call this concept “carving”. Let’s take a look at a musical example. This series of articles will demonstrate some key elements of a typical Rock Mix.
Snare
Generally the snare is the focal point of a typical rock oriented mix. I’ve started with all my faders down and raised the snare to a suitable level: 0dBu. This recording was tracked with two snare microphones. The bottom snare microphone captured the sizzle of the snare and the top microphone captured much of the attack.
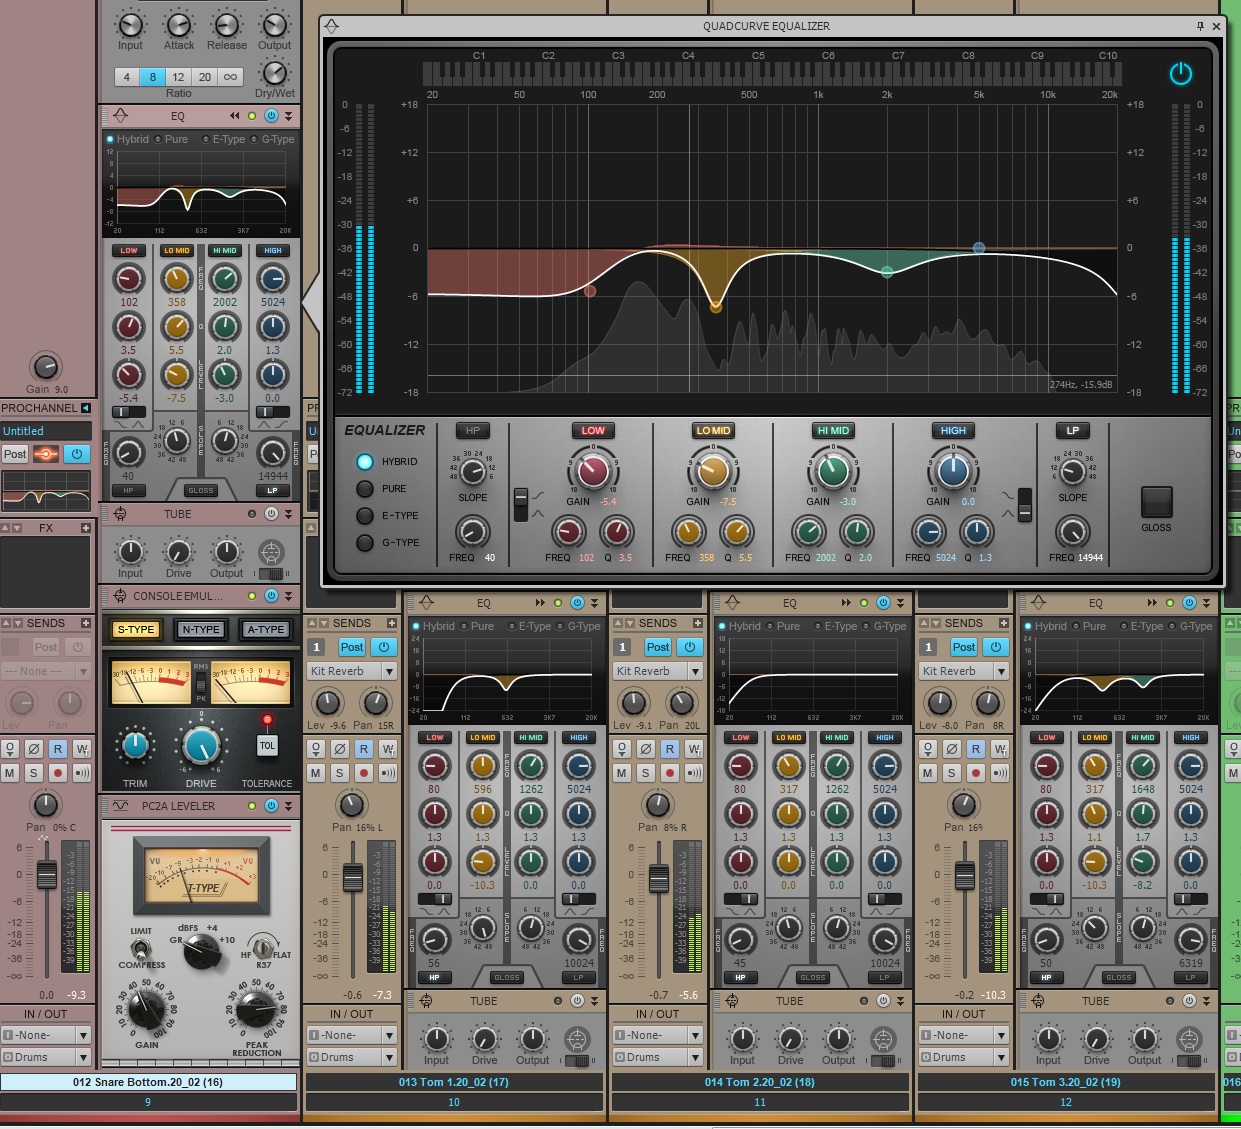
The first drawbacks I noticed when isolating the snare recordings was the amount of kick drum and cymbals that were captured. The drums were recorded in a small room with minor acoustic treatment so the initial reflections from behind the drumkit, low ceilings, and the neighboring walls caused more bleed into the snare microphones than what I may have wanted. To remedy this, I started by attenuating the lower frequencies on both the top and bottom snare microphones to filter out any bleed from the kick drum. The snare top microphone’s HPF was applied at 78Hz and the snare bottom microphone’s Low Shelving EQ band was set to 101Hz. This does not isolate the sound of the snare from the kick but rather strips the snare signals of those low end characteristics. These characteristics become more present during the mastering process so it is important to carve out the sound now.
After that some filtering was applied at the top end of both tracks to reduce some splash from the cymbals. The snare top microphone’s LPF tapered off at 12.7kHz while the snare bottom microphone’s LPF was applied a bit higher around 14.9kHz. Targeting a problematic frequency requires that you listen with your eyes closed. Many of us are guilty of listening with our eyes rather than actually looking away from the computer monitor and focusing in on the sound. In my opinion these filter cuts start right where the sound of the snare begins to suffer and the cymbals do not become too obviously filtered from the signal.
Lastly, I applied a massive cut at 313Hz on the snare top signal and another on the snare bottom around 357Hz. There is an attractive thick response between 78Hz and 313Hz and again between 101Hz and 357Hz . By cutting I have effectively exposed that thick response instead of boosting that entire spectrum. In addition, I felt that the snare bottom signal resonates nicely around some of the sibilant frequencies as well as the high mid range. To enforce those frequencies, I scooped -3dB of gain at 2kHz to enforce the frequencies in the 5 – 6kHz and 400Hz – 1.5kHz range.
Learn more about SONAR X3 and the Quad Curve EQ & Zoom with Analyser.
Read Part 2: Subtractive EQ for Guitars


6 Replies to “Subtractive EQ Part 1: Snare Drum”
Comments are closed.