Intro
XLN Audio has mastered the art of sampling with their flagship program Addictive Drums. Not only have they been able to capture three incredible kits (standard in full version), but they allow the user complete control over the samples with an in depth effects engine. At first listen the provided presets speak for themselves, but as a power user you should not rely on the presets to define your sound. Let’s take a look at how much control you, as the user, have over the Snare drum and how that can benefit you.
First off, where does a great Snare sound come from?
The answer is easy, it comes from a great snare drum. A drum that is in tune, has a good balance of midrange and high-end, and is properly in phase with the rest of the drum set will always produce good results. A “great” snare sound can be subjective in the music world because many people have their own ideals and opinions about styles. The tactics and techniques used for capturing that snare drum is where the “magic happens” so to speak. XLN Audio provides three solid drum sets with three different kinds of Snare Drums.
Control, Control, Control!
Open up Addictive Drums, solo the Snare, and drop in a simple set of 4 hits and set them to loop mode. Like so:
Let’s take a look at the different options you have within Addictive Drums for creating a great snare sound. By selecting the EDIT tab on the right side of the application you enter the integrated mixing engine that Addictive Drums provides.
Sampler
To the left we have the sampler, this is where you can easily select every drum of your drum set. For this article, the Sonor Designer Snare is selected.The Sampler part of the EDIT tab houses two powerful tools for mixing and shaping your Snare sounds. On either side of the of the image of the snare there is a separate panning and mixing setting for both the Overhead and Room microphones. The two sliders are the adjustments for Pan and the knobs are the adjustments for the amount of Snare that can be heard in the Overheads and Rooms.
What’s the benefit?
With the click of a mouse you can narrow out your snare drum or completely eliminate it from either Rooms and Overheads. Snares are mostly recorded in mono, but the OH and Room microphones are what gives snare recordings the “stereo image” and professional sound that most records go for.
Check out the differences between the Snare by itself, with the Overhead microphones, and with the Room microphones.
By itself, the Snare drum sounds underwhelming. All of that changes once you add in the ambient microphones. It’s safe to say that a lot of the Snare that you hear on your favorite chart topping hits mostly comes from the Overhead microphones, various room and ambient microphones, and some form of reverb. Experiment with different panning and level schemes and then save your presets for later use.
Pitch
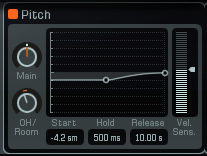
This part of the EDIT tab in Addictive Drums raises the bar as far as pitch control is concerned and offers up a plethora of possible configurations.
What’s the benefit?
Tuning drums to different pitches can become cumbersome, especially if you want to do this for most of your drum sounds. The advantage to having something like this inside of your Soft Synth saves you time and effort when comparing and contrasting between different pitches.
Addictive Drums allows you to tune the Snare in the Overheads/Rooms and itself separately. Clashing frequencies are what make up a lot of clangorous and percussive sounds so having the ability to layer differently tuned signals of the same source on top of one another is a step into the world sound design. The Pitch processing in Addictive Drums can respond to velocity and has an envelope for Start, Hold, and Release so that you can shape how the pitch affects your signal over time.
Here are some examples of this tool in action:
Test out different pitches next time you’re mixing your Addictive Drums into a song. Sometimes changing the pitch of the Snare drum makes it sit right where you need in your mix.
Volume
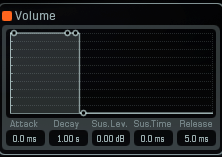
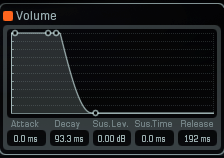
Volume in Addictive Drums is an envelope for the Snare transient. This envelope shapes how the Snare’s decibel level is perceived over time. These are typically broken up into 2, 3, or 4 parts. Addictive Drums labels these parts as Attack, Decay, Sustain, and Release.
The Attack of the Snare, what does that mean?
Once that Snare head is hit the the rest of the sound happens in less than a second. Within those first few milliseconds the wood, tension of the head, tuning of the head, and snares on the underside of the drum all create an array of complex overtones in one burst of sound. Attack refers that moment that the Snare is hit with the drum stick.
A fast attack is pretty much what all of the previous examples sound like in this article, but for an easy comparison here are the differences:
The volume ramps upward and does not produce any explosive sound when the attack is set high.
What is Decay?
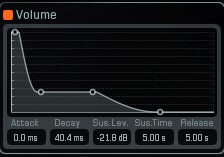
Decay is the amount of time between the initial attack of the Snare drum and the Sustain. You can use this to dynamically shape the Attack of the Snare much like you would use an Expander. It works together with the Sustain level to help carve out the body of the sound of the Snare.
The following sound examples outline it’s responsibilities on Snare Drum.
(Dynamically using the Sustain and Decay at the same time)
Notice how with the Decay set to “5ms” the only thing that is exposed is the short clicking of the Snare drum. That is the initial Attack isolated by itself without any Sustain.
What is Sustain?
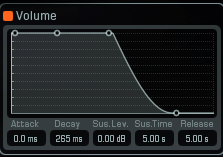
Sustain, in reference to the sound of the Snare, is the body and tone of the Snare drum after it’s been struck. In Addictive Drums you can set both time and decibel levels for Sustain.
Notice how the sound cuts off abruptly when the Sustain is set shorter? This part of the volume envelope can produce gated effects when dialed in correctly.
Last but not least, Release.
By definition, Release is the amount of time between the Sustain Level and 0dB. Because the Snare itself has a natural release, adjusting it makes for a faint effect. There are minute difference between these examples:
Snare
To the left of the insert effects, there is an image of a Snare drum with two microphones above and below it. These represent the common mic’ing techniques for Top and Bottom Snare.
What’s the benefit of this parameter?
Instead of causing the application to have an overwhelming amount of outputs, Addictive Drums gives you the option to blend between microphones in every instrument that has multiple mic positions. This is particularly useful on the Snare because of the drastic differences of the two microphones. One captures the sound of the stick hitting the snare while the other captures the sound of the snares sizzling under the drum. The sizzle (as you might have guessed) is full of high end while the top snare microphone is duller in comparison, but don’t worry there is a mix button called “Buzz” for this parameter if it’s too much. These differentiating tones produce a keen balance of a single Snare drum and once mixed with the rest of the kit, the sound of your Snare begins to take shape.
Wrap Up
In short, these are the primary parameters that you will want to start messing with once you dig into Addictive Drums. Finding your own sound will start to distinguish your sequences over others who depend out of the box presets. Be adventurous and explore! Part 2 covers the rest of the mixing effects that are included in Addictive Drums. Read Knowing Your Effects in Addictive Drums Part 2.
Check out some more Drum Production Tips on The Cakewalk Blog:
SONAR X3 QUICKTIP: DRUM REPLACEMENT WITH ARA INTEGRATION AND ADDICTIVE DRUMS (PRODUCER)
SONAR X3 QUICKTIP: FOCUS THE LOW END OF YOUR KICK AND SNARE WITH A PROGRAM EQ








One Reply to “Knowing Your Effects in Addictive Drums Part 1 (SONAR X3 Producer)”
Comments are closed.