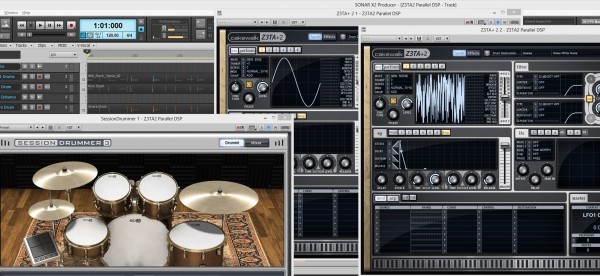
SONAR X3 Producer: Can You Ever Have Enough Virtual Instruments?

If you love virtual instruments then you’ll be happy with your upgrade to SONAR X3 Producer. We’ve got instruments for every use case, skill level, and genre of music. Who needs a band when you’ve got SONAR X3’s array of instruments at your disposal.

1. Addictive Drums

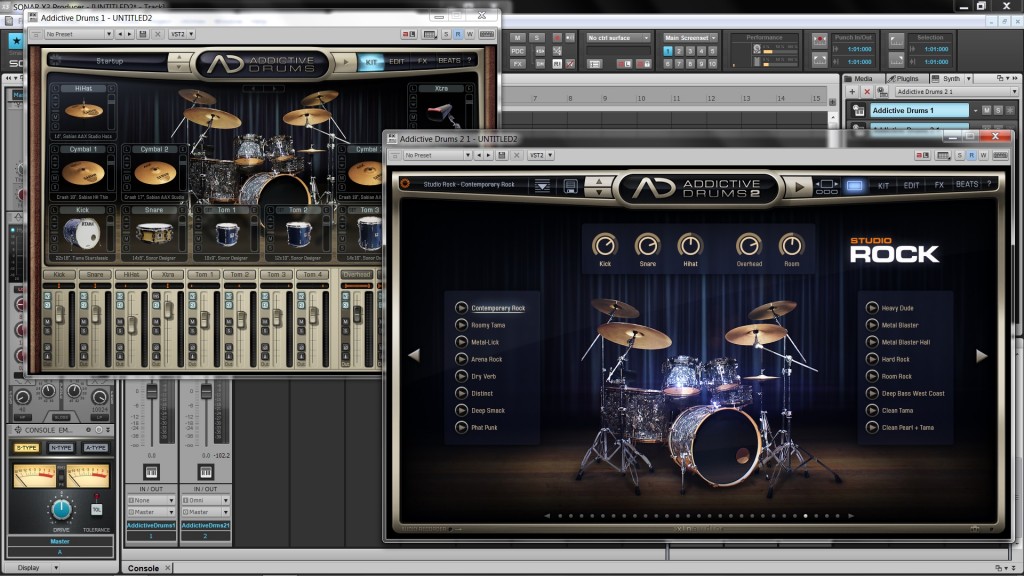
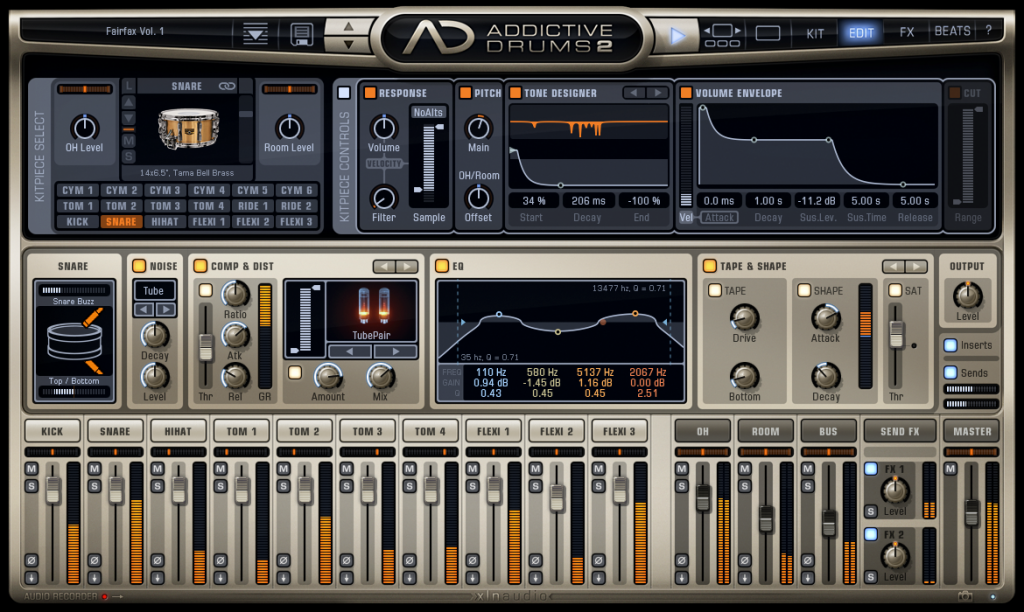
Hailing from the beautiful city of Stockholm – XLN Audio brings Cakewalk users a bountiful set of sounds inside of their flagship program Addictive Drums. The program consists of some of the best drum samples that you could possibly get that are completely optimized for both hardcore and first time users.

2. Dimension

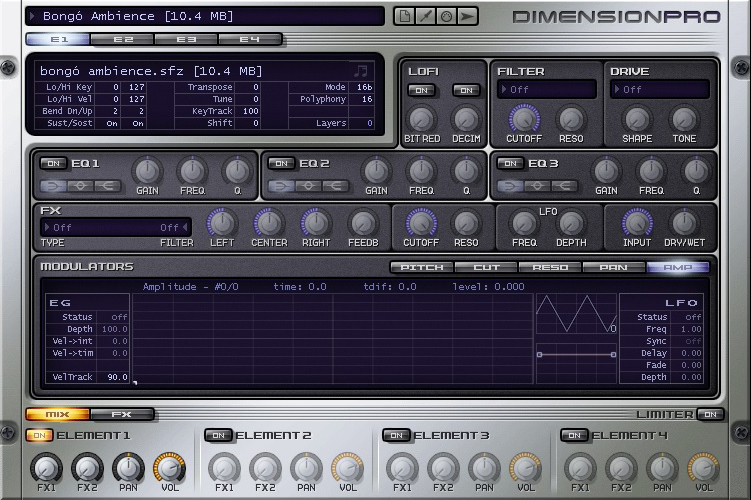
A classic in the Cakewalk world. Dimension is a powerhouse sample based virtual instrument that can play extensive libraries consisting of drums, guitars, strings, etc. Continue reading “SONAR X3 Producer: Can You Ever Have Enough Virtual Instruments?”

A New Way To Learn Synthesis – Syntorial: Z3TA+ 2 Edition

Syntorial Z3TA+ 2

Syntorial: Z3TA+ 2 Edition – A New Way To Learn Synthesis
Syntorial is video game-like training software that will teach you how to program synth patches by ear. With almost 200 lessons, combining video demonstrations with interactive challenges, you’ll get hands on experience programming patches on a built-in soft synth and learn everything you need to know to start making your own sounds with ease.

Now comes with over 3 hours of Z3TA+ 2 video lessons!

Learn more and try it for free
 

Ben Cantil on Z3TA+ 2 – Teaching Synthesis & Sound Design at Berklee Valencia

We recently had the opportunity to catch up with our friend Ben Cantil (aka. Encanti) – EDM Producer, author of the Mutant series Expansion Packs, and evangelist for Z3TA+ 2.

Who is your Masters Sound Design Course at Berklee Valencia geared towards?
I am working with young professionals from all walks of life who have come to Berklee Valencia to earn their Master’s degree, especially as part of the Music Technology Innovation program. My curriculum emphasizes practical and professional applications of creative music software. Some of these students will become sound designers, but many others will become engineers, stage musicians, film scorers, and installation artists, so I try to find common threads to make the content really relevant and useful no matter where you take your skills outside the classroom.


What are your goals for the students in your class?
This course is all about the fundamentals of sound design. The first goal is to equip students with creative and technical skills for generating sounds from scratch, emulating sounds, and composing unique sonic gestures intuitively. Another goal of this course to produce content using a variety of different medians. I think it is an ideal class for anyone that learns best from hands-on experience.


What are some of the Cakewalk Products being used in your class?
Z3ta+ 2 is a major part of my masters sound design course. We spend several weeks building patch libraries and sequences to make the synth really sing. I’ve found this is the ideal plugin to use when teaching synthesis, because it’s so unrestrained and versatile without being a processor hog.


Understanding Virtual Instrument Routing in SONAR

by Dan Gonzalez

Are you new to SONAR? Well then this article is for you!

SONAR acts a bit differently than some of it’s competitors – especially when it comes to inserting, routing, and using virtual instruments. Let’s take a look at the way these work inside of SONAR:

1. You can insert a virtual instrument in a few different places within SONAR

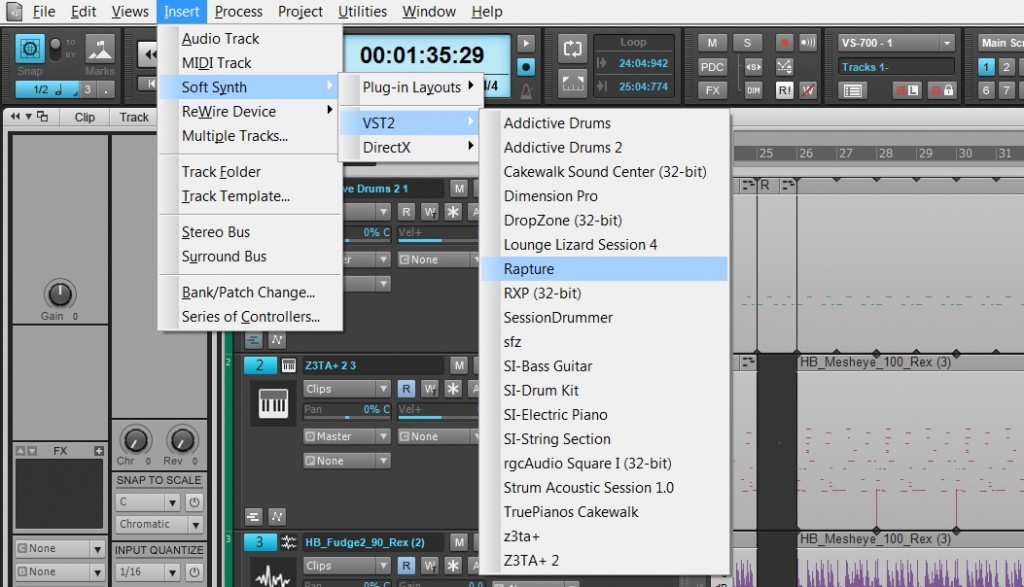
The first way is by selecting from the main menu along the top of SONAR: Insert > Soft Synth > (type of plugin) > (plugin)

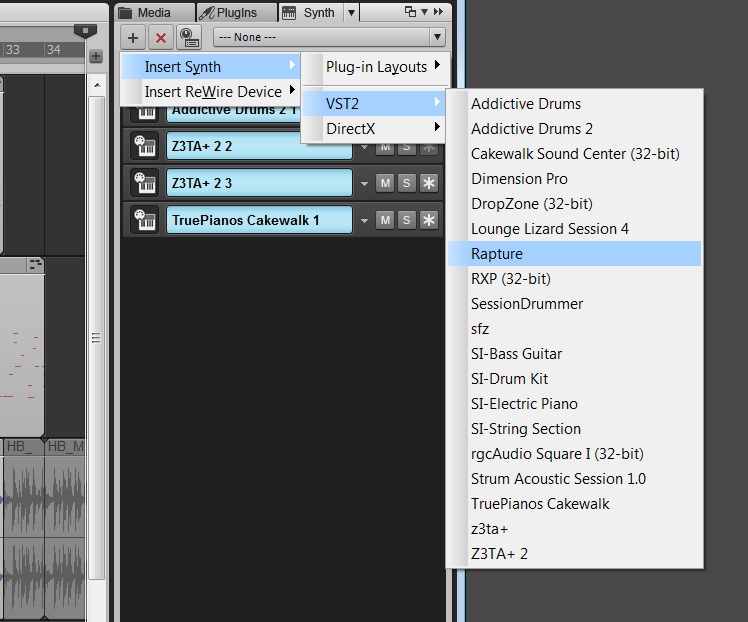
Another useful way is to use the Synth Rack and click on the “+” button. This will expose a similar list.

Lastly, one of the quickest and easiest ways Continue reading “Understanding Virtual Instrument Routing in SONAR”

Virtual Instruments: 5 Tips For The Z3TA+ Junkie

Here are some of our favorite Z3TA+ tips and videos from our archive:

1. EDM Production – Enhance Your Drums with Z3TA+ 2

  • Insert two instances of Z3TA+ 2.
  • Copy your drum sequence to both Z3TA+ 2 tracks.
  • Isolate the Kick on one track and the Snare on the other.
  • Setup the first Z3TA+ 2 to generate a Sine Wave for the Kick.
  • Setup the second Z3TA+ 2 to generate White Noise for the Snare.
  • Adjust the Amplifier Envelope to match the duration of each hit.
  • Within Z3TA+ 2 add Reverb, Compression, and EQ.
  • Mix in under your existing Drum Loop.

2. How to Customize Z3tA+ 2’s Stock Arpeggios

Z3TA+ 2 comes packed with a massive pool of MIDI programs that power it’s internal Arpeggiator, but why stick to the stock programs when you can make your own?

Here’s how:

  • Open Z3TA+2 and activate the Arpeggiator Section
  • Right-Click on the sequence in the arpeggiator and make sure the following are checked
  • Auto Disable Pattern When Dragged to Host
  • Auto Fit Patterns to One Measure When Loaded
  • Load one of the Arpeggios from the Pattern menu
  • Drag and Drop the Arpeggios right into SONAR X2
  • Edit the MIDI Clip to your liking
  • Go to File > Save As
  • Select MIDI 0 in “Save as type”
  • Go to C:\Cakewalk Content\Z3TA+ 2\MIDI Arpeggios and Save it
  • Load it into Z3TA+2′s Arpeggiator by going to Pattern > Load MIDI File…

3. How to create a bass synth with Z3tA+ 2

Who doesn’t like bass? Especially synth bass. Z3TA+ 2 is the answer to all of your sound design needs especially when you are looking to improve your production in the low end. I’ve put together a short tutorial on how to make a simple bass synth inside of Z3TA+2. Once you understand how everything works together you’ll be able to really start to make this plugin work for you.

Picking the right Oscillators

Within Z3TA+2 the first section you need to start working with is the OSC section. First I’ve selected two different square waves for OSC 1 and 2. They were Vintage Square 1 and Vintage Square 2. When creating a bass synth you need to make sure that your patch will not break up in the low end so be sure not to drop the octaves on the individual oscillators too low. I typically set mine to -2 at the most. Once you get to a certain range the instrument will sound weak and lose it’s driving Bass Synth sound

[READ THE REST OF THE TIP HERE]

4. [VIDEO] Digital Sound Factory Z3TA+  Sound Design

5. [VIDEO] Mixing and Mastering a song using only the Z3TA+ effects engine in SONAR

5 Awesome Virtual Instrument Tips in SONAR

With thousands of features, workflows, and settings,  even the most hardcore user can miss out on something awesome buried in SONAR. It happens to the best of us. So we’ve put together 5 quick and easy features that can improve your workflow as well as your creativity with Virtual Instruments and Synths. Check out the video here:


Try SONAR free for 30 days

Recording Virtual Synthesizers: The Art of Imperfection

Synths can make perfect sounds…but is that always a perfect solution?

by Craig Anderton

Recording a virtual instrument is simple…you just insert it, hit a few keys, and mix it in with the other tracks. Right?

Well…no. Synthesizers are musical instruments, and you wouldn’t mic a drum set by taking the first mic you found and pointing it the general direction of the drummer, nor would you record an electric guitar by just plugging it into a mixing console. A little extra effort spent on avoiding an unnatural sound when mixing synths with acoustic instruments, improving expressiveness, tightening timing inconsistencies, and other issues can help you get the most out of your virtual instruments.

But first, remember that “rules” were made to be broken. There is no “right” or “wrong” way to record, only ways that satisfy you to a greater or lesser degree. Sometimes doing the exact opposite of what’s expected gives the best results. So take the following as suggestions, not rules, that may be just what the doctor ordered when you want to spice up an otherwise ordinary synth sound.

THE SYNTHESIZER’S SECRET IDENTITY

The paramount aspect of recording a synth is to define the desired results as completely as possible. Using synths to reinforce guitars on a heavy metal track is a completely different musical task from creating a all-synthesized 30-second spot. Sometimes you want synths to sound warm and organic, but if you’re doing techno, you’ll probably want a robot, machine-like vibe (with trance music, you might want to combine both possibilities).

So, analyze your synth’s “sonic signature”—is it bright, dark, gritty, clean, warm, metallic, or…? Whereas some people attach value judgements to these different characteristics, veteran synthesists understand that different synthesizers have different general sound qualities, and choose the right sound for the right application. For example, although Cakewalk’s Z3TA+ is highly versatile, to my ears its natural “character” is defined, present, and detailed.

Regarding sonic signatures, perhaps one of the reasons for a resurgence in analog synths sounds is digital recording. Analog synths tended to use low-pass filters that lacked the “edgy” sound of digital sound generation. Recording the darker analog sounds on analog tape sometimes resulted in a muddy sound; but when recording on digital, analog sounded comparatively sweet. Digital also captured all the little hisses, grunts, and burps that characterized analog synths. This is a case where the “imperfections” of analog and the “perfection” of digital recording complemented each other.

Another thought: look at guitars, voices, pianos, etc. on a spectrum analyzer, and you’ll note there is little natural high end. If you’re trying to blend a virtual instrument in with physical instruments, remember that a virtual synth has no problems obtaining a solid high end. Using the ProChannel’s LP filter set to 48dB/octave and lowering the frequency just a little bit can introduce the “imperfection” that matches the spectral characteristics of “real” acoustic and electric instruments more closely, so the synth seems to blend in better with the other tracks (Fig. 1).
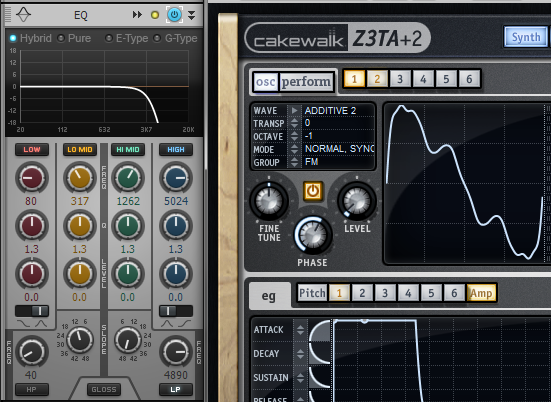
Fig. 1: The ProChannel QuadCurve EQ’s lowpass filter can help digital synths sit better in tracks that use multiple physical or acoustic instruments. Continue reading “Recording Virtual Synthesizers: The Art of Imperfection”

Feature Spotlight: Addictive Drums 2 (Now in SONAR X3 Producer)

In this video we review some of the great new features inside of Addictive Drums 2. SONAR X3 Producer now includes a free upgrade to Addictive Drums 2.

  • New sound shaping and kit building features
  • More legendary drums. New sound engine
  • New rhythm creation and transformation tools.
  • More kitpiece slots,
  • New studio-grade effects (including delay and saturation/distortion),
  • Brand new Tone Designer and Transient Shaper modules,
  • Easy kitpiece linking, and new electronic sounds that can take your drums to exciting new territories
  • Drag-and-drop drum hits and complete loops straight to your music software’s timeline for maximum ease of use.
  • Say goodbye to boring beats. Our new Beats page helps you locate or build interesting beats quickly and to transform existing beats to make them uniquely yours.

The “Punch” Factor with Synthesizers

What exactly constitutes “punch”? Find out here

by Craig Anderton

We all know a punchy recorded sound when we hear it—but what exactly constitutes “punch”? It seems that perhaps punch is something that can not only be defined, but quantified.

This all started because years ago, I wondered why seemingly every musician agrees that the Minimoog has a punchy sound. Then, when I started playing a Peavey DPM3, several people commented that my bass patches had a punchy sound, “like a Minimoog.” Clearly, the technologies are totally different: one was analog, the other digital; one used voltage-controlled oscillators, the other sample playback. Yet to listeners, they both shared some common factor that was perceived as punchiness.

Analyzing a Minimoog bass line revealed something interesting: even with the sustain set to minimum, there was about 20-30 milliseconds where the sound stayed at maximum level before the decay began. There is no way to eliminate that short period of full volume sustain; it’s part of the Minimoog’s characteristic sound.

I then looked at the DPM3’s amplitude envelope and it exhibited the same characteristic—a 20-30 ms, maximum level period of sustain before the decay kicked in. Also, both instruments had virtually instantaneous attacks. Could this combination be the secret of punch?

For comparison, I then checked two synths that nobody considered punchy-sounding: an Oberheim OB-8, which is generally characterized as “warm” and/or “fat” but not punchy, and a Yamaha TG55. Both had fixed attack times, even with the attack control set to zero, that lasted a few milliseconds. I also recalled some experiments ex-Peter Gabriel keyboard player Larry Fast ran in the mid-70s, when he was curious how fast an attack had to be for a sound to be “punchy.” His research indicated that most listeners noticed a perceptible loss of punch with attack times as short as one or two milliseconds.

So it seems the secret of punch is that you need an extremely fast attack time, but you also need a bit of sustain time at maximum level. This sustain isn’t long enough to be perceived as sustain per se; it’s more of a psychoacoustic phenomenon.

Wondering if this same technique worked with other sounds, I took an unprocessed snare drum sound and tried to add punch by normalizing each cycle to the highest level possible for the first 20-30 milliseconds. Comparing the processed and unprocessed sounds left no doubt that the edited version had more punch.

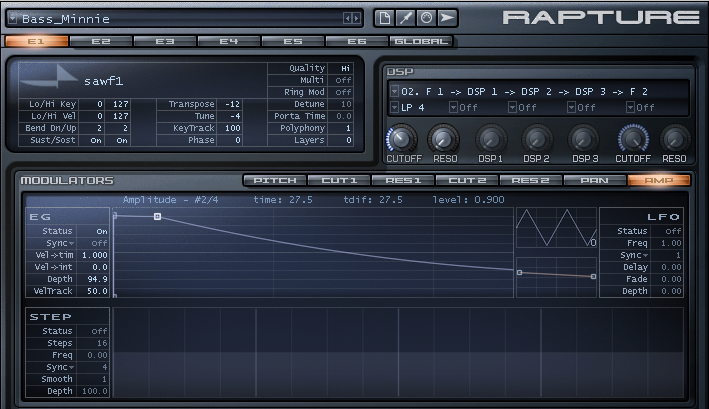
When I designed the Minimoog Expansion Pack for Rapture, I made sure that where appropriate, the envelopes had that characteristic Moog attack (Fig. 1). Note that the second node sustains the sound for 27.5 ms. Rapture’s tight attack time and ability to create “high-resolution” envelopes made it easy to add punch.

Fig. 1: Adding the “punch” factor to a Rapture Minimoog patch. Continue reading “The “Punch” Factor with Synthesizers”