by Dan Gonzalez
Are you new to SONAR? Well then this article is for you!
SONAR acts a bit differently than some of it’s competitors – especially when it comes to inserting, routing, and using virtual instruments. Let’s take a look at the way these work inside of SONAR:
1. You can insert a virtual instrument in a few different places within SONAR
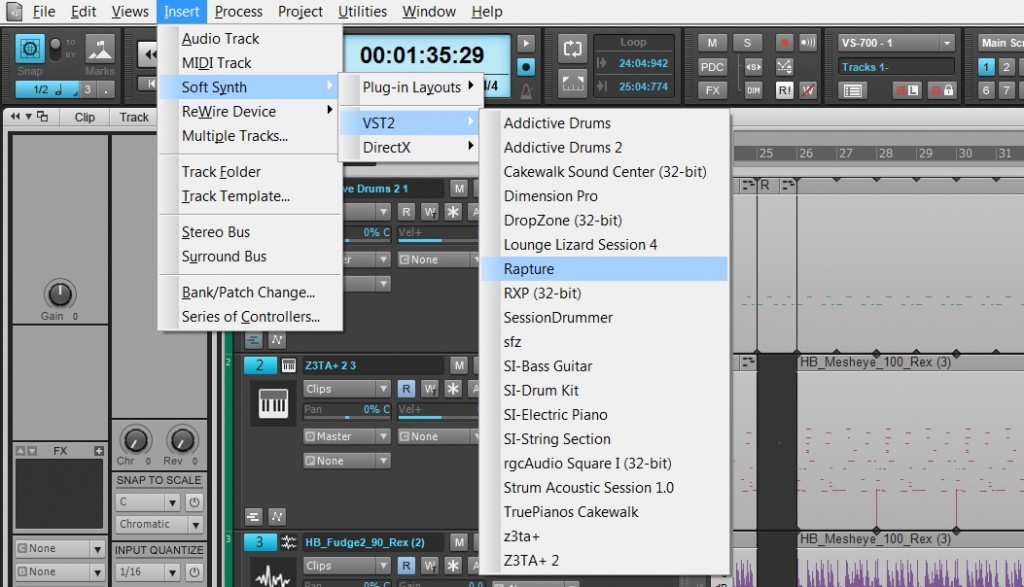
The first way is by selecting from the main menu along the top of SONAR: Insert > Soft Synth > (type of plugin) > (plugin)
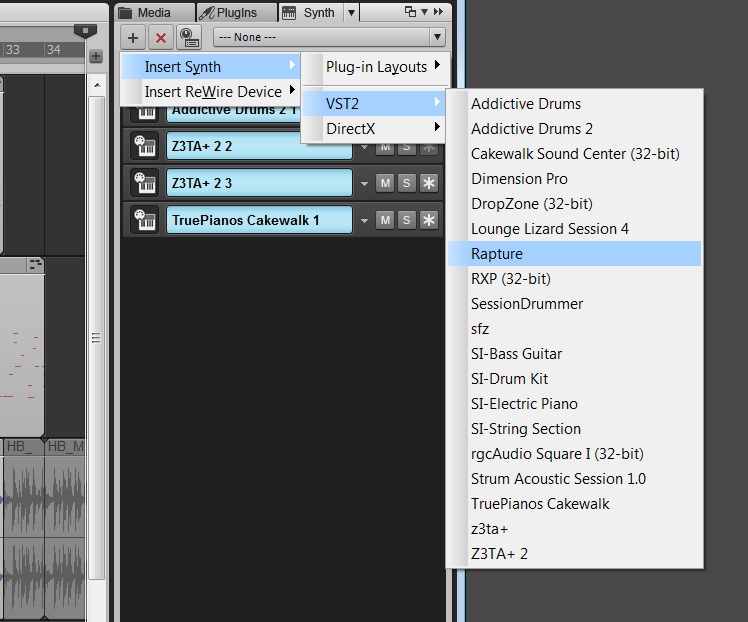
Another useful way is to use the Synth Rack and click on the “+” button. This will expose a similar list.
Lastly, one of the quickest and easiest ways to insert a synth in SONAR is by taking advantage of SONAR’s drag and drop features. Within the Browser go to the Plugins tab > Instruments > (plugin folder) > (plugin) and drag the plugin into the Track View of SONAR. The insert soft synth will appear.
2. Inputs and Outputs are located in 3 places
This is crucial to understanding your DAW regardless of it being SONAR or not. Within SONAR you can access your I/O in a few different places.
The first place is within the Console View. This is where you can see all of your tracks alongside one another and where you’ll spend a lot of your time mixing.
Below the faders (circled in blue) is where the Inputs and Outputs are located. Inputs on top and outputs on the bottom.
The second place where you can locate your inputs and outputs is in the Inspector. You can expose this by selecting “I”.
This has a similar look to the Console View but allows you to access it based on the selected track in the Track View. It even shows you the primary associated bus. Down at the bottom under the faders you have access to your I/O
The last place that you can locate your inputs and outputs is in the Track Pane.
3. Virtual Instruments live INSIDE of the Synth Rack
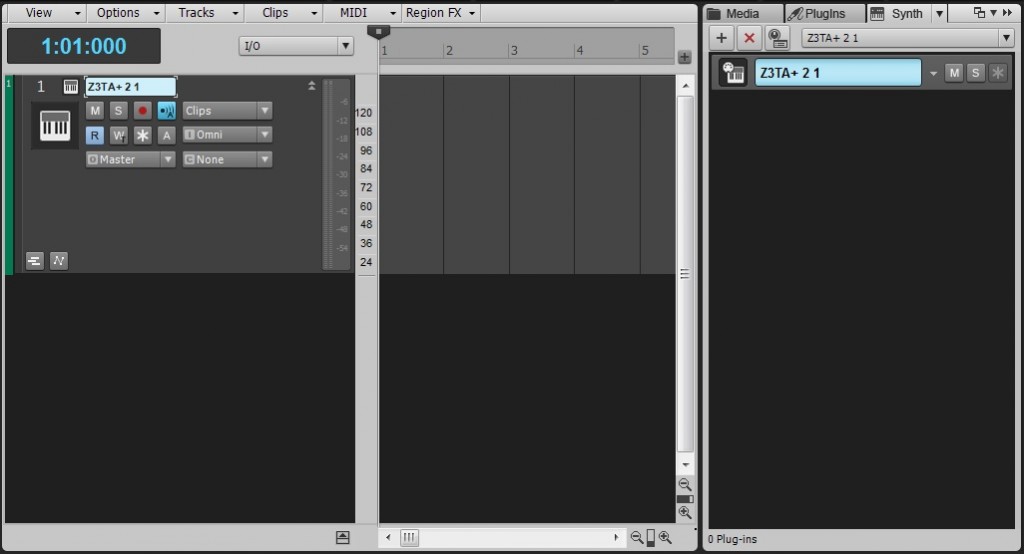
Once a virtual instrument is loaded into SONAR the actual instrument itself resides inside of the Synth Rack. Why? Well it’s because SONAR treats routing from one place to another just like an actual rack of external sound modules. MIDI routes from the MIDI track to the Synth Rack and then returns audio onto an Audio track.
Unlike other DAWs, the synthesizers are not placed in the FX Bin, nor are they set as an input device.
The benefit of this is that you can delete the associated instrument, audio, and MIDI tracks in your track view without having to insert your plugin again. Say you wanted to route multiple MIDI tracks to your synth. All you have to do is insert a MIDI track and then set it’s output directly to the synth. Done. No additional assembly required.
The synth rack also features many parameters that you can choose from to control your virtual instruments. You can Mute, Solo, Freeze, Enable Read/Write Automation and assign your favorite parameters to two rows of macros. You can see some of those outlined in the pictures above.
4. The Insert Soft Synth Menu box isn’t as intimidating as it looks
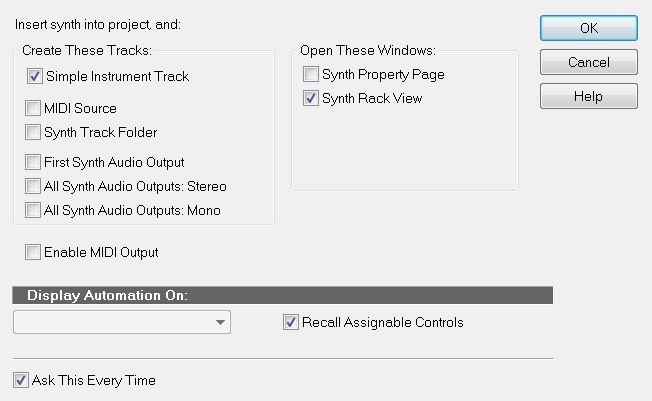
Once you insert a virtual instrument into SONAR there is a box that appears called the “Insert Soft Synth Options”
Simple Instrument Track
MIDI Source & First Synth Audio Output
MIDI Source, First Synth Audio Output, and Synth Track Folder
MIDI Source & All Synth Audio Outputs Stereo
MIDI Source & All Synth Audio Outputs: Mono
Under “Open These Windows”:
- Synth Property Page – When ticked this will open the actual plugin window
- Synth Rack View – With this selected ticked you’ll see the Synth Rack available.
So what does this all mean?
It means that SONAR gives you some serious flexibility when it comes to routing and your synthesizers within SONAR.
Typically I recommend inserting synthesizers as “Simple Instrument” tracks first to understand the relationship between the Track View and and Synth Rack. This is great for single instrument virtual instruments. From here you can easily apply audio effects and edit your sequence with ease.
Inserting a Soft Synth with a MIDI source and First Synth Audio Output will essentially expose what a Simple Instrument Track looks like under the hood.
For the more complex sequences, you can select MIDI Source and one of the All Synth Audio Outputs. If your plugin supports multiple outputs then you’ll have every track that this plugin supports ready and waiting for you. This allows for you to easily create stems from complex drum and orchestral plugins.
5. Can’t hear your Virtual Instruments? Check the following places first.
It all happens to us. So let’s take a look at a few places that you need to check.
First check out your MIDI Preferences. Those are located in Edit > Preferences > MIDI > Devices. Make sure that your connected MIDI Controller actually shows up here and is ticked. If it isn’t here it means that SONAR is not seeing the MIDI Controller you’re using to connect to the virtual instrument. Contact the manufacturer to troubleshoot the issues and make sure your drivers are installed.
After that go to your Inputs and Outputs – which I outlined in # 2. Make sure that your MID Controller is selected from the Input list.
After this, make sure that none of your other tracks or buses are Solo’d. This can accidentally mute the track you’re trying to hear.
Next expose the Synth Rack. Make sure that your synthesizer is not grayed out. If that’s the case it may mean that SONAR may no longer see the plugin anymore. You can go to Utilities > Cakewalk Plug-in Manager to rescan your plugins.
Check out SONAR X3 free for 30 Days here


