by Dan Gonzalez
SONAR Platinum is the newest, greatest, and most advanced version yet. It contains all the tools and accessories that anyone would need in order to produce, mix, master, and compose their own music. In this mixing tutorial I’ll be using SONAR Platinum exclusively to show you the various ways I went about mixing this track.
You can download this project here and following along.
Synths
There are a total of 6 synth tracks in this song. All of them are quite trance-y and bring a unique dance flavor to this song. Let’s take a look at a few of the things I did to the more prominent synth tracks. For the most part this song reminds me of bands like The Killers. Maybe it’s the voice of the singer and the style of drumming but it has that kind of feel to it.
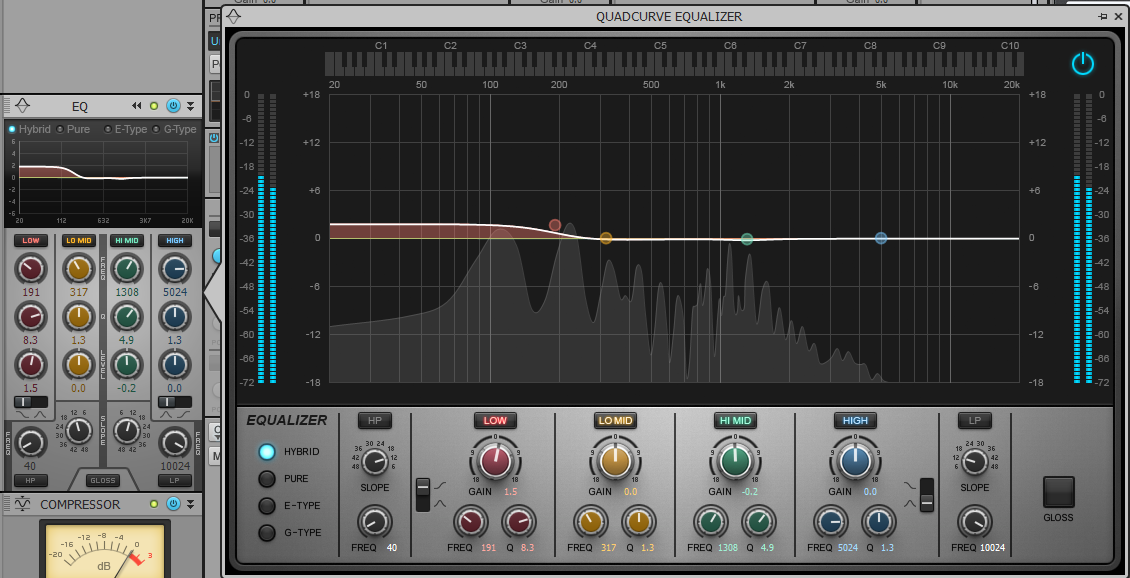
The first synth track that you hear running in the background behind the marching tom hits is a pretty dry track to start with. It’s already processed to some degree but in my opinion needs a little bit of low end and an equal amount of space in the mix. Taking this into consideration I add a low shelf on the Quad-Curve EQ at about 191Hz. This thickens it up a bit so that the song has a strong entrance with the pounding toms.
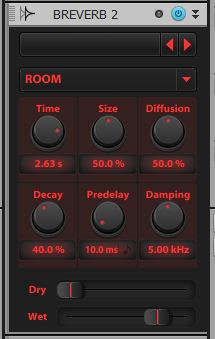
Next, I sent this synth to a bus I declared Synth FX. Within this section I inserted the Breverb ProChannel module and set it to the Room algorithm. In order to use this as a reverb-throw – I reduced the dry signal on Breverb and left wet at 0dB. Since we’re not using the reverb directly on the audio track there is no reason to control the amount of wet vs dry signal that is passing through the reverb. Adding dry signal in the bussed reverb will only add unwanted volume to the synth track. You can see the other parameters in the following screenshot or the supplied project.
How does bussing work?
In order to see the bus section within the console view make sure to lasso and drag the window from the right to the left. Here you’ll see that the faders are blue – indicating that they are slightly different than the audio and MIDI tracks.
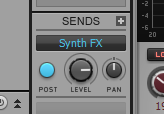
Adding a send is easy. Simply right click the sends section within the console view and choose an existing send or New Stereo Bus. This will insert a new send into the bus section where you can assign effects and prochannel effects. In SONAR, buses are in their own section so that you can keep things organized and fluid.
On your tracks, the sends section has a knob that allows you to increase or decrease the signal going to that bus. It’s called a send because you’re sending audio to another location in your console. In this case, a reverb.
Here you can see one of our fine Skylight updates at work with our Dynamic Sends. Now inside of SONAR we allow you to insert up to as many sends as your window can handle. We have also updated the interface for a clearer viewing pleasure. Feel free to prod, touch, and twist these parameters to your heart’s content.
More Synths
 The track SynthPad2 comes in a few bars into the song and provides some harmonic support for the main melody. Since this synth is also very wide and rich in sound I decided to apply a narrowing effect to this and then place a stereo imager on the previous synth were talking about. All I did was select the stereo interleave button on the audio track to sum it to mono.
Located above the M (Mute) button, the stereo interleave button changes the audio track from a stereo track (which means two audio signals) or dual mono track (2 audio tracks mimicking the sound of a mono track) to a mono track (1 audio signal) and back. By selecting this button I’ve essentially summed the the stereo synth into a mono track track so that it’s right in the center between the SynthPad1.
Next, I shaved off a the low end of SynthPad2 to help it stick out a bit more and not take up any low end. This makes room for the drums and SynthPad 1. This cut was just above 200Hz – where most of the bass and low end really sits. Too much of this frequency and your signals become muddy and too fat.
Up next, we have a track labelled “SynthFuzz” in this session and it’s a pretty large synth sonically. It kicks in during the chorus so it’s importance is rather obvious. I felt that this synth just didn’t have the production twist that it needed to sound right in this track so I employed the help of a few fun effects found throughout SONAR.
First, there’s BiFilter2. SONAR Platinum comes stock with this infinitely creative mixing tool. To fit this underneath the vocal tracks I set it to the Low Pass Moog filter setting and put it right around 8.5kHz. Immediately there is a more aggressive tone to the sound of this synth by taking away some of it’s higher frequencies.
After that, I then added a stereo imager to widen up the already wide synth.
Creating dynamics where they don’t exist using Ducking

Lastly, I wanted to get this synth to move. Move in the sense that it becomes more of a dynamic effect in the background of the chorus while still holding that strong harmonic support for the vocals. I chose to pull out a typical electronic production move called ducking.
By applying the PC4k S-Type Compressor to the SynthFuzz I enabled the use of ProChannel side-chaining. After that I switched over to my Kick track (which we’ll cover in a later part) and inserted a send that goes directly into compressor that I just added via it’s Side-Chain. Afterwards, in order to make sure that the PC4K S-Type Compressor reacts to the kick signal all the time, we must place the send in “pre-fader” mode which is done in SONAR by selecting the POST button the send and turning it grey.
This means that the signal of the kick drum is getting sent out of the audio track before it hits any mutes, solos, or volume faders. This allows us to hear the affected synth without hearing the kick drum.
The side-chain of a compressor is an alternative way to control a compressor. By taking advantage of this second input you’re essentially directing the compressor to reduce levels in volume from another source. In this case, we’re sending the pounding aggression of the kick drum into the side-chain of a compressor that is on a synth. Everytime the kick drum is hit, the compressor squeezes the synth in volume. This give the synth rhythmic qualities instead of long drawn out chords. Solo the Kick track and the SynthFuzz track and you’ll see what I mean.
Stay tuned, we’re going to cover more about this Pop mix in the next article with SONAR Platinum.
Want to learn more about our Dynamic Sends? Check out our Get Started video:


