Singing Tips – Don’t Tax Your Voice Before a Vocal Performance

This post originally appeared on Disc Makers’ blog. Reprinted with permission.

Resting before a vocal performance is key, but environmental things, like being in a place where the decibel level is too high, can adversely affect your capacity to sing.

What makes a great vocal performance? There are many answers to that, and they don’t all require being the most technically gifted singer with a five-octave range. Confidence, charisma, and the right repertoire are among the many subjective elements that go into any great performance – live or when recording vocals in a studio – in addition to having chops as a singer.

“‘Synthesis’ is this fancy word we throw around in our college,” says Daniel Ebbers, Associate Professor of Voice at the Conservatory of Music of the University of the Pacific, “and I do think it’s an important thing. We study all these things individually, but it’s the synthesis, a command of your vocal instrument, a command of the stage, a command of the language and the language you use – all these things synthesized together make a great vocal performance.”

Of course, much of what helps a performer reach the point where all these elements come together is preparation, practice, and experience. A good vocal warm up, and general vocal care, can help ensure peak vocal performance.

Continue reading “Singing Tips – Don’t Tax Your Voice Before a Vocal Performance”

DAW Best Practices: 11 Easy Tips For Project Organization

1. Categorize your tracks by Color

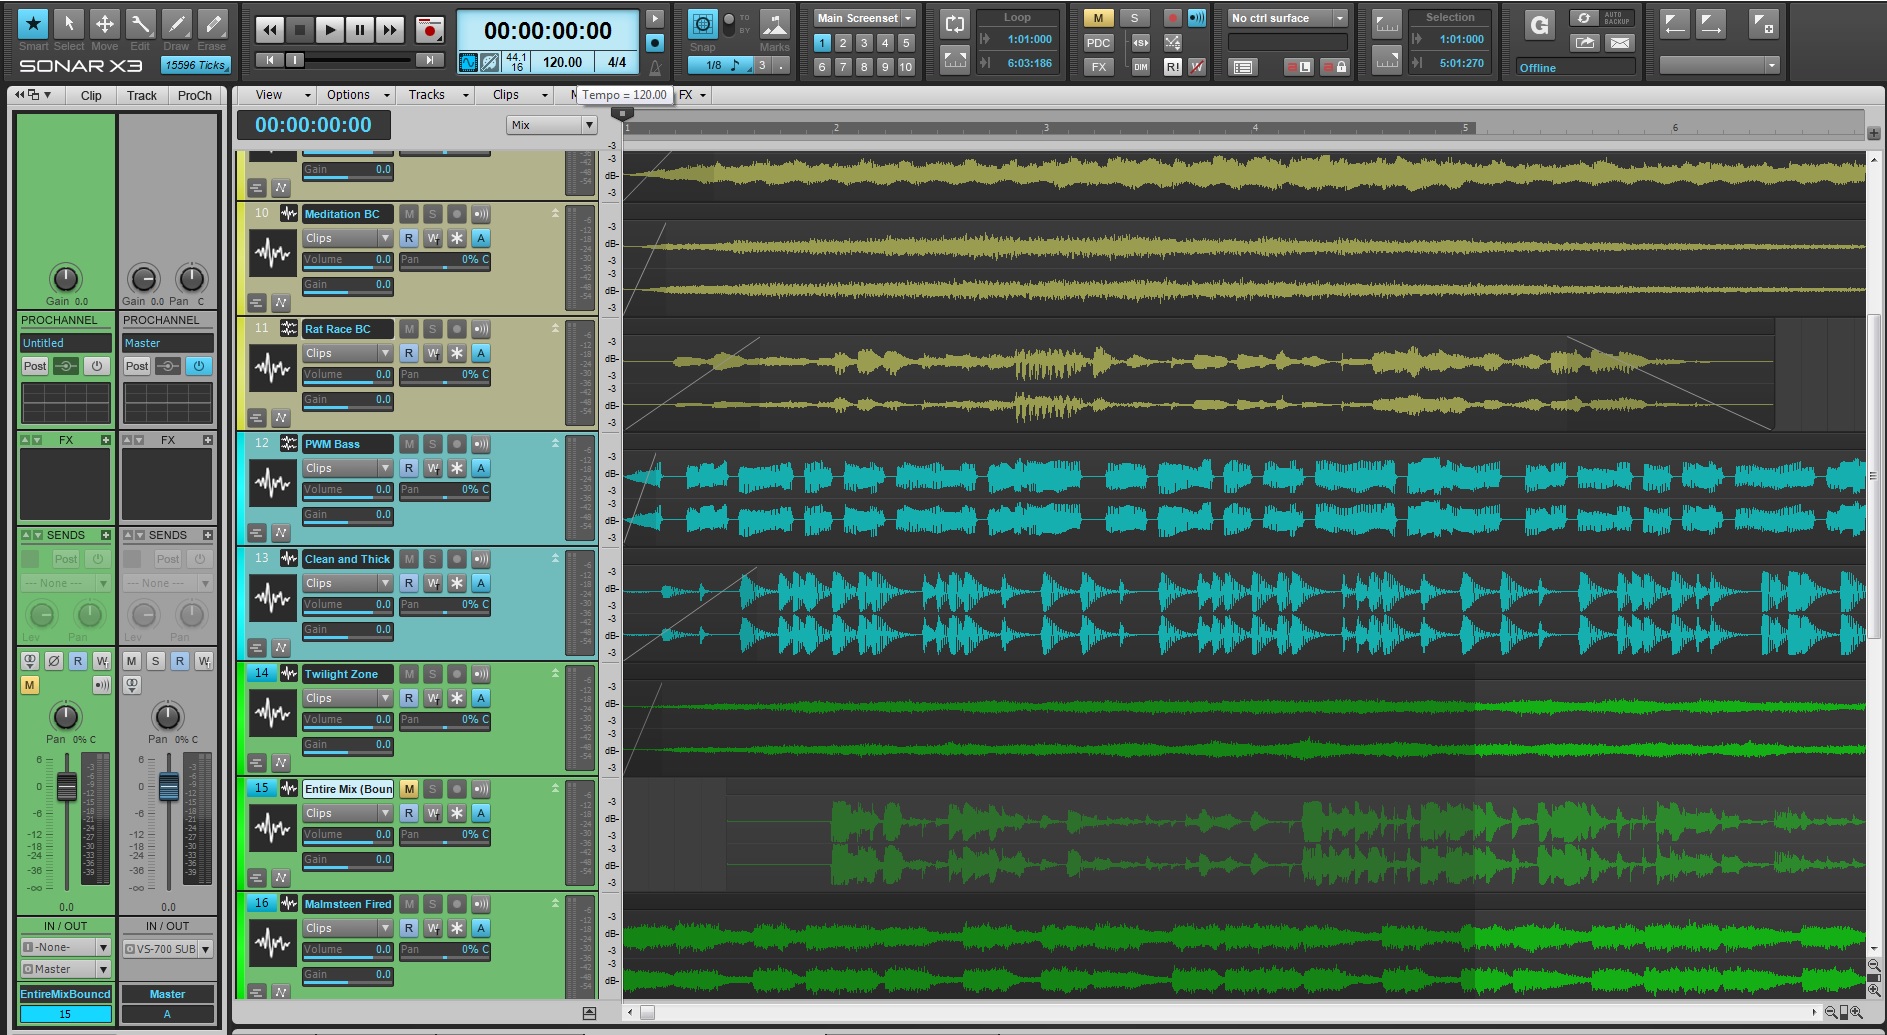
Categorizing your tracks by color can be one of the biggest advantages to keeping a solid workflow when recording or mixing. If your DAW has the ability to do this then figure it out, it should be fairly obvious where these options are located. Try dedicating color schemes to instruments, types of tracks, and the buses associated with your tracks. This makes the overall environment easier to work with, especially if you are handing your work off to another engineer or the artist themselves.
2. Dedicate a Bus to each one of your tracks or groups of tracks

Making final adjustments to your tracks will become easier and more organized once you take advantage of the bus section within your DAW. Setting your tracks to their own dedicated buses reduces them to a single track so that you can adjust an entire section of instruments with one fader, compressor, EQ, or any other plugin you feel is needed. If you are in the final stages of mixing with an artist at your side, I’ve found that typical comments can consist of “The drums could be louder.” or “Can the vocals come up a bit?” These kinds of adjustments could be difficult if you have tons of automation already laid down on your individual tracks. Sending your tracks to a bus will allow you to adjust overall levels easier and more efficiently.

SONAR X3 allows you to organize your tracks by color or choose to follow bus colors based on routing. Read more about Color Customization in SONAR X3.

3. Name your tracks in a way that makes sense

Audio files will take the names associated with the tracks they were recorded on. If your tracks are set to “Audio Track 1-16” then your audio files will be recorded as “Audio Track 1-16”. Make sure to name your tracks in a way that someone could understand them in a passing glance. My naming convention consists of the instrument type, number, amp name (if applicable) and microphone or DI box used. Here are some useful ways to name your tracks.

  • Guitar 1 Egnator 57
  • Guitar 1 5150 421
  • Bass 1 DI
  • Bass 1 Ampeg
  • Vocal 1 U47
  • Kick IN 52
  • Snare Bottom 414

Here are some examples of inefficient ways to name your tracks:

  • Mic 1 John
  • Drum 1 AWESOME
  • Guitar Right 1
  • Bass HEAVY tone 3
  • Kevin
  • Audio Track 27

Notice the difference? Figure out a system that works for you and stick with it.

4. Group tracks that have variations of mic placements

When recording or editing multi-mic’d instruments its useful to group your tracks in a way where all the tracks can be edited at once. At one point in your career you will record an amp that could have 5 microphones on it or a drum set that consists of 20 microphones. Setting up this type of group will allow you make alterations to these tracks without too much headache.
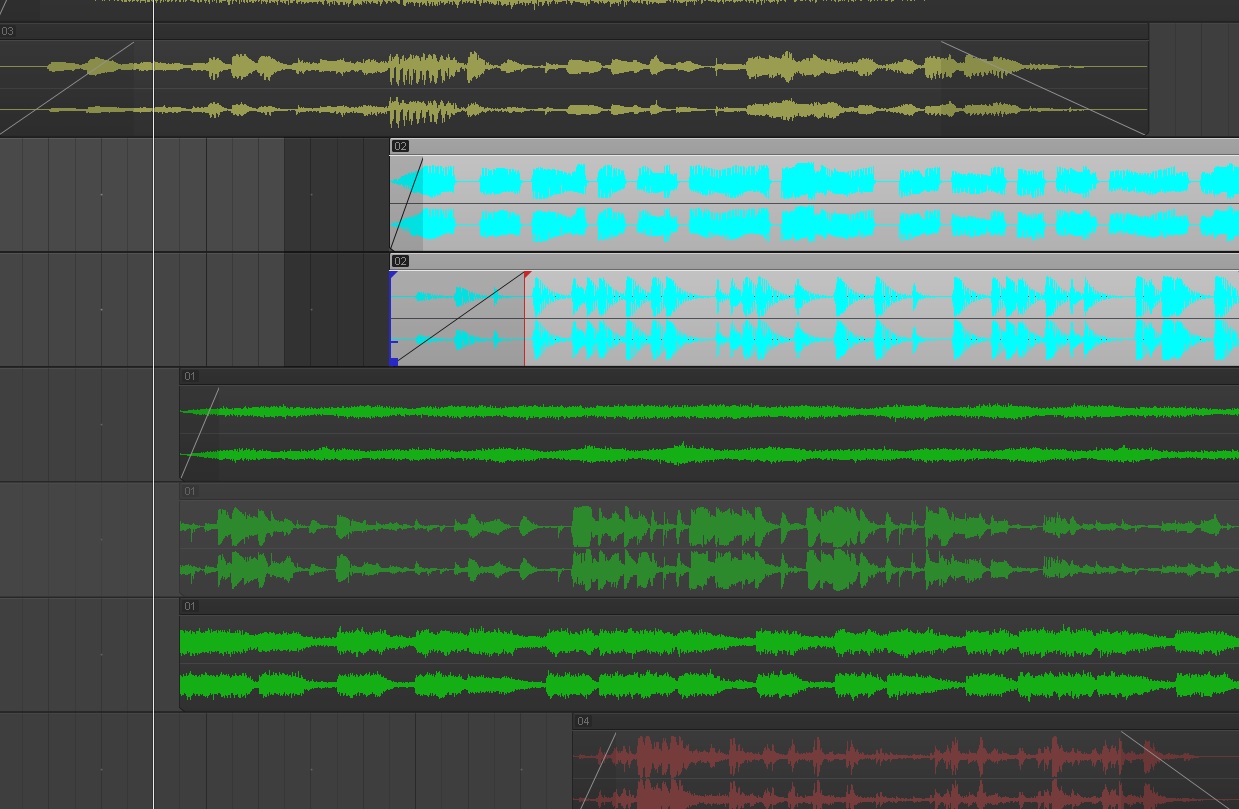
SONAR X3‘s “Region Groups” feature makes it easy to group and edit multiple audio regions at once.

5. Version your projects manually

Manually versioning your projects should be second nature regardless of whether or not your DAW contains an automatic save feature. Every 5 minutes go to Save As and label your project as “Project Name” followed by a number. This keeps your projects organized in a way that allows you to recall your work at a moments notice without relying on some sort of invisible background process. It’s important to have a system in place for saving your projects. It will save you in some of the worst case scenarios.
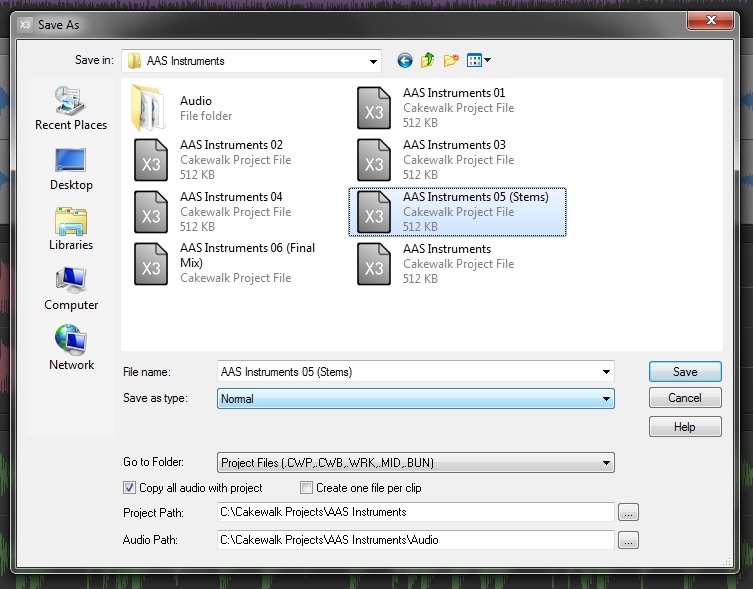
6. Make a dedicated “Bounce” or “Stems” folder

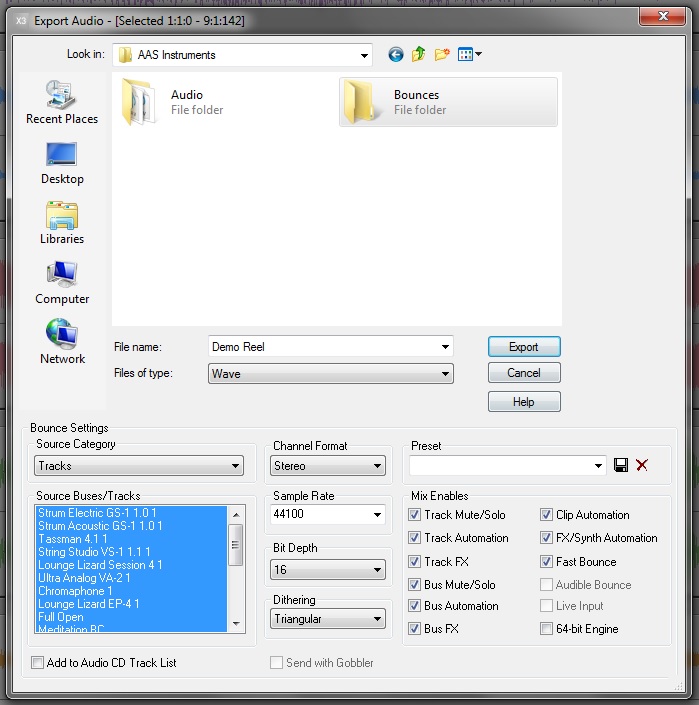
Some DAWs perform this function by default, but you don’t have to change your platform to take advantage of this easy tip. When processing your mixes or rendering stems always make sure to save this audio data to a dedicated folder separate from your audio files folder. This will save you the headache of scrolling through your audio files folder looking for your latest mix or batch of stems.

Just about every DAW has an “Export Audio” window. Change the filepath for this to your project folder and make a new folder called “Bounces” or “Stems”.

  • PC shortcut is CTRL+SHIFT+N for a new folder

  • Mac short is Cmd+Shift+N for a new folder

Once you make the new folder, make another new folder within your Bounce or Stems folder with the current date. Save your audio accordingly.

Now as you send mixes out for review you, will know what mixes were sent and when they were sent. Obviously you can use email for this information, but why not have this data available right in your project folder?
7. Save your plugin presets

This might come as an obvious detail to some, but to others it doesn’t sound so obvious. Saving your plugin presets is definitely worth your time and effort. Everyone eventually switches to another computer or needs to rebuild a project. Having a folder with your presets saved as separate files can be useful in the event your presets do not load or load incorrectly. Never assume that your presets will stay intact, especially with projects that are a few years old.
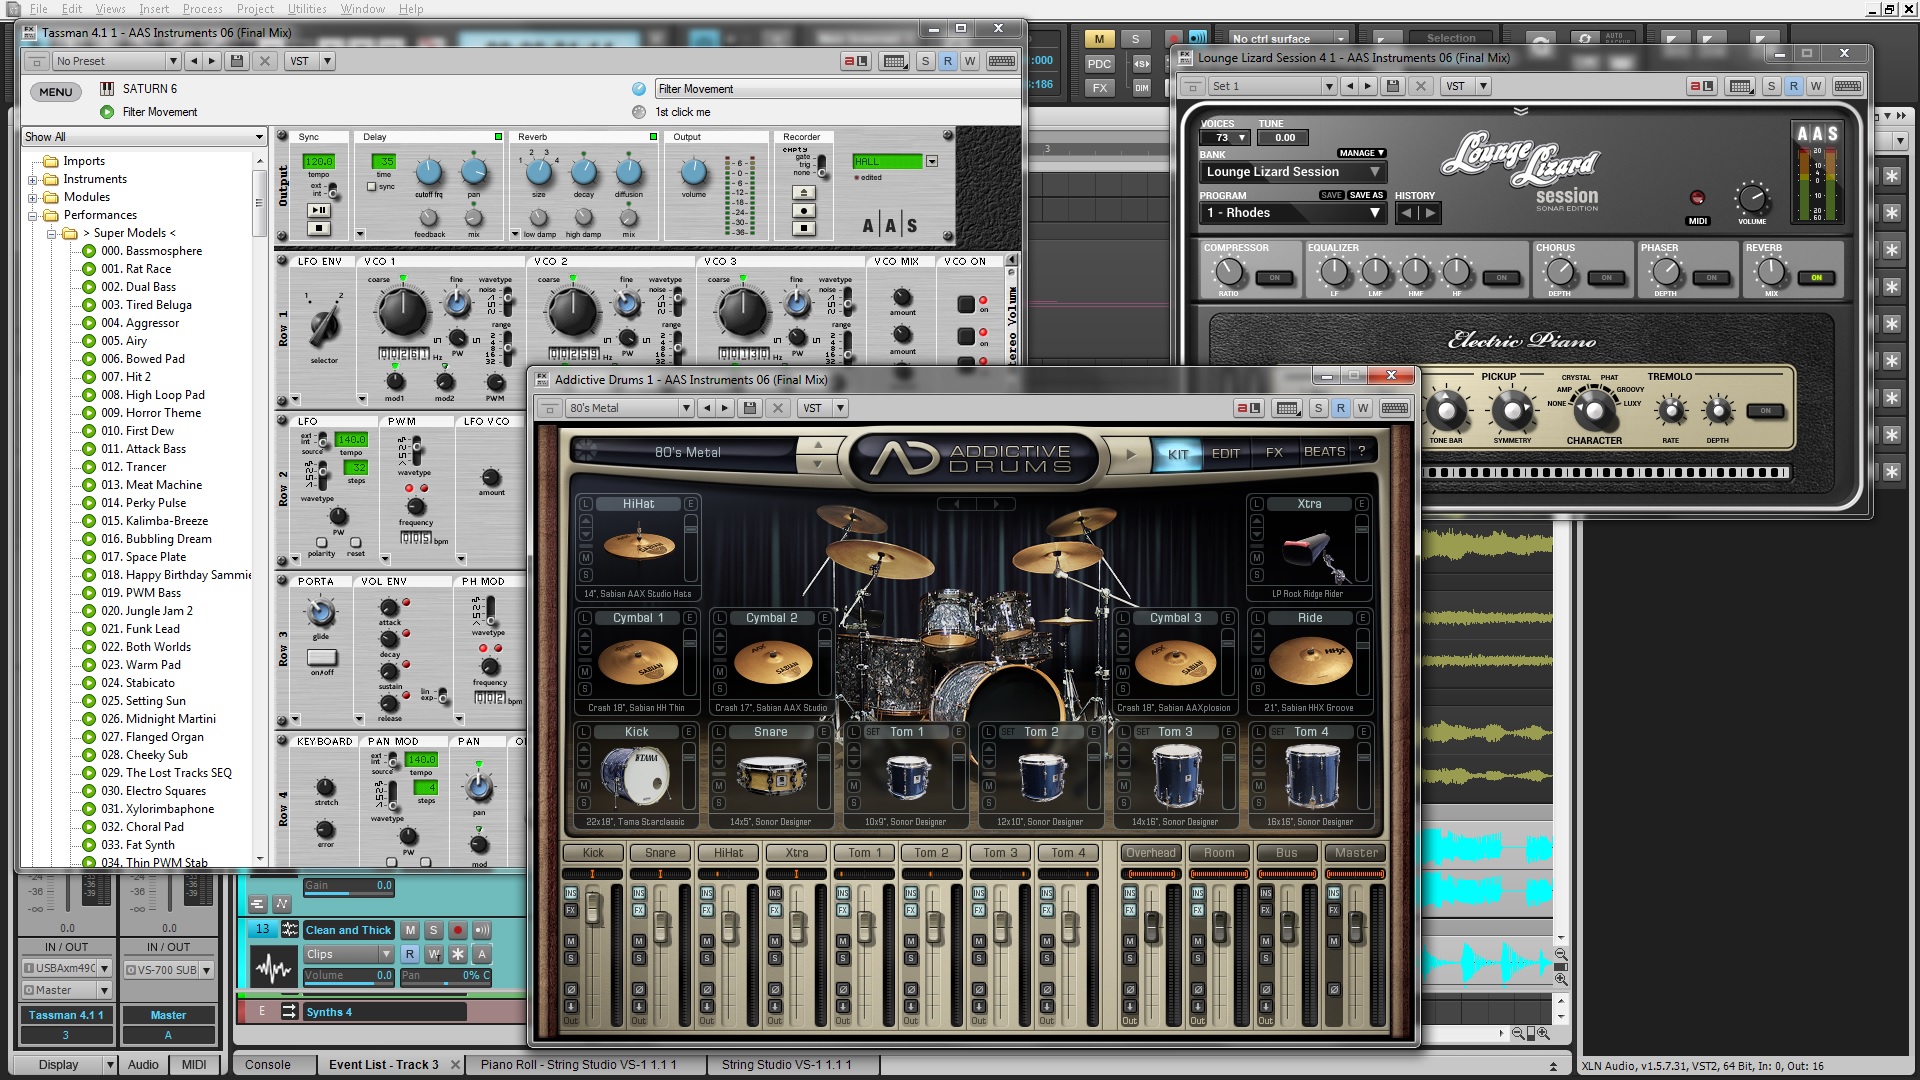
Learn how to set up your Addictive Drums in SONAR X3.

8. Always render your instrument tracks

Make a decision and stick with it. Once you find a sound you like, render it, or mix it down so that idea is encapsulated in an audio file. Loading large sample libraries or syncing external sound generators slows down your session flow. It’s hard to hit the creative ground running when your computer and DAW are constantly keeping you waiting and waiting for unneeded reasons. Do not be afraid to make a decision about a sound. It boils down to knowing your tools and how they work. If you achieved a specific sound once, then you can definitely do it again and better than before.

Rendering your instrument tracks has other benefits too. You don’t need to worry about the MIDI sequencing misaligning with your project tempos, or other computers not having the same plugins you’ve purchased. Saving your data as workable stems or mixes will keep your ideas flowing without any technical speedbumps in the way.

SONAR X3 has been using Fast Bounce capabilities for over 10 years. Choose to bounce your tracks in place, bounce your tracks with buses, bounce tracks to a new track, bounce through your mixbus, or just simply freeze your audio in place.

9. Create templates

Templates will save you time and keep your session organized. Working on full length records can be tedious depending on the style of recording that needs to be done. Some albums start with the drums, move to the guitars, and then vocals, etc. Other albums can be made one song at a time regardless of instrumentation. In the end it’s the engineer’s job to make sure that transitioning from project to project is an easy task with quick setup. Making templates with plugins, routing, and naming conventions already inputted will allow you to move faster than you would think.

The same kind of logic can be applied to the mixing world. Make a template of your typical 2Mix bus, audio buses, and favorite processing plugins so that you can just drop in audio files and begin working. Time saving is important, but being organized is what makes or breaks your session flow.
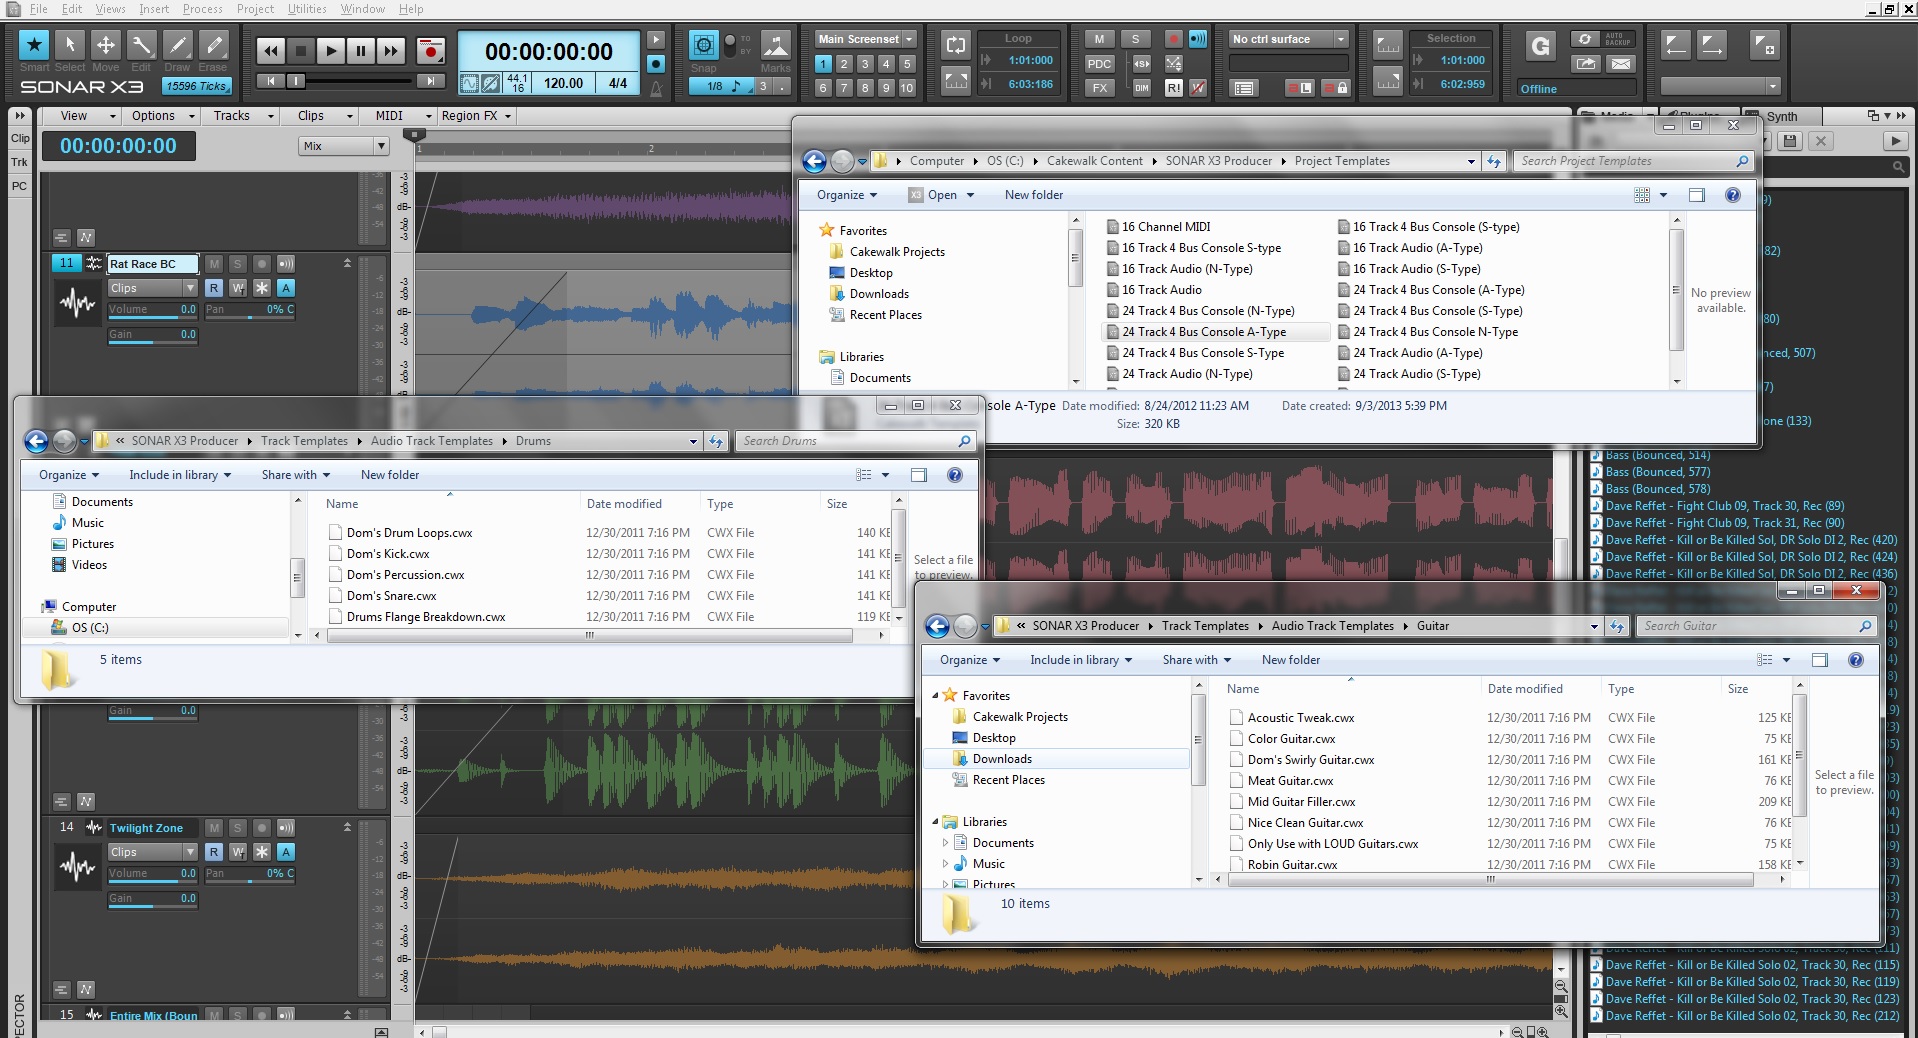
SONAR X3‘s powerful track and project templates allow users to fully customize a project for any environment.

10. Master your keyboard shortcuts

Everyone should have a set of their favorite keyboard shortcuts within their DAW. Know them and master them so that your workflow does not suffer from mis-clicking or awkwardly sensitive mouse scrolling configurations. Some DAWs allow for customizable keyboard shortcuts and the ability to import and export shortcut libraries. Get to know these types of features because speed and efficiency is what will save you time in the studio and allow you to focus on the music. Create shortcuts for recording, mixing, composing, or even audio editing so that you can fly between different workflows without fumbling around in menus and with mouse clicks.
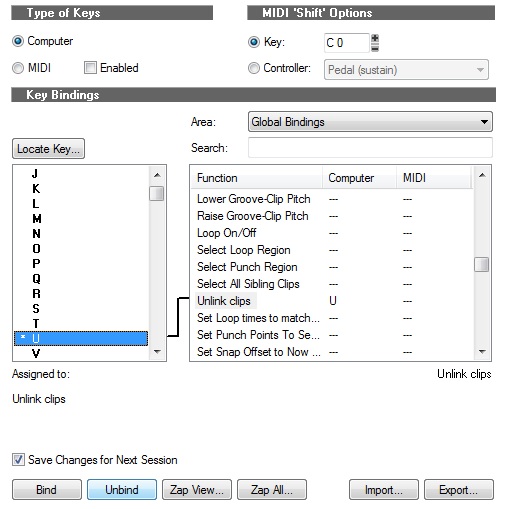
SONAR X3 comes with keyboard shortcuts from other DAWs and allows it’s users to make their own and save them externally.

11. Use Markers and name them accordingly

Markers can be overlooked by aspiring engineers and producers, so make sure to understand how to generate them and modify their names. Mark the verse, chorus, lead section, bridge, intro, outro, and possible punch points so that you know exactly where to go when the artist or producer needs to jump to different sections. You are never going to know exactly where every small important detail of the track starts or even its timestamp unless you are very close to the music. Markers are there to be used, so use them!

\

SONAR X3 was used in these pictures, click here to find out more.

9 Life Lessons That I've Learned as a Freelance Producer

1. Never be the reason why things are taking forever. If mixes, stems, vocal comps, or those types of things take longer, then so be it; but make sure it’s because you were waiting on the artist and not the other way around.  The people that wait on you are the artists who carry your good name.  You don’t want your name associated with rolling eyes and snickering remarks.  You depend on your work to get more work, and that is honestly how this business goes.

2. You can always learn more about the process, about the experience, about the mic positioning, about the way you handle an artist, or how you handle yourself.  Maybe you figured out how many hours you can stay up straight without noticing the time go by.  Or, maybe this time you were able to consciously sit back and say “Ok guys, that’s a wrap, we’re not getting any more done tonight.” If you have an ego, make sure that it’s because you have a few Grammys in your back pocket and not because you’ve been “around.” Never stop learning and you will continue to hone your skills as a producer and an individual.

Dan in Studio3. Pre-production is key to making deadlines.  It all happens to us, sometimes there are things that just take a backseat and never get done.  The singer you thought was going to be your saving grace was actually slacking off because you were blinded by your “trust” in his/her ability to prepare things on their own time. There are occasions where unforeseen things will happen and it’s inevitable that your prospective finish date will get delayed. Sometimes your artist is having a hard time and is going through some personal things that can’t be resolved immediately.  It’s your job as the producer to carry on and get things done the best you can in the time frame that is given.

4. Get your personal life in order first before you go off and think you can spend a week in the studio.  Make sure you know that you can be gone for long hours at a time and that you aren’t just leaving someone hanging out to dry on something else you were working on.  The worst thing that can happen is that you have to leave the studio for a personal reason . “Oh, I have to pay my rent – be right back” will not cut it, and will most likely result in losing the gig.

5. Ask yourself, “Do I really like what I’m working on,” because if you don’t, then you won’t care about it enough.  Once you stop caring about something you let things fall through the cracks.  You let yourself cut corners where obvious issues stand.  Sometimes you let yourself completely crash and burn and start to wonder what happened in the beginning that caused a massive spiral of bad events.  Was it because you didn’t care enough?  Was it because you didn’t ask yourself some honest questions about how you feel?  Take a night and sleep on those massive decisions. They are what define you and your work.

6. Take a step back and acknowledge what you will gain from your next project or your next big endeavor. Think about what every project is going to do for you in 5 years and then make a decision. Do you think your next big project will make you look bad? Do you think your next big project is a stepping stone or just a paycheck?  What do you think you could learn?  These are questions that you need to weigh.

7. You’re going to make big mistakes no matter what you do or how you swing it.  At one point in time you’re going to miss a fine detail, blast someone’s ears in the studio, say the wrong thing to the wrong person, or offend someone without knowing it.  This might even cost you the gig. The point is that you learned from this experience and more importantly, it will never happen again.

8. Plan your budget out as early as humanly possible.  Don’t just say “Yeah, studio time is going to cost ‘this much,’ my tracking fee is ‘this’ per hour.” No, sit back and write out every fee, every move, every drop of gas down so that you have a realistic idea of how to get from point A to point B. How do massive productions that tour around the world for years at a time stay profitable? It’s because of a budget. Live by it. Figure out how your artist or group is going to spend it. Once the money runs out it’s more or less coming out of your pocket. See “3” for more details on that.

9. Figure out your end game and don’t let anything stand in it’s way.  It only takes a few small tweaks to your life to get you one step closer to your ideal job.  Do them one at a time and don’t stress if you make a mistake early on.  That’s part of the learning process. You can’t look at your life and directly compare it to where you want to be, that’s just overwhelming and unrealistic.  What you can do is find a professional who is doing exactly what you want to be doing and learn from them. Listen to their records, email them, read their blogs, and listen to their interviews.

Become a master of guitar recording in SONAR X1

Guitarists Guide to SONARCraig Anderton is one of the most widely respected pro audio writers today. He has authored more than 20 books and is currently editor-in-chief of Harmony Central and executive editor of EQ magazine.  He’s even worked closely with Cakewalk to create two critically-acclaimed SONAR X1 Advanced Workshop videos. So if you are looking for tutorials to help you master the art of recording guitar in SONAR X1, Craig Anderton has got you covered.
THE GUITARIST’S GUIDE TO SONAR was designed for guitarists of varying levels of experience with music software and guitar amp simulation.  This 250 page book covers some of the situations unique to recording guitar with any computer-based system.  It then progresses into guitar-specific techniques for SONAR suited for more advanced users.

Continue reading “Become a master of guitar recording in SONAR X1”

New V-Studio 700 E-Book Gives You A Closer Look

eBook-V-Studio-700Cakewalk announces today the availability of a new eBook by Scott R. Garrigus – author of the “SONAR Power!” Book Series – that will cover the ins and outs of the SONAR V-Studio 700 music production system. Cakewalk V-Studio 700: A Closer Look is a free electronic book discussing basic and advanced functions of the V-Studio 700 such as: Getting to Know the V-Studio 700, Recording with the V-Studio 700, Composing with the V-Studio 700, Editing with the V-Studio 700, Mixing with the V-Studio 700 and more.

The 40+-page eBook is an easy to read overview on how to get the most from the V-Studio 700, and comes with numerous screenshots, tips, and tricks in easy-to-digest chapters and call-out sections in the style of the …For Dummies line of tutorial books.  It’s available as a downloadable PDF, with embedded hotlinks for pursuing additional information on key topics.

Cakewalk V-Studio 700: A Closer Look is available as a free download in PDF format at http://www.cakewalk.com/media/Ebook/vs700.asp.

Using Multiple MIDI Controllers in SONAR

cakewalk_tips-sm1Managing input from multiple MIDI devices, such as keyboard controllers and drum pads, through your DAW can be frustrating. Staying on top of all the cabling, routing and software settings is enough to make you throw in the towel and go back to point and click.

However, with SONAR, you can choose individual MIDI input ports and channels for each of your MIDI tracks. This means that you can use several different MIDI controllers simultaneously, each triggering its own synth or controller parameters. You can also choose to trigger several different synths, each on its own track, with just one MIDI controller.

The following tech tip will walk you through these common multi-controller scenarios using SONAR.

Music Radar's 12 Ways to Get More Out of SONAR 8.5

SONAR 8.5Make your New Year’s resolution one that you can be proud of. Dare to be more adventurous as a music-maker in 2010 with Music Radar’s 12 Ways to Get More Out of SONAR 8.5. With this guide, you’ll be able to manipulate SONAR’s tools for composing, editing and mastering your projects in ways you never thought possible.

Did you know that you can assign SONAR’s virtual instruments, such as Session Drummer 3, as well as project views, like the Matrix view, to your favorite controller? Trigger pre-loaded sounds and patterns from your controller with these tools and you’ll have a musical mash-up like no other. Does your vocal track need a little work? Use V-Vocal to create multi-part harmonies and AudioSnap to tweak the timing for a more realistic performance.

These tips and more can be found in hard-copy. Pick up Computer Music Magazine (January 2010) for a complete guide to the creatively-charged, SONAR 8.5.

Creating Soundtracks For Video With SONAR

At last year’s AES Conference, Cakewalk’s Robin Kelly gave a presentation on using SONAR 8 for creating a soundtrack to a video. Watch Robin’s tutorial to learn how to use SONAR’s included instruments – Dimension Pro, Session Drummer 2 and Z3TA+ – to create great sounding music tracks for your home movies. Robin also shows you how to export your final project so that you can share it with friends or publish it to your favorite video-sharing site.

Berklee Professor Steve MacLean Talks SONAR in the Classroom

Berklee-Online-LogoHello to all SONAR users!

In efforts to empower artists and music producers it is hard for me to imagine the huge numbers of students I’ve had the opportunity to work with over a 20 year span.  This happens in every format from private one-on-one or small group classes to many years in Berklee classrooms along with the Berklee online school (teaching production techniques in SONAR).  A range of numbers somewhere between 12,000 and 20,000 students is a not so calculated guess!  The truth is that I’m grateful for every one of them as each helped teach me to be a better coach and teacher along with all of the wonderful and amazing musical rewards when students apply what they have learned.  It gives me great satisfaction to know that these people will continue making progress and developing the music careers they wanted. 

One area of confusion that constantly comes up is this: 

I often notice that the technology almost forces people to work in ways that are very unnatural for what they are trying to do.  A great example of this is when the type of musical “style” the student is pursuing vigorously is ultimately made to sound lifeless and sterile.  You might ask, how can the musical style play such a huge role in the successful outcome of various production projects?

Continue reading “Berklee Professor Steve MacLean Talks SONAR in the Classroom”

SONAR's Snap to Grid Function Makes Editing Easier

Cakewalk_Tips-smEditing your tracks can be the most tedious and time consuming part of the whole music-making process. In almost every project, you’re going to need to do things like line up your Acapella track, line up your Loops and Groove Clips, syncopate your Drum clip, extend the intro or outro, add a break, etc.

DJ Serg, one of today’s hottest remix artists, makes editing much easier by giving you this in-depth look at the Snap Options in SONAR. Now, you can spend less time changing the settings and more time expressing your creativity.