As you may know by now, the Bakers at Cakewalk are constantly on a mission to improve upon SONAR. Whether that’s a bug fix, a new feature, or a feature enhancement, we’re giving you the tools to be creative and get the job done. In 2016 we brought you workflow improvements for comping such as improved copy and paste functionality, keyboard shortcuts (adjusting stretch and crossfades), as well as visual improvements and customization options for take lanes. With the 2017.02 release we take things to a whole new level, with a host of new features based on your feedback. Don’t forget, if you have features or enhancements you’d like to see, drop us a line at bakery.cakewalk.com and let us make SONAR even better! For now, let’s dig in:
10 Reasons You Will Love The SONAR X Series
The SONAR X series was introduced to the world back in 2010. Since that time, we’ve continued to refine and improve SONAR. Customers upgrading from SONAR 8.5 and earlier are in for an amazing experience. Below we’ve put together the top ten reasons you will love the SONAR X series.
1. ProChannel
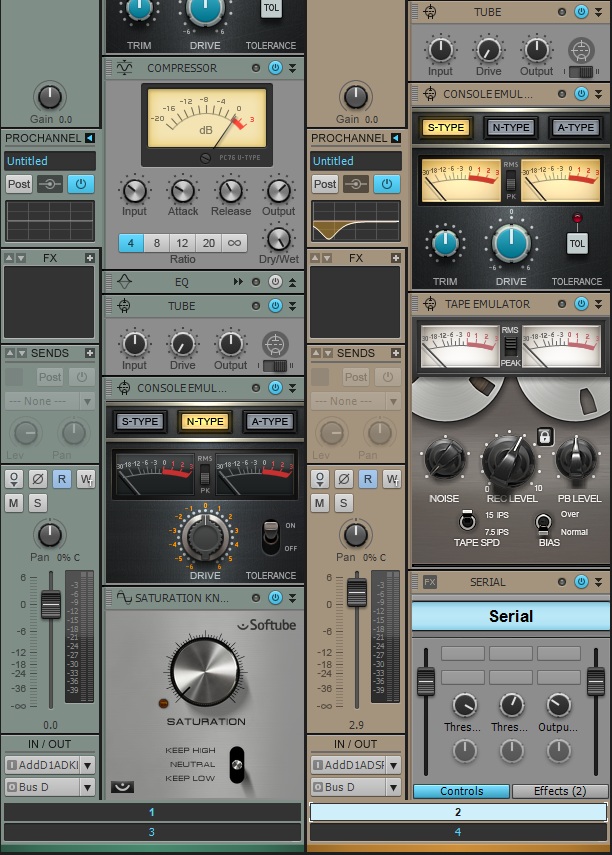
The ProChannel redefines the way you work with the Console View. Each audio track, instrument track, and bus comes with a complete modular strip of analog effects. Even the inspector allows the users to preview a selected track’s ProChannel strip right from the Track View. With the click of a button users can expand this analog mixing console and fully customize it by dragging around the modules, or loading up a ProChannel presets. Load up the Compressors, Tube Saturation, Reverb, Console Emulators, Tap Emulators, and the new QuadCurve EQ Zoom with Analyzer by simply right-clicking.
SONAR’s ProChannel lends itself to an immensely visual experience Continue reading “10 Reasons You Will Love The SONAR X Series”
SONAR X2: The Take Lane Super Highway (Tutorial & Video)
SONAR X2: The Take Lane Super Highway
By Guest Blogger Eli Krantzberg [Groove3.com]
September 2012
The ability to loop record multiple takes over the same section of a song and choose the best bits after the fact is one of the defining elements of almost all modern DAWs. Layers worked just fine in X1, but Sonar X2 has re-set the bar with the new Take Lanes feature.
The ability to loop record and then edit multiple takes is nothing new. What is new with Take Lanes is the ability to set independent Edit Filter views for each of the lanes. This might seem insignificant at first, but when you think about it, this opens up a world of possibilities.
I often automate synth controls separately from laying down the initial part. It can be difficult to concentrate on recording the music with one hand, while simultaneously concentrating on modulating synth parameters with the other.
So, I thought, why not put Sonar X2’s new Take lanes to work and use it to loop record multiple automation passes. In addition to choosing the best take, the unique Edit Filters allow you to edit the controller data after the fact directly in Track View! This is a HUGE bonus. Throw in a couple of keyboard controller knobs and Sonar’s dead simple MIDI Learn function, and the ability to experiment and capture creative ideas is not only fun and musical, but also virtually limitless.
To give you an idea of how stimulating this can be, try this:
1) Record your basic synth part.
2) Set your Loop start and end times, and enable looping in the Loop module.
3) Set your Project/Record preferences for Sound on Sound Recording. And choose Create Takes in a Single Track.
4) Right click the synth parameter(s) you want to modulate.
– Choose MIDI Learn.
– Touch an unassigned knob on your keyboard controller.
– Repeat for each parameter you want to modulate.
(And with this method, you can modulate multiple parameters together and retain the ability to edit them separately while still being able to treat them as a single entity for muting, selecting, splitting, copying, deleting, etc.)
5) Arm your synth or MIDI track and record multiple passes, tweaking the controls to your heart’s content.
6) Hit SHIFT + T, or click the Take Lanes icon to reveal all the takes.
You will now find you have multiple takes of automation. In addition to muting or soling each lane, you can put the MUTE tool to good use. Click to mute/unmute the clips as necessary; or CNTRL drag along the bottom half to isolate sections while simultaneously muting the others (I LOVE this technique for working with multiple takes). CNTRL drag arcos the top half of the clips to toggle the process. Since this works with automation, it makes editing together a take using the best bits of each a snap. And if your automation is designed for rhythmic effect, Snap To Grid is your friend when making these types of time-based selections.
And now for the pièce de résistance:
7) Click hold the Edit Filters and choose Notes. From there, click hold a second time and choose the specific MIDI CC message you want to view and edit.
You now have the ability to edit the individual MIDI CC data directly in the Take Lanes. Switch the Edit Filters back to Clips view when you want to edit the multiple controllers together. It’s a thing of beauty!
For more great tutorials from Eli Krantzberg be sure to Download SONAR X2 Explained now available on the Cakewalk Store.


