Vocal Month: Creating Vocal Harmonies with Melodyne Essential

Can’t quite hit the high or low notes? Melodyne usually can.

by Craig Anderton

If you don’t have a wide vocal range, you have to choose a vocal’s key very carefully—the low parts can’t go below your range, and if you’re going to hit the harmony notes, you have to pay attention to where the highest notes fall as well. Unfortunately the voice sometimes loses power when you start hitting your lower limits, but if you choose the best possible range for your lead vocal then you may have a hard time hitting the harmony’s high notes. What’s a singer to do?

My solution is to choose the optimum key for the lead vocal, then reach for Melodyne Essential to synthesize the harmonies. Most of the time I can hit the harmonies so I’ll sing them “for real” and bring in Melodyne as needed, but I’ve also found merit to using Melodyne to generate the harmony even if I can hit the notes—it gives a different character that works well in some musical contexts.

Creating Harmonies

Generating harmonies requires some manual effort, but it’s worth it.

1. Clone the lead vocal.

2. Create a Melodyne Region FX for the clone.

3. Solo the lead vocal and clone (Dim Solo can be useful for this application so you can hear the vocals in context).

4. Start adjusting the clone’s blob pitches to create the harmony (Fig. 1).

Fig. 1: Thanks to a paint program’s transparent layers, colorization, and cut and paste, this shows the harmony line (blue) superimposed on the lead vocal.

Usually the easiest way to do this is by ear, but if you’re theory-minded, you can always apply those rules to determine which pitches to use for the harmonies.

Additional Tips

I highly recommend choosing Edit > Pitch Grid > No Snap and adjusting the harmony pitch by ear. Snapping doesn’t always produce the most musical results.

Also, check out my article Easy Automatic Double Tracking with Melodyne Essential, which describes how to add slight timing and pitch variations to do automatic double tracking. Applying the same technique to the harmony line prevents it from “shadowing” the lead vocal, and helps the harmony establish itself as an independent entity.

There’s a video on my YouTube channel that uses Melodyne Essential for creating both ADT and the harmony effects described in this article. In fact, there’s only one vocal track in the entire song; all the others were derived from it using Melodyne.

Finally, I demoed this technique during the video I did at Berklee College of Music last March. You can see the video here.

Happy harmonizing!

BETTER TOGETHER: TRY SONAR X3 AND MELODYNE FOR FREE!

Vocal Month: Easy Automatic Double Tracking (ADT) with Melodyne Essential

There’s a great ADT program lurking within Melodyne Essential

by Craig Anderton

So is Celemony’s ADT (Automatic Double Tracking) program any good? If you have Melodyne Essential, you can find out for yourself—because it’s the same program. Yes, hidden within SONAR X3‘s Melodyne Essential is a very cool ADT effect that’s extremely effective with vocals.

Introduction

Double-tracking is the process of singing a second vocal on top of a main vocal to “thicken” the overall sound. It’s impossible to sing a vocal exactly the same, so there will be slight timing and pitch differences that add interest and depth. Automatic Double Tracking produces this effect electronically, which can give more control over the double-tracked vocal. While there are dedicated plug-ins to give the ADT effect, Melodyne has all the tools needed to do this. I’d go so far as to say Melodyne can produce one of the best electronically generated ADT effects I’ve heard.

The Melodyne ADT effect works best with vocals where you haven’t already added extensive pitch or timing correction. As an aside, I never do a “wholesale” quantization of notes; to my ears, removing the “incorrect” pitch variations in a vocal actually create a less compelling performance. Instead, I manually correct only those notes that actually sound “wrong.” Even then, I don’t always quantize exactly to pitch. Music is about tension and release, and subconsciously, you’ll often sing a little flat or sharp (tension) and end up on pitch (release). Making all the pitches “perfect” removes this emotional component.

As an analogy, conside B. B. King’s guitar playing. He often bends a flatted 7th not quite up to pitch. By not resolving the note, instead of completing the phrase it leads you into the next one. Timing and pitch variations are an essential part of music, so don’t overdo the correction.

Setup

It’s easy to set up the ADT effect with Melodyne.

1. Clone the vocal to which you want to add the ADT effect.

2. Right-click on the cloned click and create a Melodyne Region FX.

3. Select all the notes in the vocal.

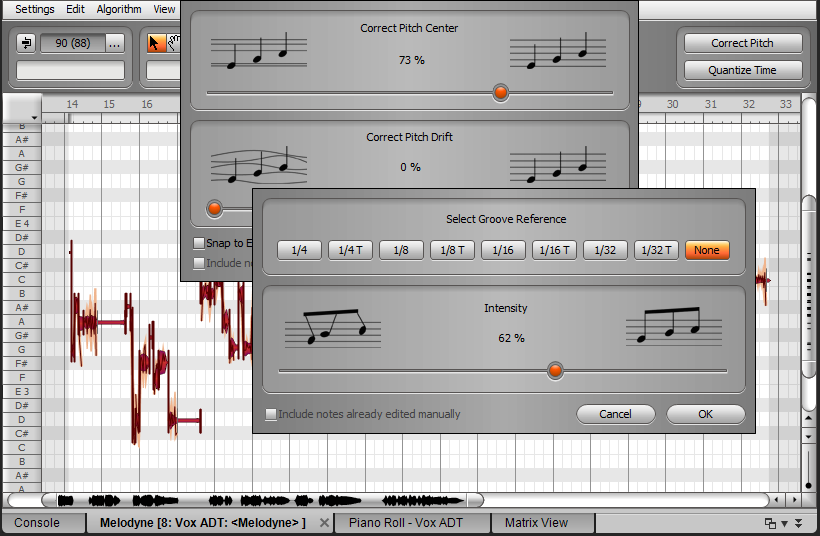
4. Turn up Correct Pitch Center to about 60% (Fig. 1).

Fig. 1: Correcting pitch and  timing subtly on a cloned vocal track can produce an automatic double-tracking effect.

5. Turn up Quantize Time Intensity to about 60% (Fig. 1).

6. Evaluate the ADT effect, and tweak the pitch and timing correction amounts as appropriate.

Generally you don’t want too much pitch or timing correction—just enough to be different from the main vocal.

Mixing ADT Vocals

When mixing, centering the two vocals tends to maximize the similarities to chorusing; the vocals sound somewhat more diffused, which works well for “gentler” material. Panning them slightly oppositely (about 30% right and 30% left) can give a more spacious sound in stereo.

With sparser mixes, centered panning often fits best while the somewhat spread sound helps the vocals have more presence in dense material, like hard rock with lots of distorted guitar. However, these aren’t “rules” as ultimately, the song itself will dictate which works best in the final mix.

Give this technique a try—I think you’ll be as surprised as I was about how effectively it provides an authentic, convincing ADT effect.

BETTER TOGETHER: TRY SONAR X3 AND MELODYNE FOR FREE!

SONAR X3 QUICKTIP: MAKE YOUR VOICE THICKER (STUDIO & PRODUCER)

Z3TA+ iOS 1.1 Update – Full MIDI Support for iPad


Z3TA+ iOS V1.1 Now Available – Full MIDI Support for iPad
Z3TA+ iOS puts the full power of Z3TA+ on your iPad. Packed with hundreds of presets, real-time oscillator modulation, dual mode filtering, and flexible effects, Z3TA+ iOS is the perfect creative toolkit for making music anywhere, anytime. The version 1.1 update is free for Z3TA+ iOS users and includes numerous user-requested enhancements.

Download Z3TA+ 1.1 on your iPad

What’s New:

  • For greater expressiveness, a simple yet powerful MIDI Learn mode offers multiple continuous controller assignments or multiple continuous controllers per assignment
  • MIDI Learn save, load, and clear configuration functions
  • Improved MIDI Channel selection (Omni as well as channels 1-16)
  • Multiple MIDI input selection
  • Clock Sync for tight rhythmic integration with other instruments and systems
  • MIDI input indicator lights for visual feedback
  • Manual localization in French, German, and Japanese
  • Onboard X/Y Pad integration with more factory presets Continue reading “Z3TA+ iOS 1.1 Update – Full MIDI Support for iPad”

Save up to 75% off Gobbler Storage through May 4th

Gobbler

Gobbler Spring Sale: Save up to 75% through May 4th
Spring is here and Gobbler has some sunshine for your creative world.  From now until Sunday, May 4th, they’re offering deals on all plans, with savings of up to 75% off regular prices.  If you’ve been thinking about starting a new collaboration or getting your projects organized and backed up to the cloud, now is a great time to make it happen.

Create more, worry less, and treat yourself to a Gobbler Spring sale deal.

Save on Gobbler Plans


8 Reasons Why Gobbler Cloud Storage is Awesome For Musicians

Learn How Gobbler is Integrated in SONAR X3

SONAR Production Tips – Building A ProChannel De-esser

Introduction

SONAR X3’s modular ProChannel allows users to take advantage of all the different aspects of a real mixing console. One great way of improving your vocal production is by using De-Essers to reduce the sibilant frequencies between 5-7kHz. The human mouth acts like a filter for words and sometimes certain words for certain singers can produce unwanted hissing sounds that get in the way of mixing. You can build your own De-Esser within the ProChannel by using the following steps.


Highlights from April: Tips to Help You "Mix it Right"

Cakewalk presents “Mix it Right” month
We have been busy this month creating new resources to help you craft better mixes. Check out all the tips, tricks, and video from experts like Craig Anderton, Dan Gonzalez, and Jimmy Landry who have all worked professionally in studios and bring decades of mixing knowledge to the table (and console)
.

EQ: Carving Out The Right Sound For Your Mix
One of the most important aspects of mixing is using EQ to “carve out” a specific frequency range for instruments so they don’t conflict with each other. If instruments have their own sonic space, it’s easier to hear each instrument’s unique contribution, which increases the mix’s clarity. Learn more

When To Break The “Rules” Of Digital Mixing
Sometimes you need a mix to have a certain sound and the so-called rules of digital mixing go out the window. Recently Cakewalk’s Jimmy Landry was hired to produce a song with some “grit” and “acoustic-oriented authenticity,” so he grabbed his 5-Year Old’s harp out of a toy chest, his acoustic guitar, and got to work in SONAR X3. Learn more

“Object-Oriented” Clip Mixing in SONAR
When you need to get really detailed, object-oriented mixing is a convenient solution. Craig Anderton explains how to approach this in SONAR. Learn more

How to Use Reverb to Create Depth
Applying the proper Reverb requires more time than just scrolling through the presets of the basic Hall, Room, and Plate algorithms. Cakewalk’s Dan Gonzalez covers the dos-and-don’ts of Reverb for guitars, vocals, drums, and more. Learn more

Video: How to Use Compression
Mixing with Compression is an essential part to shaping and creating a great sounding track. In this video series Dan Gonzalez shows you how to use compression on various types of instruments in SONAR X3 with the CA-2A T-Type Leveling Amplifier. Learn more Continue reading “Highlights from April: Tips to Help You "Mix it Right"”

When To Break The "Rules" Of Digital Mixing

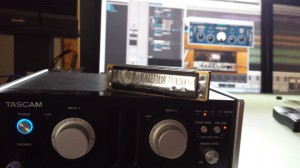
Recently I was asked to create a song for a new short film that will be making the rounds on this year’s film festival circuit.  I got the creative brief [I had to write for a specific subject in the film] and got to work writing and recording everything myself in SONAR X3. Thankfully, SONAR X3 has pretty much everything you need to make a radio-ready track in the box; even if you are a #hack-of-all-trades like me. 😉  It was requested that this song have some grit to it, as well as some acoustic-oriented authenticity, so I grabbed my 5-Year Old’s harp out of his toy chest, my acoustic guitar, and got to work.  The only outboard gear used on this track were a Tascam UH-7000, an AT4033a mic, my Les Paul DC and Carlos Robelli bass.  I also played Dimension Pro organ through a controller.

THERE ARE NO MIXING RULES (KIND OF)

After writing the song on an acoustic and then tracking everything, it was time to mix.  I love mixing in the digital world because there really are no rules in terms of creativity.  Once you understand the basics of frequencies and how to put tracks together properly, you can really get creative with the Continue reading “When To Break The "Rules" Of Digital Mixing”

How to EQ: Carving Out The Right Sound For Your Mix

Sometimes EQ is more about “sonic sculpture” than anything else

by Craig Anderton

One of the most important aspects of mixing is using EQ to “carve out” a specific frequency range for instruments so they don’t conflict with each other. If instruments have their own sonic space, it’s easier to hear each instrument’s unique contribution, which increases the mix’s clarity.

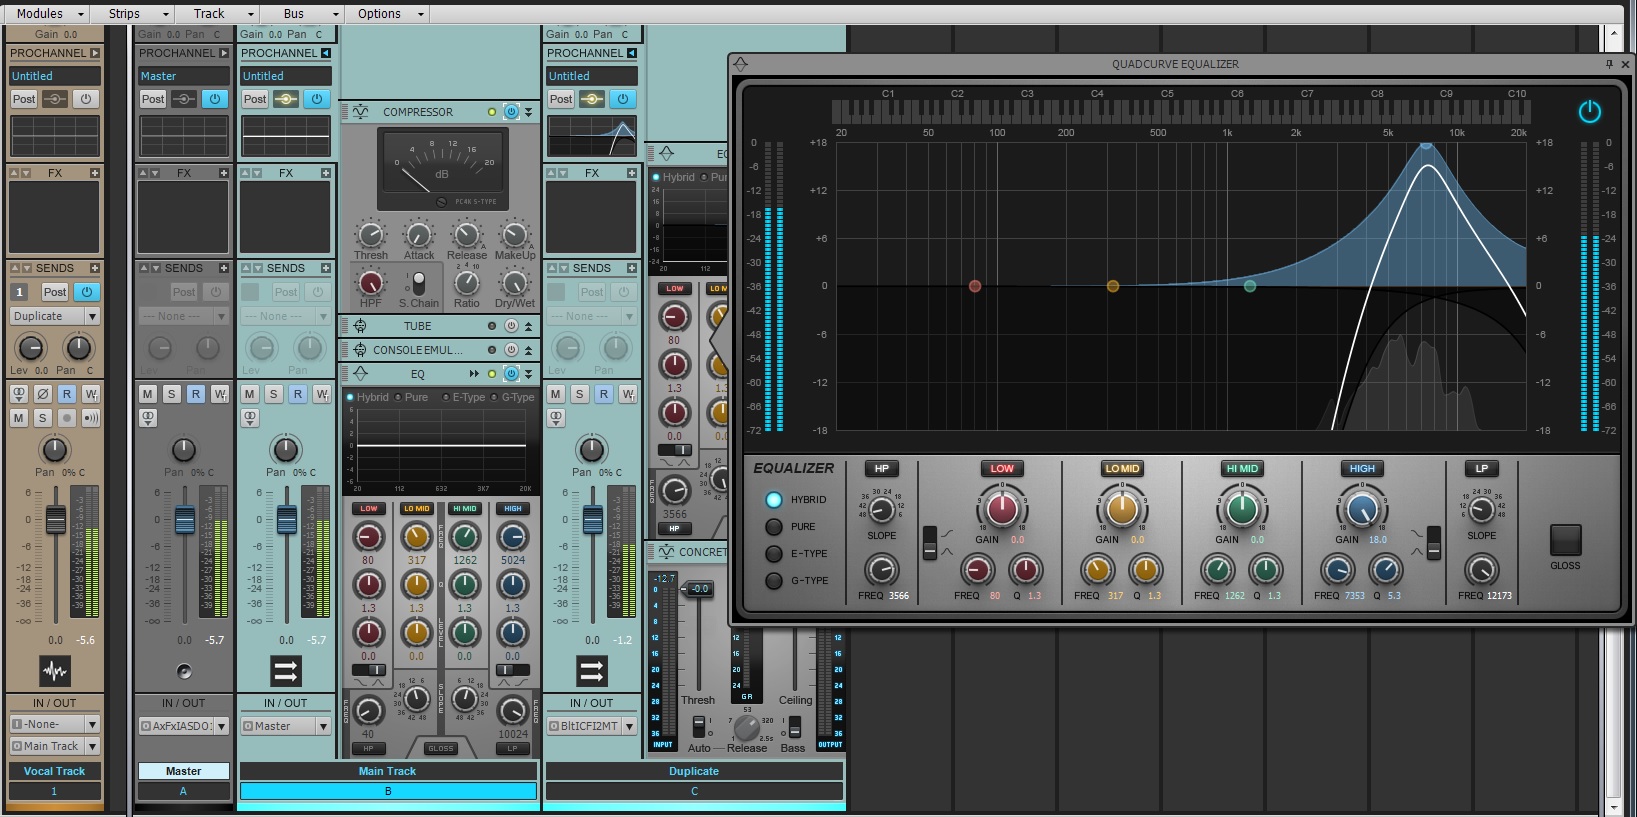
Dan Gonzalez did a great series for the Cakewalk blog on subtractive EQ, and how cutting frequencies can help create a better a mix; this is more of a complementary article about how I carved out EQ for various instruments in a cover version of the song “Black Market Daydreams” (by UK songwriter Mark Longworth). All the displays are set for +/-6dB.

Choirs: Using a low-shelf response to cut starting at the midrange gives the choir more brightness and “air.” This way it sort of floats over the mix. The same approach works well for ethereal pads, and lets you mix them a little lower to make space for other sounds. Also note that I couldn’t resist throwing a little Gloss in there…

Try the QuadCurve EQ in the SONAR X3 Producer Free Trial

Guitar power chord: Enabling the high pass and low pass filters creates a broad bandpass in the midrange area where there’s not a lot of energy Continue reading “How to EQ: Carving Out The Right Sound For Your Mix”

“Object-Oriented” Clip Mixing in SONAR

When you need to get really detailed, object-oriented mixing is a convenient solution

by Craig Anderton

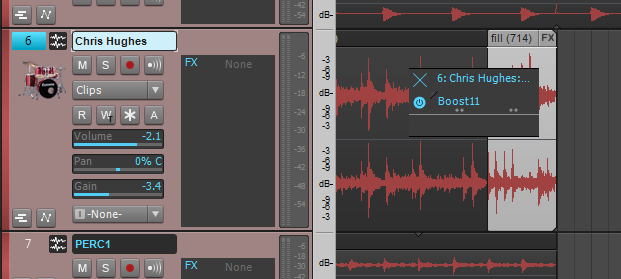
Many times when mixing, you’ll want to apply an effect or volume change to a small, specific section. Clip Automation makes it easy to handle Gain or Pan changes, but you can also work with effects by isolating specific “objects” in a track, then processing them individually. This is different from the usual method of applying effects to an entire track, but can come in really handy for detailed work. Also note that object-oriented effects processing works with any type of clip—audio, MIDI, or groove.

Here’s a step-by-step example of how to apply object-oriented mixing by adding maximization to one drum fill to make it really stand out. Download SONAR X3 to give this a try.

1. To isolate the object from a selected track, alt-click with the Smart tool at the beginning of the section you want to isolate, or place the Now time at this point and type “S.” Do the same at the end of the section.

2. Right-click on the object, and select “Open Clip Effects Bin” from the context menu (keyboard shortcut: Alt+K).

3. An effects bin opens up that’s similar to the standard track effects bin.

4. Right-click on a blank part of the effects bin, choose Audio FX from the context menu, then drill down to find the effect you want.

5. The effect will now appear in the bin. Like a standard effects bin, the small “power symbol” circle (blue for enabled, gray for disabled) appears to the effect’s left. To insert more effects Continue reading ““Object-Oriented” Clip Mixing in SONAR”

Mixing Tips: How to Use Reverb to Create Depth

Introduction

Mix engineers that have had their time behind a board can pick out the misuse of Reverb when they hear it. Just like with anything, applying the proper Reverb requires more time than just scrolling through the presets of the basic Hall, Room, and Plate algorithms.

Overview

Music tends to have a significant three-dimensional experience to it. This concept requires the understanding of width, height, and depth. The best way to understand this is to find a pair of large studio headphones and listen to some billboard topping hits that have dense and complex instrumentation. Grab a sheet of paper and draw two lines intersecting as well as one diagonally through the middle. Label them “Width”, “Height”, and “Depth”. Make a few copies of this sheet and as you listen to the music observe where the instruments sit in the mix. Mark the Toms, Snare, Kick, Vocals, Guitars, Keys, Backing Vocals, Bass, Strings etc. in their respective places on this XYZ plane. Once finished compare and contrast the different songs you listened to and you may notice how different each song turns out. Take one of your own mixes and do the same. You may learn something about your own techniques.

What does this little Continue reading “Mixing Tips: How to Use Reverb to Create Depth”