Optimizing tracks with DSP, then adding some judicious use of the DSP-laden VX-64 Vocal Strip, offers very flexible vocal processing.
By Craig Anderton
This is kind of a “twofer” article about DSP—first we’ll look at some DSP menu items, then apply some signal processing courtesy of the VX64—all with the intention of creating some great vocal sounds.
PREPPING A VOCAL WITH “MENU” DSP
“Prepping” a vocal with DSP before processing can make the processing more effective. For example, if you want to compress your vocal and there are significant level variations, you may end up adding lots of compression to accommodate quiet parts. But then when loud parts kick in, the compression starts pumping.
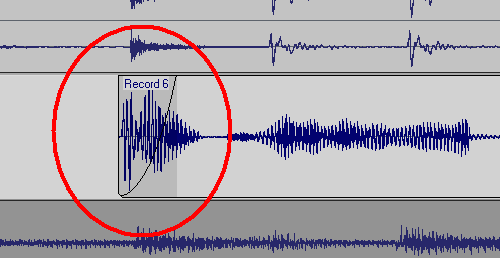
Here’s another example. A lot of people use low-cut filters to banish rogue plosives (e.g., a popping “b” or “p” sound). However, it’s often better to add a fade-in to get rid of the plosive; this retains some of the plosive sound, and avoids affecting frequency response.

Adding a fade-in to a plosive can get rid of the objectionable section while leaving the vocal timbre untouched.
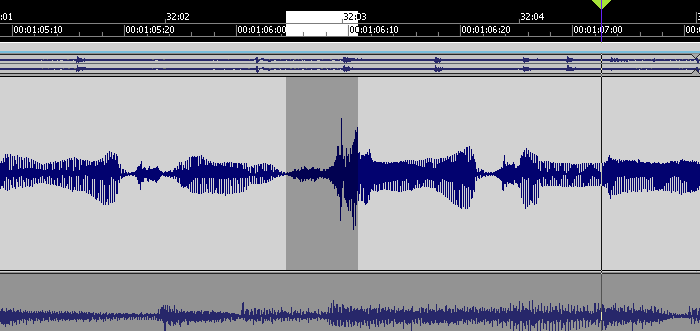
Also check if any levels need to be evened out, because there will usually be some places where the peaks are considerably higher than the rest of the vocal, and you don’t want these pumping the compressor either. The easiest fix is to select a track, drag in the timeline above the area you want to edit, then go Process > Apply Effect > Gain and drop the level by a dB or two.
 This peak is considerably louder than the rest of the vocal, but reducing it a few dB will bring it into line.
Also note that if you have Melodyne Editor, you can use the Percussive algorithm with the volume tool to level out words visually. This is really fast and effective.
While you’re playing around with DSP, this is also a good time to cut out silences, then add fadeouts into silence, and fadeins up from silence. Do this with the vocal soloed, so you can hear any little issues that might come back to haunt you later. Also, sometimes it’s a good idea to normalize individual vocal clips up to –3dB or so (leave some headroom) so that the compressor sees a more consistent signal.
 The clip on the left has been normalized and faded out. The silence between clips has been cut away. The clip on the right fades in, but has not been normalized.
With DSP processing, it’s good practice to work on a copy of the vocal, and make the changes permanent as you do them. The simplest way to apply the changes is simply to select the clip, then go Clips > Bounce to Clip(s). When all the clips have been prepped and (if necessary) normalized, you can then select and bounce all of them into a single clip if you find it easier to deal with a single track rather than multiple clips.
MEET THE VX-64: COMPANDER
The VX-64 vocal strip has a De-Esser, Compressor/Expander, “Tube” Equalizer, Doubler, Delay, and Saturation. The Doubler is a stereo effect, so if the vocal track was recorded in mono, click on the associated mixer channel’s Interleave button and select Stereo.
 The VX-64, re-skinned for a blue look. The graph toward the right provides details on whatever control you’re editing.
Having prepped the track, it’s processing time. I usually do dynamics first, then de-essing, EQ, and finally, anything else…then re-tweak if needed.
Almost every vocal you hear has compression on it. My ideal is a vocal that’s compressed quite a bit, but doesn’t sound it. The DSP prep work helps, and proper use of compression is another. Here’s one way to go about adjusting compression.
1. Assuming your vocal is a nominal –3 dB below 0, set the Threshold to around –15 dB. The top field of the big graph toward the right shows precise parameter values.
2. Increase the Ratio from 1:1 upward until you find the “sweet spot” where the vocal sounds much more consistent, but still natural and lacks any kind of pumping or artifacts (unless, of course, that’s what you want). For natural-sounding vocals the ratio is usually no more than 4:1; for rock/pop vocals, it’s 10:1 and sometimes more.
3. The Attack control has a huge effect on vocals. With very short attacks (under 0.5ms), the clamping on signal dynamics is instantaneous. Attacks of 1ms and above let through some of the dynamics, which gives the vocal more “life.”
4. You may need to go back and re-tweak these controls, as they all interact.
The Compander also includes an Expander section. This is useful for reducing mic preamp hiss, mic handling noise, and other low-level signals. If you already took care of this during the DSP prep phase, you probably won’t need the Expander. To disable it, set the Threshold to –90dB, and the Ratio to 1:1.0.
If you do need to get rid of low-level noise, try a Ratio of 1:10. Turn the threshold up just until there’s no noise in the space between vocals; it’s helpful to find a space like that and loop it to make adjustments easier.
By the way, the Deesser does more than take care of only high sounds. On one song I was mixing, there was an overly loud “shh” sound that didn’t reach particularly high frequencies. But the Deesser (set to its lowest frequency) was able to reduce it.
The easiest way to optimize the Deesser is to:
1. Turn on the Listen switch (up position), so you can hear what’s being removed by the Deesser.
2. Turn Depth up full, then sweep the Frequency until you hear the sound you want to minimize.
3. Turn off Listen. You may be surprised how even a little bit of de-essing can sound like too much when the full vocal is happening, so pull back on the Depth control if needed.
EQUALIZATION
This is so important for vocals, but the VX-64 includes a twist: You can saturate any of the three bands to add a sort of “exciter” effect.
Vocals often need a fair amount of upper midrange boost, especially with dynamic mics. For this, use the middle band set to between 2–4 kHz, and be generous with the boost—maybe even 4 to 6 dB. Think of the high shelf as adding “air,” and use the low shelf to either cut bass if the vocals sound muffled, or add bass if the vocals lack “depth” or “warmth.”
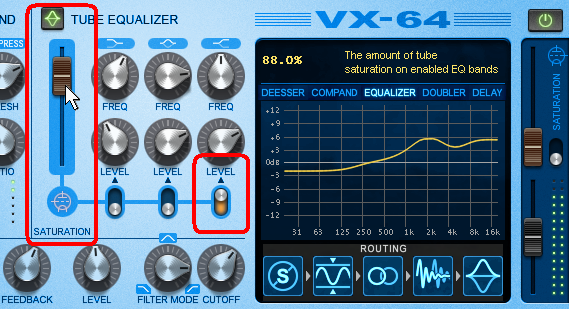
Once the EQ is set, consider adding an extra 5% of sparkle with a tiny amount of saturation. I leave the input and output Saturators all the way down, because I usually don’t do ultra-distorted vocals. But the EQ saturation is something else. There’s a switch for each band that enables saturation for that band, and a “global” Saturation slider for the three bands. What works for me is applying saturation only to the highest band, and turning up the Saturation fader until the little tube icon barely glows on peaks. The extra sheen can be a subtle, but audible, improvement.
 The switch that enables saturation for the equalizer’s high shelf is enabled. Note that the Saturation slider may seem very high, but because it’s restricted to only the higher frequencies, it adds a very subtle effect.
DOUBLING AND DELAY
Now that the vocal sounds solid, let’s put on the audio equivalent of makeup.
If you like to double your vocals, you’ll love the Doubler (remember, set your vocal track to stereo for this to sound right). The Presence control mixes in the doubled line, while Stereo changes the doubling’s width. You can reinforce your voice without necessarily having it sound “doubled” by turning Stereo fully counterclockwise, then bringing up Presence just enough to add fullness. On the other hand, if you want to sound like a trio of voices, turn Stereo fully clockwise, and add a lot of presence.
The Delay appears fairly standard—Delay, Feedback, and Level controls, with Delay synchable to tempo. The interesting twist here is that you can filter the echo with a morphable filter (from lowpass, to bandpass, to highpass, with variable cutoff frequency). Highpass is excellent for adding an ethereal quality, while a midrange bandpass filter sounds more like an old tape echo. I haven’t found much use for echoing only the bass, but someone will probably figure out some amazing application for it, and end up getting a hit record…
ORDER IN THE EFFECTS
Like the PX-64, you can change the order of effects just by dragging around their little icons in the lower right; try the Deesser in various locations to determine which does the best job (usually it’s the first slot, but experiment). Try EQ both before and after compression. I usually place the Doubler and Delay last.
Finally, remember to re-tweak if needed, and when you get something you like, save it as a preset. You just may need the same effect again—in fact, you probably will!


One Reply to “Optimizing Vocals with DSP”
Comments are closed.