Optimizing tracks with DSP, then adding some judicious use of the DSP-laden VX-64 Vocal Strip, offers very flexible vocal processing.
By Craig Anderton
This is kind of a “twofer” article about DSP—first we’ll look at some DSP menu items, then apply some signal processing courtesy of the VX64—all with the intention of creating some great vocal sounds.
PREPPING A VOCAL WITH “MENU” DSP
“Prepping” a vocal with DSP before processing can make the processing more effective. For example, if you want to compress your vocal and there are significant level variations, you may end up adding lots of compression to accommodate quiet parts. But then when loud parts kick in, the compression starts pumping.
Here’s another example. A lot of people use low-cut filters to banish rogue plosives (e.g., a popping “b” or “p” sound). However, it’s often better to add a fade-in to get rid of the plosive; this retains some of the plosive sound, and avoids affecting frequency response.
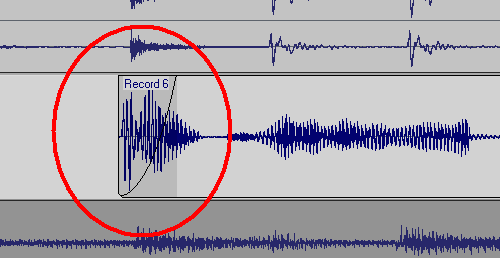
Adding a fade-in to a plosive can get rid of the objectionable section while leaving the vocal timbre untouched.
Also check if any levels need to be evened out, because there will usually be some places where the peaks are considerably higher than the rest of the vocal, and you don’t want these pumping the compressor either. The easiest fix is to select a track, drag in the timeline above the area you want to edit, then go Process > Apply Effect > Gain and drop the level by a dB or two.
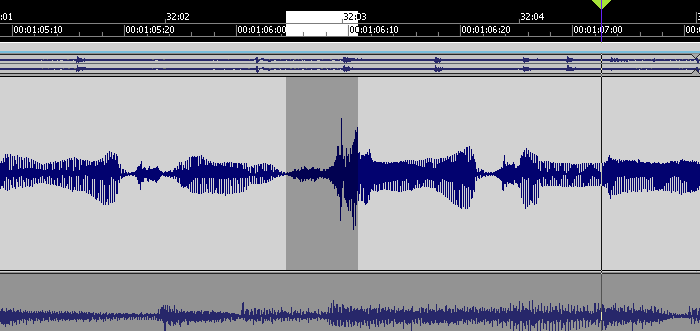 This peak is considerably louder than the rest of the vocal, but reducing it a few dB will bring it into line.
Also note that if you have Melodyne Editor, you can use the Percussive algorithm with the volume tool to level out words visually. This is really fast and effective.
While you’re playing around with DSP, this is also a good time to cut out silences, then add fadeouts into silence, and fadeins up from silence. Do this with the vocal soloed, so you can hear any little issues that might come back to haunt you later. Also, sometimes it’s a good idea to normalize individual vocal clips up to –3dB or so (leave some headroom) so that the compressor sees a more consistent signal.
 The clip on the left has been normalized and faded out. The silence between clips has been cut away. The clip on the right fades in, but has not been normalized.
With DSP processing, it’s good practice to work on a copy of the vocal, and make the changes permanent as you do them. The simplest way to apply Continue reading “Optimizing Vocals with DSP”



 This peak is considerably louder than the rest of the vocal, but reducing it a few dB will bring it into line.
 The clip on the left has been normalized and faded out. The silence between clips has been cut away. The clip on the right fades in, but has not been normalized.
