Recording Virtual Synthesizers: The Art of Imperfection

Synths can make perfect sounds…but is that always a perfect solution?

by Craig Anderton

Recording a virtual instrument is simple…you just insert it, hit a few keys, and mix it in with the other tracks. Right?

Well…no. Synthesizers are musical instruments, and you wouldn’t mic a drum set by taking the first mic you found and pointing it the general direction of the drummer, nor would you record an electric guitar by just plugging it into a mixing console. A little extra effort spent on avoiding an unnatural sound when mixing synths with acoustic instruments, improving expressiveness, tightening timing inconsistencies, and other issues can help you get the most out of your virtual instruments.

But first, remember that “rules” were made to be broken. There is no “right” or “wrong” way to record, only ways that satisfy you to a greater or lesser degree. Sometimes doing the exact opposite of what’s expected gives the best results. So take the following as suggestions, not rules, that may be just what the doctor ordered when you want to spice up an otherwise ordinary synth sound.

THE SYNTHESIZER’S SECRET IDENTITY

The paramount aspect of recording a synth is to define the desired results as completely as possible. Using synths to reinforce guitars on a heavy metal track is a completely different musical task from creating a all-synthesized 30-second spot. Sometimes you want synths to sound warm and organic, but if you’re doing techno, you’ll probably want a robot, machine-like vibe (with trance music, you might want to combine both possibilities).

So, analyze your synth’s “sonic signature”—is it bright, dark, gritty, clean, warm, metallic, or…? Whereas some people attach value judgements to these different characteristics, veteran synthesists understand that different synthesizers have different general sound qualities, and choose the right sound for the right application. For example, although Cakewalk’s Z3TA+ is highly versatile, to my ears its natural “character” is defined, present, and detailed.

Regarding sonic signatures, perhaps one of the reasons for a resurgence in analog synths sounds is digital recording. Analog synths tended to use low-pass filters that lacked the “edgy” sound of digital sound generation. Recording the darker analog sounds on analog tape sometimes resulted in a muddy sound; but when recording on digital, analog sounded comparatively sweet. Digital also captured all the little hisses, grunts, and burps that characterized analog synths. This is a case where the “imperfections” of analog and the “perfection” of digital recording complemented each other.

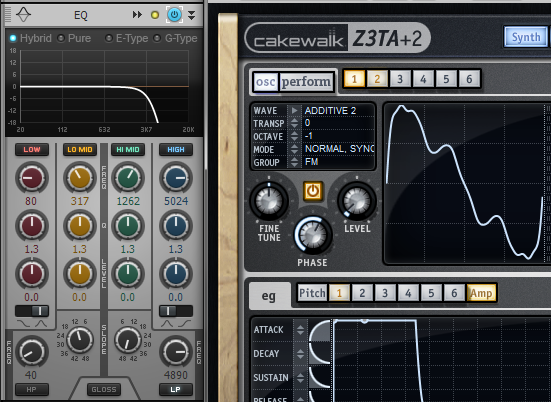
Another thought: look at guitars, voices, pianos, etc. on a spectrum analyzer, and you’ll note there is little natural high end. If you’re trying to blend a virtual instrument in with physical instruments, remember that a virtual synth has no problems obtaining a solid high end. Using the ProChannel’s LP filter set to 48dB/octave and lowering the frequency just a little bit can introduce the “imperfection” that matches the spectral characteristics of “real” acoustic and electric instruments more closely, so the synth seems to blend in better with the other tracks (Fig. 1).

Fig. 1: The ProChannel QuadCurve EQ’s lowpass filter can help digital synths sit better in tracks that use multiple physical or acoustic instruments. Continue reading “Recording Virtual Synthesizers: The Art of Imperfection”

When To Break The "Rules" Of Digital Mixing

Recently I was asked to create a song for a new short film that will be making the rounds on this year’s film festival circuit.  I got the creative brief [I had to write for a specific subject in the film] and got to work writing and recording everything myself in SONAR X3. Thankfully, SONAR X3 has pretty much everything you need to make a radio-ready track in the box; even if you are a #hack-of-all-trades like me. 😉  It was requested that this song have some grit to it, as well as some acoustic-oriented authenticity, so I grabbed my 5-Year Old’s harp out of his toy chest, my acoustic guitar, and got to work.  The only outboard gear used on this track were a Tascam UH-7000, an AT4033a mic, my Les Paul DC and Carlos Robelli bass.  I also played Dimension Pro organ through a controller.

THERE ARE NO MIXING RULES (KIND OF)

After writing the song on an acoustic and then tracking everything, it was time to mix.  I love mixing in the digital world because there really are no rules in terms of creativity.  Once you understand the basics of frequencies and how to put tracks together properly, you can really get creative with the Continue reading “When To Break The "Rules" Of Digital Mixing”

Mixing Tips: Know Your Signal Flow in SONAR

Signal Flow is an important concept to understand, and it may be easier to think about when presented with a diagram of how audio is passes through SONAR.

Inputs and Outputs – Easier than you think!

The first concept to understand is the relationship between Inputs and Outputs. There isn’t anything complex about the subject unless you over-think it.  It is the underlying theme to just about anything within your Digital Audio Workstation. Always remember the following:

  • Outputs: Always feed Inputs
  • Inputs: Always fed by Outputs

Sometimes Outputs can be named “Outs or Sends” and sometimes Inputs are labelled “Ins or Returns.” If you’re a guitar player then you can associate this concept with the FX Loop that exists on the back of your amp. You use this to Send audio to your effects pedals and then back to your Amp’s Return.

First, let’s start where audio starts. Typically it begins with an instrument or audio file:

Upon opening SONAR many users will head straight to their Media Browser and Continue reading “Mixing Tips: Know Your Signal Flow in SONAR”

DAW Best Practices: Migrating SONAR to a New Computer

So you just brought home your shiny new dream machine computer with the most powerful CPU, loads of drive space and more RAM then you know what to do with. First thing you do is fire up SONAR to work on a project but wait – you can’t find any of your favorite plug-ins. It’s time to migrate all of your favorite settings, and this handy article will show you how.

Set-up
The first thing you will need is a way to move files from your old computer to your new one. The easiest method is with GobblerContinue reading “DAW Best Practices: Migrating SONAR to a New Computer”

Free SONAR X3 Clinic by Berklee Online [March 31st 2014]

Innovative Music Production Techniques with Cakewalk SONAR X3

When: Monday, March 31 at 4:00pm ET
Length:
30 minutes

Next Monday, join Berklee Online for an in-depth online clinic with Craig Anderton, a renowned music technologist and producer, and Chief Magic Officer for Gibson Brands.

Learn how to create, edit, master, and more using SONAR X3 Producer.


Topics for this Open House will include:

  • The MIDI advantage for songwriting
  • Using loops for both songwriting and EDM
  • Speeding up workflow to prevent “inspiration atrophy” (effects chains, track templates, browser techniques, etc.)
  • Creating your own mixer architecture
  • Using “spot” timing correction to tighten timing without destroying feel
  • How to make amp sims sound great (e.g. effects chains)
  • Mastering in SONAR

Sign-up here

Flat Response Amps vs. Conventional Guitar Amps

Many guitar players are discovering the advantages of the FRFR (Full Range, Flat Response) guitar amp compared to conventional amps. This isn’t to diss the traditional guitar amp; it’s great, and has its uses. But the FRFR option has some compelling advantages.

A guitar amp does more than make soft signals loud. The cabinet is basically a filter; open-back cabinets reduce bass, closed-back types give more bass, and the high-frequency response starts rolling off at around 5kHz. Also, the preamp and power amp affect the sound dramatically—or Spinal Tap would never have praised the virtues of turning up an amp to eleven.

Guitar amps are wonderful not because they’re precision devices like studio monitors, but because they’re about character. Adding a pedalboard and some cool effects creates a setup that has served us well for decades.

However, conventional guitar amps are generally limited to a particular “signature” sound. Plugging your guitar into a different amp or direct into a PA mixer gives a different sound. Tube amps have their own magic, but also, some drawbacks: Tubes get “soft” over time, wear out, and can become microphonic.

An FRFR amplification system is like a PA or studio monitoring system—clean and accurate. You get your “sound” before it hits the FRFR amp, either through a quality multieffects with amp/cab simulation, or a laptop running amp sim software. This means you’ll get the same sound whether you plug into an FRFR system, PA, or recording setup because your tone isn’t dependent on the specific way an amp colors your sound.

Read the full article by Craig Anderton

Free Download: White Knuckle Bass Presets for TH2 Producer

I sat down with some of my best session players to collaborate on 50 presets for TH2 Producer that are sure to add some grit to your low-end instruments. It’s no secret that my passion is mostly in the Rock and Metal world of music and I’ve felt that Bass doesn’t get enough love in those genres. Below are 5 examples from the Free Download that outline some great Rock and Metal lead, rhythm, clean, and ambient effects and I would definitely pull out of my bag of tricks for a record.

1. Pick Rhythm

Here’s a style of playing called “Djent” that has been popular in the last couple years. Typically this sound is done with down-tuned guitars but why not just use a bass? I’ve double-tracked this recording to give a wider sound Continue reading “Free Download: White Knuckle Bass Presets for TH2 Producer”

RECREATING PORTAL 2′S “WANT YOU GONE” WITH MUSIC CREATOR 6 TOUCH [PART 2: VOCAL TIPS]

Recently, Cakewalk worked with the great folks over at Valve to make our Music Creator 6 Touch software available to their community, and the onslaught of new “music creators” has been nothing short of amazing and inspiring.  To kick off our promotion, we thought it would be a fun experience to recreate Jonathan Coulton’s cult classic “Want You Gone” from Portal 2 all in Music Creator 6 Touch (MC6t) – but the kicker is that we had 24 hours to do it in order to make the deadline for launch.  In this case, not only was collaboration creatively beneficial, but it was also essential.
Getting the bed-tracks together was the first step, and you can read our previous blog here on how this all came together.  Cakewalk’s Bill Jackson and Seth Kellogg spent time programming some great drum tracks, keyboards and guitars, and then I was able to easily embellish and add to the programming with loops, sounds and mixing.  After the drums, bass, keys and guitars were in a good spot, it was time to figure out how we were going to capture the focal point of the song: THE VOCALS.

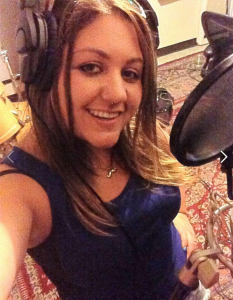
I had just finished a record with a great singer by the name of Jodi Good so she was my first logical phone call.   As timing and luck would have it, she had just finished her video shoot for her first single (Definitely Different) in NYC and she had a 2 hour window to help pitch in.  There were two hurdles: 1.) she could not make it out to my studio, and 2.) I had to get clearance for name, likeness and sound from her and her legal team for usage – not a problem 😉

Continue reading “RECREATING PORTAL 2′S “WANT YOU GONE” WITH MUSIC CREATOR 6 TOUCH [PART 2: VOCAL TIPS]”

Approaching Drums Left of Center with AudioSnap and Session Drummer – Norman Matthew [MURDER FM]

So Last “NorMonday” I went on a little (ok a lot) about how I approached tracking guitars, before that we tapped on my signature vocal techniques. Now it’s time to get into the foundation of it all, drums. Again, prepare yourself for some left of self-centered techniques.

THE KICK DRUM SUCKS…NO WORRIES, THERE’S AN APP FOR THAT

Seems there’s an app for EVERYthing these days. In the recording world, I like to think of plugins as the “apps.” I’ve been part of approximately 16.25 trillion sessions and not a-one has gone by that I haven’t run into a horrible kick drum sound – clicks, flaps, slaps, flops or just generally sounding like a basketball being dribbled through my mic. The flip-side to these tones of course, is that Gawd-awful weak kick drum that sounds like an egg-beater hitting a pillowcase.

Well I have found a Godsend when it comes to such atrocities….SESSION DRUMMER and AUDIO SNAP!

Drum replacement happens EVERYwhere, ALL the time, so don’t let anyone fool you… the key is knowing how to keep the feel and dynamics alive. I learned a lot about drum replacement from producer Beau Hill (Ratt, Eric Clapton, Alice Cooper, etc.), who took me under his production wing and mentored me on many techniques. In music production, we all strive for the best drum sounds because after all, that is what the rest of the music sits on. Unfortunately, we can’t all afford fancy tracking rooms where the walls move to adjust to the natural reverb. So, many of us at one point or another are slaves to the machine: tracking drums in the jam room, or in mom’s garage next to the washing machine (which is constantly on for some reason). Continue reading “Approaching Drums Left of Center with AudioSnap and Session Drummer – Norman Matthew [MURDER FM]”