The Evolution of Comping

Compiling or “Comping” takes is relatively new to sound recording. With the increased ability of technology has come the increased desire to comp with excruciating attention to detail, sometimes all the way down to a syllable or note, to create “The Perfect Take.”

The Acoustic and Electrical Eras (1877-1945)EdisonPhonograph

When audio recording was first introduced, it was an entirely mechanical process. Comping did not exist. In fact, neither did mixing as we know it. Everything was recorded in one take, and level adjustments were made by moving musicians closer to or farther from the horn–essentially the microphone of its time.

In the primitive stages of this recording format, it was not uncommon to have copies of the same record that sounded entirely different. This was because if a band wanted to release 1,000 copies of a song, they would have to record it 1,000 different times, each take resulting in its own uniquely-performed copy.
Continue reading “The Evolution of Comping”

Five Reasons Why Patch Points Rock

By Craig Anderton

Looking for some advanced, interesting, or downright weird ways to use the new Patch Points feature? Here you go:

Signal Splitter

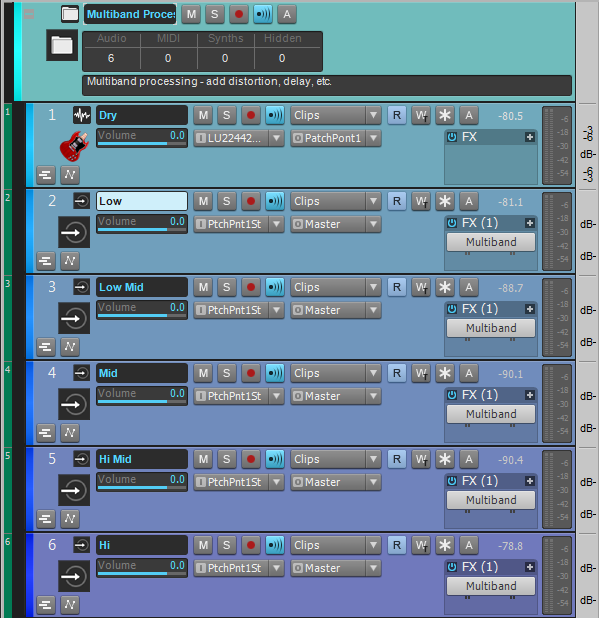
Suppose you want to split one track to several outputs, for example to do multiband processing. Here’s how:

SONAR Patch Points Splitter

The Dry track output goes to Patch Point 1 instead of the master bus. Five tracks, each of which filters a different band of frequencies, have their inputs set to Patch Point 1. The Dry track now feeds all five channels simultaneously. Placing all these tracks inside a track folder makes it easy to fold them up when you want a tidier setup.
Continue reading “Five Reasons Why Patch Points Rock”

5 Ways SONAR's Rolling Updates Are Working For You

With the introduction of the new SONAR last January, we also introduced a new delivery model we call Rolling Updates. Essentially, when you purchase an upgrade to SONAR Artist/Professional/Platinum, you receive 12 months of SONAR updates free. Each month, you receive an update (or sometimes more) which can include anything from fixes to new features and tools, add-ons, additional content, tutorials, and more. Once the initial 12 month period is up, you can renew for an additional 12 months and continue to receive updates, or keep everything you own up to this point. Lots of folks were skeptical at first about these Rolling Updates, but since their introduction, they’ve proven their worth. Here’s how:

5) Faster Learning Curves

When we were releasing a version every year or so, you’d receive a whole boatload of new features all at once – which was pretty cool, except you suddenly had tons of totally new features you had to learn to use. These game-changing new features were often designed to speed up your workflow and make your life a little easier, but investing the time to learn how all the new things worked could be overwhelming.

With Rolling Updates, you can now ease into all these new features. Instead of piling on 10-20 new tools, we’re introducing them in bite-sized pieces so you can take them in one or two at a time. This allows you to get a real feel for how they work before diving into something new, and has less impact on your workflow.

Continue reading “5 Ways SONAR's Rolling Updates Are Working For You”

5 Tools To Get "That Analog Sound" From SONAR

With the advent of digital audio, some feel a certain quality associated with the analog signal path has been lost. While that may have been true at one point, analog emulations have come a long way since first introduced. Let’s find out how to add that “analog sound” using some of SONAR’s plugins. (Note: Many of the following examples use features are exclusive to SONAR Platinum, so if you don’t already have this version, you can try a free demo by clicking here.)

#5 – ProChannel Tape Emulation

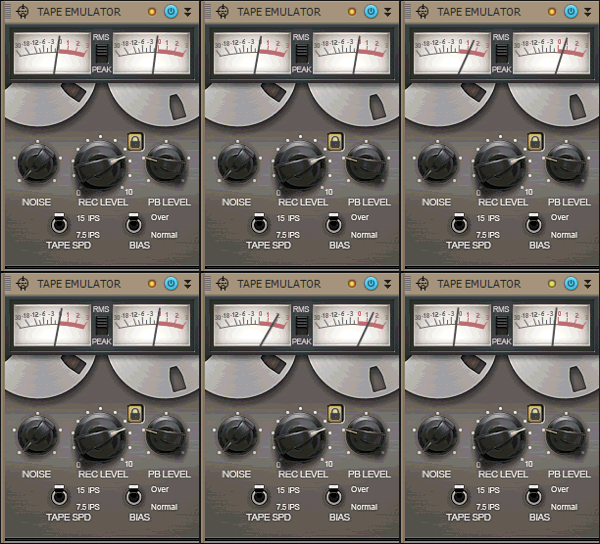
Tape Emulator Gif

Tape does some pretty magical things to audio, so SONAR Platinum includes tape emulation as a ProChannel module. Best  of all,  you can use it as much as you like without having to clean the heads!

Here’s how tape emulation enhances the sound:

  • Emulates the “head bump” of analog tape to enrich the low end, adding subtle warmth
  • Smooths response by slightly rolling off lowest lows and highest highs
  • Increases sustain by smoothing peaks
  • Saturates the signal in a non-linear, analog manner
  • Optionally introduces high-frequency hiss

For a basic application, insert the Tape Emulator in the Master Bus ProChannel. You’ll immediately hear a more cohesive mix. Increasing the REC LEVEL increases the overall saturation. The REC LEVEL knob, TAPE SPD switch, and BIAS switch all interact in unique ways, so try out different combinations to hear how they affect each other.

After hearing how the Tape Emulator affects your sound, try applying it to individual tracks (your drums will sound particularly fabulous). This will be a more subtle effect, adding a sense of depth to the overall mix.

Continue reading “5 Tools To Get "That Analog Sound" From SONAR”

HOW ILAN BLUESTONE APPROACHES HIS CHARTING EDM TRACKS

SONAR Platinum artist iLan Bluestone’s career trajectory is moving fast.  The jet-setting EDM producer is touring the world, but was kind enough to share not only his time with us discussing his music production techniques, but also his new single collaboration with mogul-producer BT titled “All These Wounds.”  We caught up with iLan in Chicago at the Spring Awakening Festival, and then again down the road at Sweetwater’s Gearfest:

Speed Up Your Workflow With 5 (Rather Hidden) SONAR Features

SONAR has a LOT of features. So many, in fact, that it’s easy for some of them to fly right under the radar. The list below contains five of my favorite SONAR features that can really speed up your workflow!  Download the latest SONAR Free Demo and follow along.

#5 – Clip Coloring

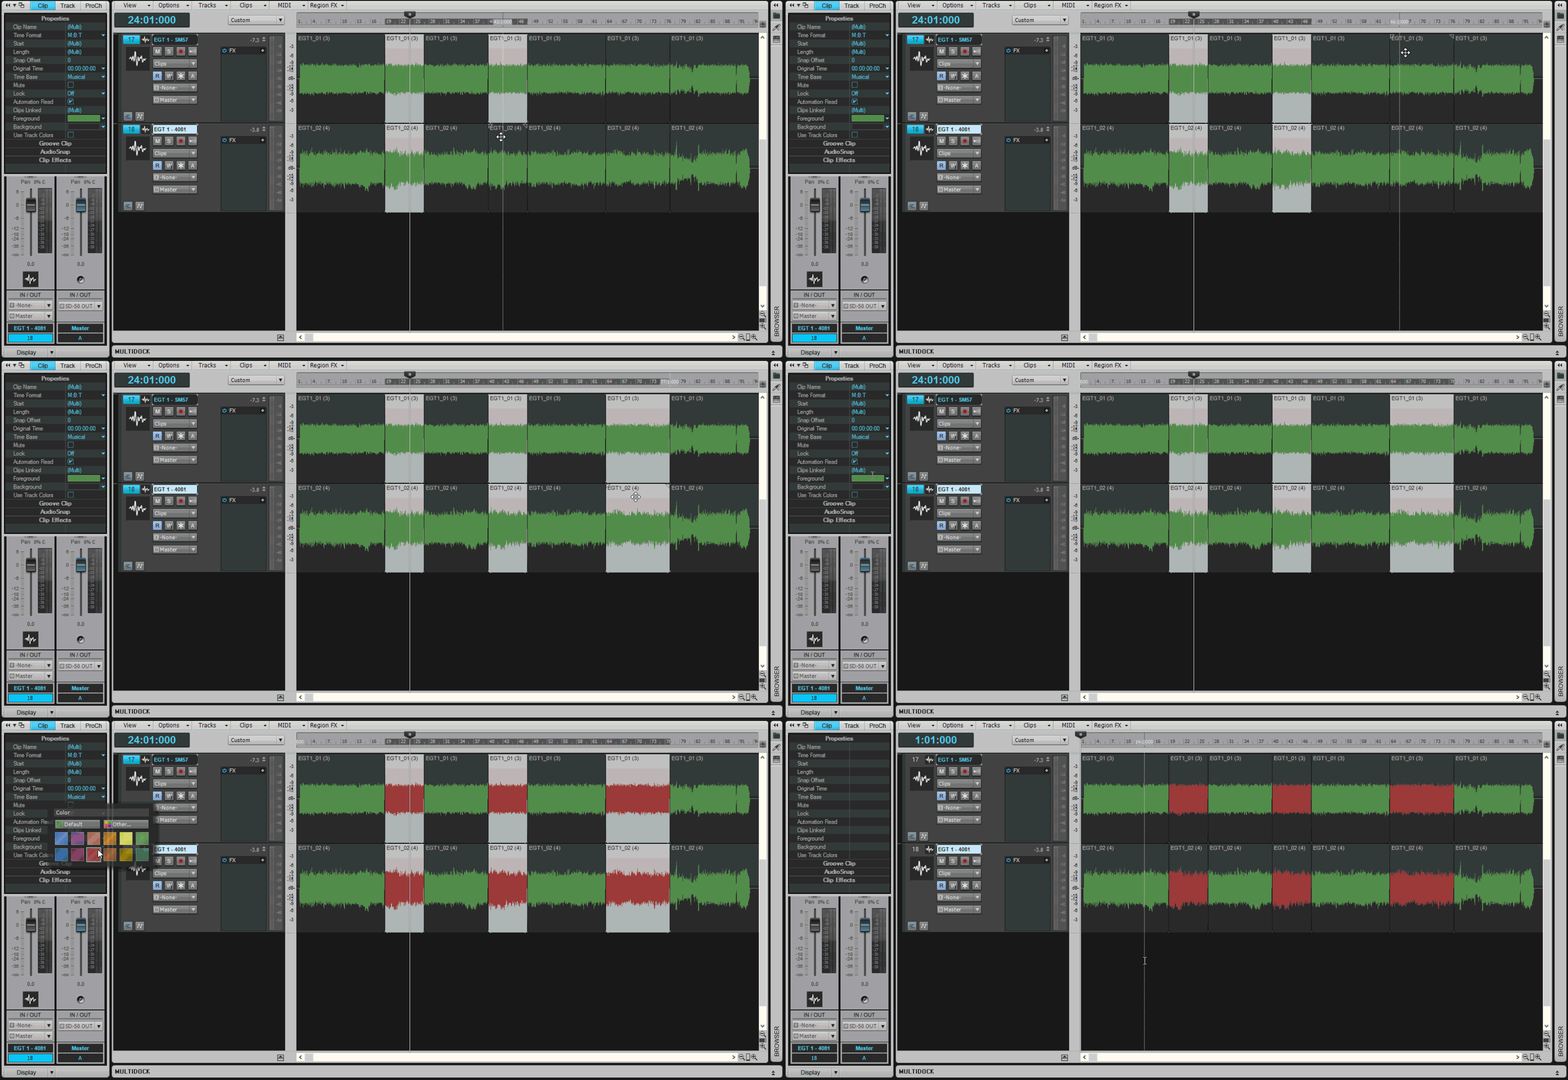
Let’s say you’ve recorded a couple of guitar tracks, and the guitar player changed tone in certain parts of the song. You may want to identify these parts easily during the mixing process. Markers can work, but I typically use those to indicate sections and turning points in the song, and the tone change doesn’t always line up with arrangement changes. Instead, you can change the clip color in these sections to make the parts easier to find.

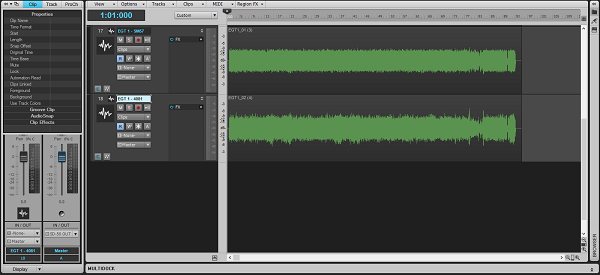
Here are the clips in their original state:
Clips Before Editing

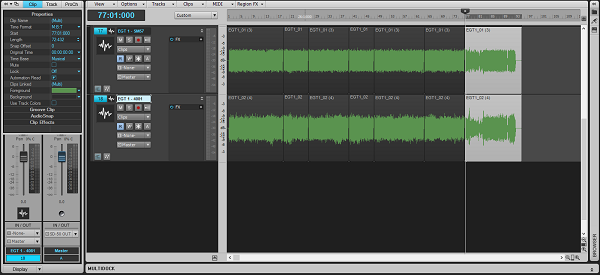
Make some splits where the pickup change happens:
Clips Have Been Split

Now, select the parts with Shift+Click where the guitarist changes his tone, and using the Foreground selector in the Clip Inspector, color these red:
Clip Coloring GIF

You can now see all the sections where the guitar player used an alternate tone by the red waveform, which can come in very handy while mixing.

Continue reading “Speed Up Your Workflow With 5 (Rather Hidden) SONAR Features”

Mixing Vocals: Create Depth with a Digital Reverb

by Dan Gonzalez

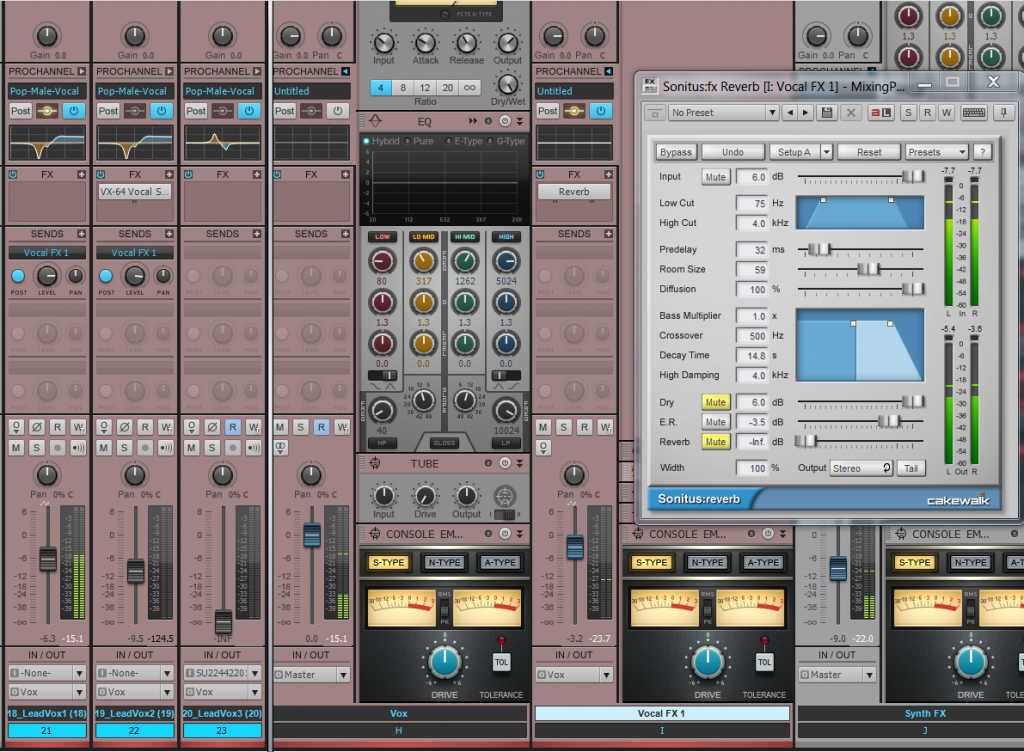
Depth is a factor of every mix, just like Height and Width. This is a harder concept to grasp because there really is no “Depth” adjust on a mixer. In this article we’ll talk about how to create depth using the Sonitus Reverb.

Creating Depth using the Sonitus Reverb

Digital reverbs are the proverbial swiss-army-knives of the mixing world. They are programmed in a way that emulates every part of a reverb. This includes the pre-delay, decay time, width, diffusion, early reflections etc. Since these emulate spaces like halls, plates, rooms, and other reverberant places – we can use them to create a room sound around our audio tracks for the purpose of creating depth. That’s a fancy way of saying that we can use reverb for depth. Here’s a vocal track that has no effects on it at all. It’s mixed into this track completely dry.

Continue reading “Mixing Vocals: Create Depth with a Digital Reverb”

The New SONAR: New Tricks for Drag and Drop

by Dan Gonzalez

There are a lot new things going on inside of the new SONAR Platinum, Professional, and Artist especially in some of the parts of the interface that aren’t so obvious. Did you know that we made some enhancements to our Media Browser and Drag and Drop mechanism? Well, it’s pretty useful stuff – especially for our die-hard users that know and love these workflows.

Export region selections using drag and drop

Within SONAR, you can now select a portion of an audio clip in the track view and drag it to another location on your computer. This nifty trick is great for extracting parts of audio without editing it and exporting.

Drag and drop now renders certain fx

Next up, if you drag audio clips to a destination outside of SONAR, any Clip FX or Clip Gain envelopes will be applied to the clip. Previously we wouldn’t bake any of this into the audio – but now it’s a pretty seamless.

Drag and drop to media browser inherits interleave setting

Drag and drop to the Media Browser now properly exports the expected interleave (mono or stereo) instead of always exporting to a stereo file or multiple mono. Multiple mono files work, but they can be annoying if you want to stick to the way your tracks were meant to be heard. You can see in the snippet below that my stereo audio file is twice the size of it’s mono counterpart. These were exported to the Media Browser using drag and drop.


Media Browser now supports Broadcast Wave Format via Drag and Drop

Drag and drop to the Media Browser now supports Broadcast Wave format so if you’re transferring files from one project to another – they’ll stay true to your timestamp on the timeline.

Copy or Replace Files Using Drag and Drop

Audio and MIDI files can be copied or replaced in the Media Browser via drag and drop using the CTRL modifier. If you drag and drop an auio file to the Browser, SONAR will rename it. But if you hold CTRL while you do this, the file will force the Clip Name that it has inside of SONAR. You can see here how the Clip Name stays as (19) when holding down CTRL.

In addition, if you need to replace the same file in your browser with an update version all you do is hold CTRL while dragging to the Browser.

Wrap Up

Grab your new version of SONAR Platinum, Professional, and Artist and start checking out these new tweaks today. Stay tuned for more about the latest additions to our Skylight Interface and upcoming new features on SONAR’s What’s New page.

Achieve More Professional Sounding Vocal Tracks With VocalSync

by Jimmy Landry

Things have obviously changed in music production over the years, but just recently a few technological advances have surfaced that are game-changers. One of these items includes the VocalSync technology inside the new SONAR Platinum. What exactly is VocalSync and why should you care? Here is one real-world practical example:

VocalSync is a tool that’s integrated directly inside of SONAR Platinum which gives anyone working with vocals 2 distinct benefits:

1. The ability to save a lot of time from manual editing
2. The sonic advantage of producing tight professional sounding multi-tracked vocals

It does this by “guiding” or conforming the information on one track to match another more fluently. The outcome of this is a much more professional production sound in the vocal tracks.

Let’s take a look at a real-world example: Recently, I had the good fortune to work with a great artist from Finland by the name of Peppina who has made a name for herself through Joseph Gordon-Levitt’s brainchild platform HitRecord. If I had to compare or categorize her music I would say it’s a modernized version of Dido sprinkled with some Sarah Bareilles and Ingrid Michaelson. With my producer hat on, I thought to myself that her vocals needed to be very large and wide on the tracks, but they also needed to sound authentic, realistic and intimate. To achieve this sound for the lead vocal, I used VocalSync to tighten 3 “takes” that would work together strategically in the stereo field. Continue reading “Achieve More Professional Sounding Vocal Tracks With VocalSync”

Drum Maps for Addictive Drums 2 in SONAR

by Joey Adams

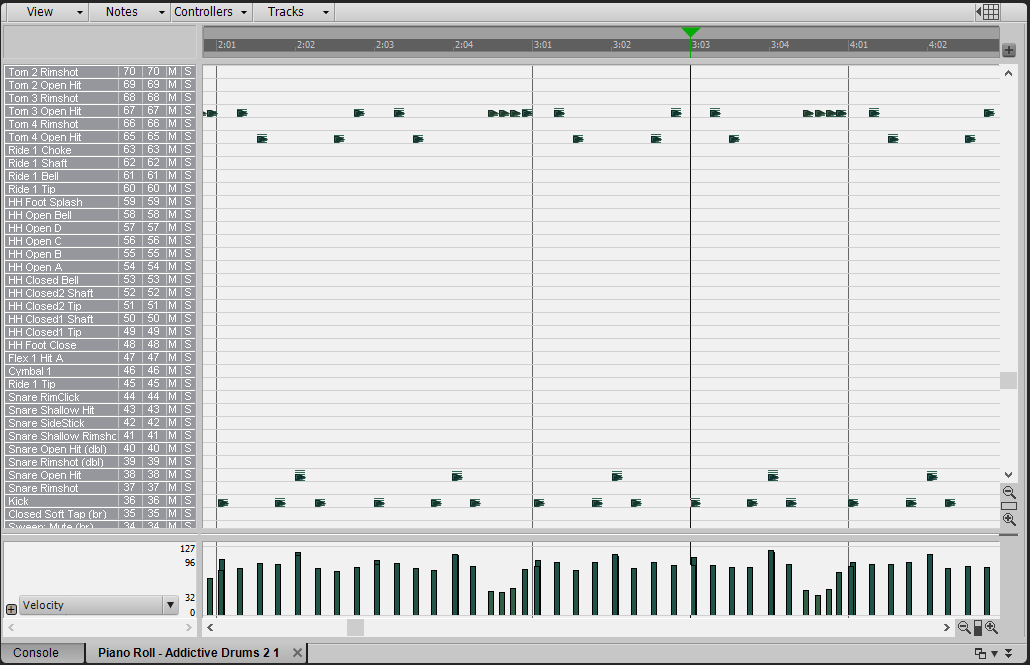
Drum Maps are a powerful tool for taking all the guesswork out of editing your MIDI drum tracks. By using Drum Maps, you are able to see exactly which MIDI Notes trigger which sounds in your VST drum kit.

The purpose of this particular Drum Map is to allow you to see the relationship between MIDI notes and drum kit pieces of Addictive Drums 2, a VST Instrument included with your SONAR Professional and SONAR Platinum software.

Here is what editing MIDI in Piano Roll view looks like without a Drum Map:

Here is the same exact MIDI data viewed with a Drum Map. Now you can see exactly which pieces of the drum kit are in use:


Step  1 – Download the files you’ll need

To get started you will want to download the Continue reading “Drum Maps for Addictive Drums 2 in SONAR”