Universal Routing Technology 202: Unlocking the Creative Potential of the Aux Track

By Craig Anderton

Here are some representative applications for using Patch Points and Aux Tracks. There are often several ways to accomplish the same functionality, so use whichever is most comfortable. For example, if you already have existing tracks that you want to connect to Patch Points, it’s probably easier to assign their inputs to Patch Points than create new Aux Tracks. However, if you’re setting up a new recording scenario, it will probably be easiest to create an Aux Track as that will create both a track and a Patch Point assignment.

Application #1: Recording the Metronome to a Track

Note: If your project already contains a Metronome bus, skip to step 7.
  1. Choose Insert > Stereo Bus to create a new bus for the audio metronome.
  2. Rename the new bus to Metronome.
  3. Choose Edit > Preferences > Project – Metronome.
  4. Select the Recording check box and clear the Playback check box (you will hear the recorded metronome instead during playback).
  5. Select “Use Audio Metronome.”
  6. Click the Output drop-down menu and select the bus named Metronome, then click OK to close the Preferences dialog box.
  7. Click the Metronome bus’s Output control and select New Aux Track on the pop-up menu.
  8. Arm the Aux Track for recording.
  9. Begin recording.

Continue reading “Universal Routing Technology 202: Unlocking the Creative Potential of the Aux Track”

Universal Routing Technology 101: Improving Your Workflow With Patch Points

By Craig Anderton

Cakewalk has been quietly developing a Universal Routing Technology that gives tremendous flexibility when routing signals within SONAR. One of the first examples was the FX Chain, which provided a “container” for routing effect inputs and outputs together, and had the intelligence to disconnect controls if the effects being controlled were removed. The ProChannel and FX Racks are a basic example of taking the “insert jacks” on mixers to a more flexible level by providing two ways of inserting effects, where one block could be pre or post compared to the other.

Synth recording took the concept another step further by allowing real-time recording of synth outputs, but now Patch Points and Aux Tracks introduce a mind-boggling level of flexibility: you can feed tracks (audio or instrument) into tracks, buses into tracks, sends into tracks, or even (get ready!) tracks, sends, and buses into the same track—and much more. It’s even possible to do something like feed track outputs and bus outputs into an Aux Track, when can then feed with other Aux Tracks and a Send into a different track. This may sound complicated enough to make your head explode, but it’s all implemented in a smart, intuitive way that not only adds no clutter to the Track or Console view, but even cleans up unused patch points if the routing changes.

Please note: Projects that contain Patch Points and Aux Tracks cannot be opened in SONAR versions prior to SONAR Jamaica Plain (Update 9). If you need to open a project in an earlier version, first back up the project, unassign any patch points, then re-save the project.

For detailed Patch Points information, see the New Features section in SONAR’s online Help.

Creating, Choosing and Assigning Patch Points

When you open a track input or output picker, or a send or bus output picker, you’ll see the option “New Patch Point.” Select this to create a Patch Point. This is also how you pick an existing Patch Point. Continue reading “Universal Routing Technology 101: Improving Your Workflow With Patch Points”

The Evolution of Comping

Compiling or “Comping” takes is relatively new to sound recording. With the increased ability of technology has come the increased desire to comp with excruciating attention to detail, sometimes all the way down to a syllable or note, to create “The Perfect Take.”

The Acoustic and Electrical Eras (1877-1945)EdisonPhonograph

When audio recording was first introduced, it was an entirely mechanical process. Comping did not exist. In fact, neither did mixing as we know it. Everything was recorded in one take, and level adjustments were made by moving musicians closer to or farther from the horn–essentially the microphone of its time.

In the primitive stages of this recording format, it was not uncommon to have copies of the same record that sounded entirely different. This was because if a band wanted to release 1,000 copies of a song, they would have to record it 1,000 different times, each take resulting in its own uniquely-performed copy.
Continue reading “The Evolution of Comping”

Five Reasons Why Patch Points Rock

By Craig Anderton

Looking for some advanced, interesting, or downright weird ways to use the new Patch Points feature? Here you go:

Signal Splitter

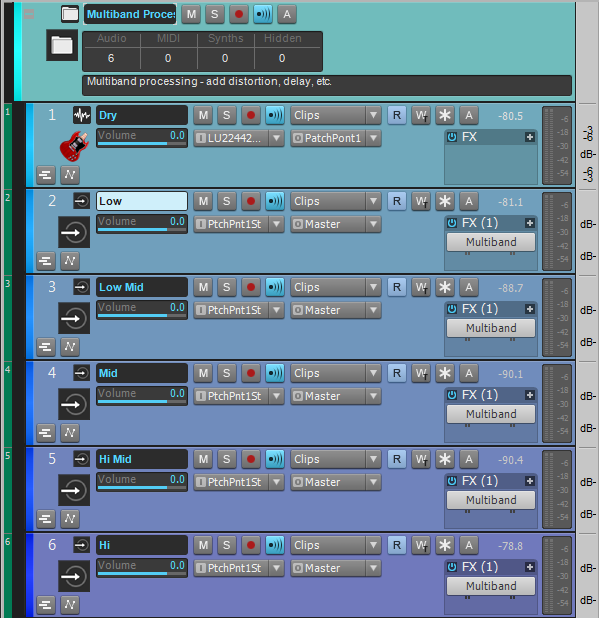
Suppose you want to split one track to several outputs, for example to do multiband processing. Here’s how:

SONAR Patch Points Splitter

The Dry track output goes to Patch Point 1 instead of the master bus. Five tracks, each of which filters a different band of frequencies, have their inputs set to Patch Point 1. The Dry track now feeds all five channels simultaneously. Placing all these tracks inside a track folder makes it easy to fold them up when you want a tidier setup.
Continue reading “Five Reasons Why Patch Points Rock”

SONAR Professional Giveaway on Equipboard

Equipboard SONAR Professional Giveaway

This month, Equipboard will be giving away a copy of SONAR Professional to 4 lucky winners.

Equipboard is a community of musicians and music fans, building the world’s largest database of artists and the gear they use. For a chance to win, just submit music gear for any artist on Equipboard between October 1 and October 14. Each submission will count as its own entry, so you can improve your chances with ease! The first 2 winners will be selected on Thursday, October 8, then the next 2 winners a week later on Thursday, October 15.

If you win, you’ll not only receive SONAR Professional – unlimited and highly powerful recording and mixing software – you’ll get all the bells and whistles too! That means a fully unlocked copy of Melodyne Essential, Addictive Drums 2 Solo, the Nomad Factory BlueTubes plugin bundle, and more! For a comprehensive list of everything included in SONAR Professional, click here.

Well, what are you waiting for? Go Sign Up or Log In to Equipboard and start submitting!

5 Ways SONAR's Rolling Updates Are Working For You

With the introduction of the new SONAR last January, we also introduced a new delivery model we call Rolling Updates. Essentially, when you purchase an upgrade to SONAR Artist/Professional/Platinum, you receive 12 months of SONAR updates free. Each month, you receive an update (or sometimes more) which can include anything from fixes to new features and tools, add-ons, additional content, tutorials, and more. Once the initial 12 month period is up, you can renew for an additional 12 months and continue to receive updates, or keep everything you own up to this point. Lots of folks were skeptical at first about these Rolling Updates, but since their introduction, they’ve proven their worth. Here’s how:

5) Faster Learning Curves

When we were releasing a version every year or so, you’d receive a whole boatload of new features all at once – which was pretty cool, except you suddenly had tons of totally new features you had to learn to use. These game-changing new features were often designed to speed up your workflow and make your life a little easier, but investing the time to learn how all the new things worked could be overwhelming.

With Rolling Updates, you can now ease into all these new features. Instead of piling on 10-20 new tools, we’re introducing them in bite-sized pieces so you can take them in one or two at a time. This allows you to get a real feel for how they work before diving into something new, and has less impact on your workflow.

Continue reading “5 Ways SONAR's Rolling Updates Are Working For You”

What Windows 10 Means for Music Creators

Windows 10 is here, and our trusted code-commanders have been working closely with Microsoft to ensure an enhanced experience for our valued Cakewalk community.  Our benchmark testing has shown the new operating system to be very efficient with a lighter footprint.  In general, Windows 10 has outperformed Windows 8 in all of our tests in terms of performance and efficiency.  Subjectively speaking, the “look and feel” of this free upgrade is a much welcomed improvement over the “Metro” landscape of the previous operating system.  But what does this mean for music creators?

1.)    More responsive: Out of the gate people will notice a much snappier operating system.  The tweaks Microsoft made to the kernel and other parts of the OS in general have given it a responsive overhaul.

2.)    Upgrade ease:  Moving into Windows 10 is a very quick and easy upgrade.

3.)    Unified OS:  The best elements of Win 7, Win 8, and Win 8.1 have been combined into a streamlined experience with Win 10.  Store Apps and Desktop Apps seamlessly run side by side for a smooth universal experience.

4.)    New MIDI API available across all devices:  The new API allows multi-client access to single MIDI hardware and new jitter-free operation.  Microsoft worked hard on bringing this all together for better MIDI implementation.

5.)    Enhancements to the kernel: Microsoft has made changes in the multimedia scheduler and kernel components to minimize spikes – this can make a big difference in low-latency streaming apps like SONAR.

6.)    FLAC and ALAC Support:  Windows 10 has native support for these two codecs.  Both “Apple Lossless Audio Codec” and FLAC  could mean great things for Windows audio moving forward.

7.)    Much faster boot-time:  A lower footprint in memory combined with some new optimization techniques will get you up and running and making music faster than ever.

8.)    Runs smoother on older machines:  The lower memory footprint and optimization tweaks will also allow Win 10 to run more efficiently on older machines.  This is great news for Wn 7 users who never upgraded to Win 8.

9.)    Lower Latency:  15ms lower roundtrip latency using WASAPI (shared mode).

10.)  Core isolation: Drivers and applications can now isolate and dedicate low latency audio processing to a single CPU core.  This can minimize the effect of DPC latency spiking from networking, Bluetooth, or other DPC spiking processes by preventing interruptions to audio processing.

At Cakewalk, we are dedicated to staying on the forefront of technology.  Our CTO (featured below) and his team worked closely with Microsoft to make sure our products run smoothly on Windows 10.  We are very excited about this free update, and highly recommend it to our customers. Try SONAR with Windows 10 today for the ultimate music creation experience.

Speed Up Your Workflow With 5 (Rather Hidden) SONAR Features

SONAR has a LOT of features. So many, in fact, that it’s easy for some of them to fly right under the radar. The list below contains five of my favorite SONAR features that can really speed up your workflow!  Download the latest SONAR Free Demo and follow along.

#5 – Clip Coloring

Let’s say you’ve recorded a couple of guitar tracks, and the guitar player changed tone in certain parts of the song. You may want to identify these parts easily during the mixing process. Markers can work, but I typically use those to indicate sections and turning points in the song, and the tone change doesn’t always line up with arrangement changes. Instead, you can change the clip color in these sections to make the parts easier to find.

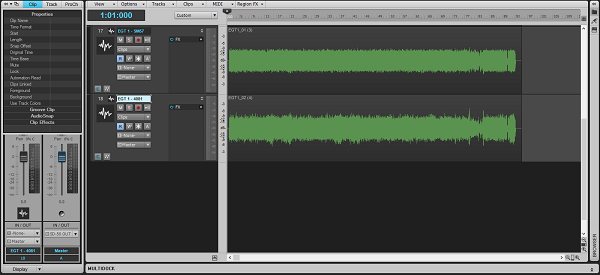
Here are the clips in their original state:
Clips Before Editing

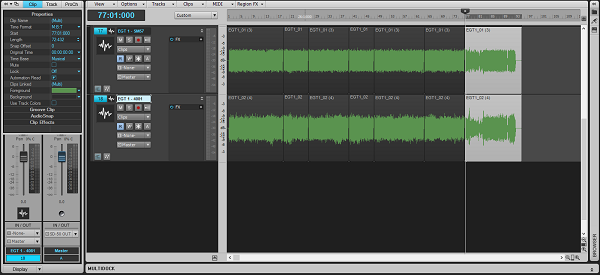
Make some splits where the pickup change happens:
Clips Have Been Split

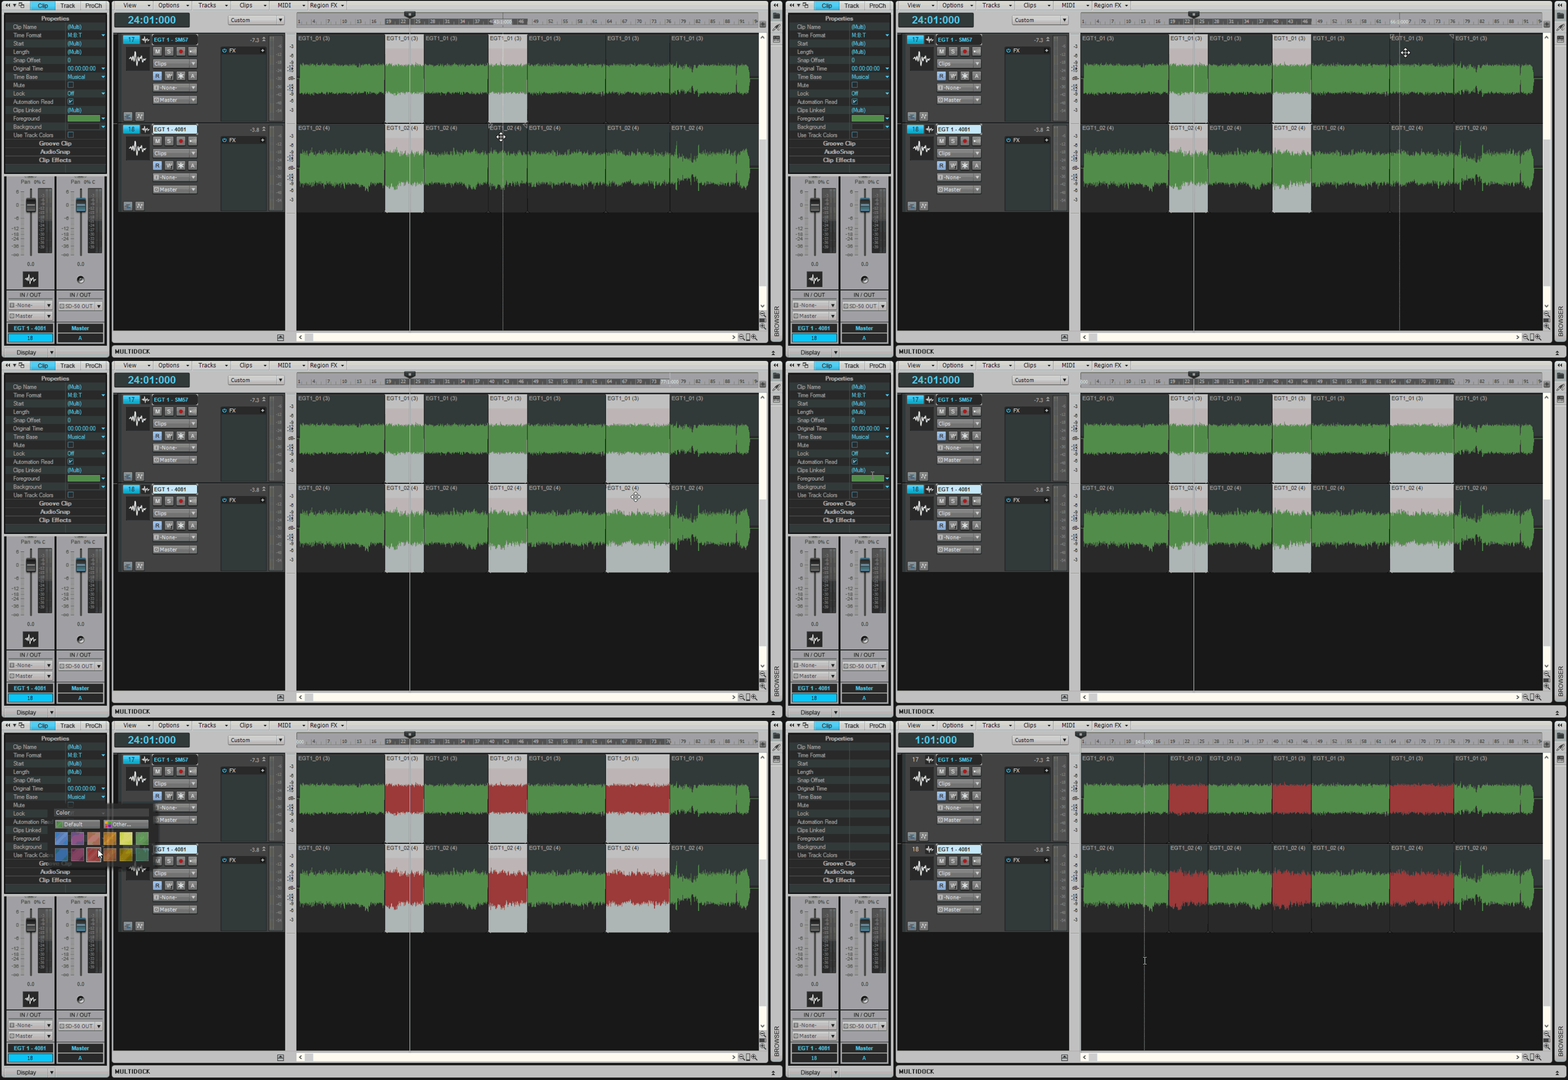
Now, select the parts with Shift+Click where the guitarist changes his tone, and using the Foreground selector in the Clip Inspector, color these red:
Clip Coloring GIF

You can now see all the sections where the guitar player used an alternate tone by the red waveform, which can come in very handy while mixing.

Continue reading “Speed Up Your Workflow With 5 (Rather Hidden) SONAR Features”

A Letter From Cakewalk's President On SONAR "Everett"

Last week we launched the SONAR “Everett,” Release which includes our new Drum Replacer tool. Everyone at Cakewalk is still buzzing about how it can transform a simple loop, or drum tracks recorded in less ideal conditions, into amazing sounding drums. Additionally, we have improved the overall SONAR experience with 40 fixes, the new Sizzle Bus FX Chain for mixing and mastering, and have included some awesome drum content to complement Drum Replacer. And to help everyone get the most of this powerful new tool, we have posted four free Drum Replacer video tutorials.

This release also has a deeper meaning to me. It’s now June, five months after we launched the New SONAR. Drum Replacer is not a minor update.  Third party equivalent plug-ins cost hundreds of dollars, but SONAR Platinum customers receive it at no additional cost. In the annual upgrade model (SONAR X3 or earlier), people wouldn’t have seen this feature until next January. But since we have introduced “membership,” we can bring this to you today, almost 8 months sooner.

There’s been a lot of fuss and confusion about SONAR’s new membership program, and why we created it. It’s NOT a subscription scheme, because you can still own (not rent) SONAR, and never need to make a monthly payment if you don’t want to. SONAR “Everett” is what SONAR membership is really all about. Our ability to develop, test, refine, and release exciting SONAR features to users throughout the year. It’s about continuous innovation. It’s about helping you make better music every day.

Enjoy!
Michael

Mixing Vocals: Create Depth with a Digital Reverb

by Dan Gonzalez

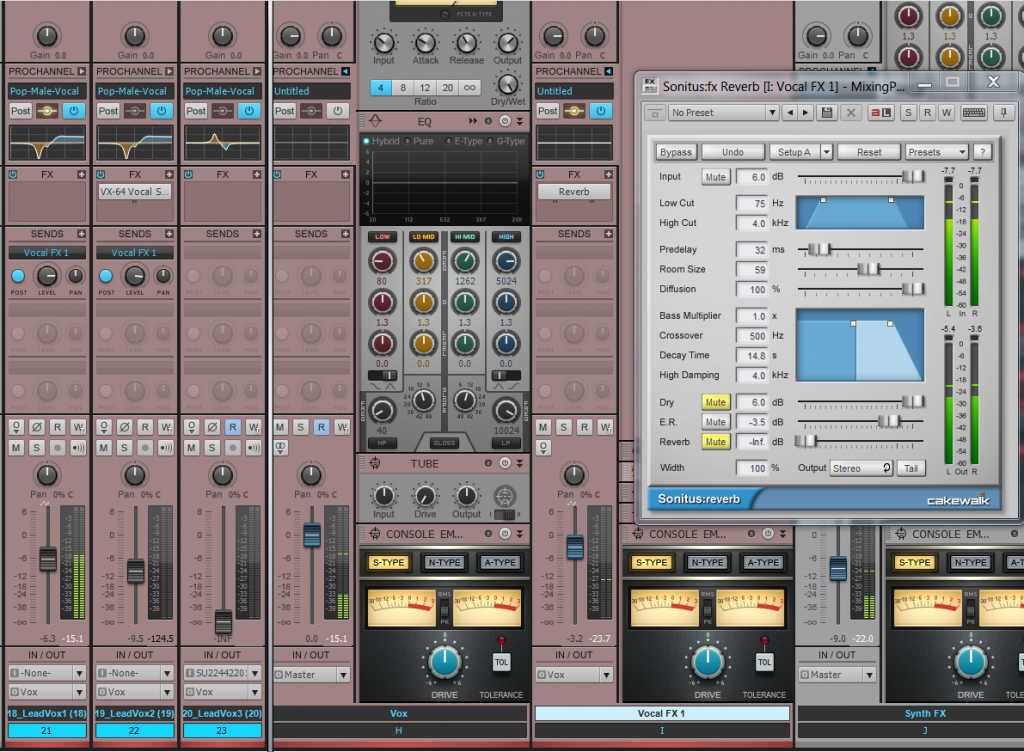
Depth is a factor of every mix, just like Height and Width. This is a harder concept to grasp because there really is no “Depth” adjust on a mixer. In this article we’ll talk about how to create depth using the Sonitus Reverb.

Creating Depth using the Sonitus Reverb

Digital reverbs are the proverbial swiss-army-knives of the mixing world. They are programmed in a way that emulates every part of a reverb. This includes the pre-delay, decay time, width, diffusion, early reflections etc. Since these emulate spaces like halls, plates, rooms, and other reverberant places – we can use them to create a room sound around our audio tracks for the purpose of creating depth. That’s a fancy way of saying that we can use reverb for depth. Here’s a vocal track that has no effects on it at all. It’s mixed into this track completely dry.

Continue reading “Mixing Vocals: Create Depth with a Digital Reverb”