A SONAR Story with Cory Hawthorne

After seeing Vancouver’s own “Payolas” at the age of 15, singer songwriter, guitarist and sound designer Cory Hawthorne knew he wanted to become a musician. 2 weeks later he bought his first guitar, a no name Les Paul copy and it changed the rest of his life. He went on from there to get a degree in music from the University of British Columbia in 2000 and release his first solo album in 2012 under his name called The King of the Broken Hearts. In the midst of pursuing his dream to be a rock star, a guitar student Cory was teaching approached him about getting into sound design for video games, and for the last 18 years has become an expert at the craft. He has released many titles including Prototype; one of the best-selling games from Radical Entertainment along with Scarface and Simpsons Hit & Run, which went on to sell over 7 million copies . This last June, with a small team at Charm Games, Cory released his first virtual reality game titled “FORM”.

In January 2017, Six soon to be very tired people, started on what would become a new benchmark for VR games through a lot of blood, sweat, support from their families, and sacrifices.

“It’s immersive, engaging and beautiful, setting a new standard for virtual reality and visual design”
 4/5 – Hardcore Gamer

“FORM shows a command of the medium that few have grasped with such clear intention”
 8.5/10 – Road to VR

“Charm Games has created a mesmerizing experience from start to finish.”
 4/5 – VRFocus

Cory had a very limited time of 6 months to compose all the music, create all the sound FX from scratch, and record all the voice over dialog for FORM but he used this hard constraint to ground him in the project. Collaboration with his team allowed him to make decisions quickly and focus on what was most appropriate for the game.

“Working on FORM was like a sound designer’s dream. I had unlimited options but there was one thing that I knew and that was if it sounded good, so I had to trust myself all the time throughout the process. We reached the end of the line and I had to write and record 3 tracks in 3 hours because we were releasing the game in 2 days. I tried to focus on the mood and nail it and not get caught up in what scale I should use. Is this a Lydian vibe? I didn’t have time for that stuff because I had to finish a track in that hour.”

At the start of the project, Creative Director Derek Young told Cory to “Be Weird” and “Do something no one would recognize”. For Cory, that meant that everything needed to be unique and made from scratch. He utilized the Rapture Pro synth for nearly all the FX design, sometimes starting with a simple sine wave and tweaking from there. The lesser known synth company, WOK VST Plug-in’s Ghost synth was utilized for several simple lead sounds in the musical compositions. To create the voices for the game, Cory recruited local talent for many of the roles but ended up being the voice of the lead character’s computer. What originally started as a test recording from an iPod 5 microphone had just the right nuance to be the real voice so all the rest of the computer dialog was recorded on the same iPod 5 and used in the final game.


How can others get into game sound design?

“It’s a weird thing. You have to be tough and be ready to move with all the changes. Get ready for a lot of late nights. You need to go into it knowing that the industry is changing all the time and for most, the days of having your own studio is gone. It’s all contract work or not a full-time job for most people. I’m very grateful to be where I am at Charm. A great way to start though is to make your own original FX library using synthesis and your own recordings, as well as to find the students in your area who are making games or going to school for it and connect with them. Work with them for what they can afford, or even for free or on spec if they have no budget and you like the project, until you can get off the ground.”

If you could give one piece of advice to other SONAR users, what would it be?

These days you can get a mic, an audio interface, a copy of SONAR, and a laptop for almost nothing so there is no excuse to not make music but you should start now using what you have and don’t try to sound like anybody else. As Stravinsky said “The more constraint one imposes, the more one frees one’s self. And the arbitrariness of the constraint serves only to obtain precision of execution”.

Cory Hawthorne

You can hear Cory’s music on Spotify, SoundCloud, and also at his webpage www.coryhawthorne.com

Follow him on Twitter: @CoryHawthorne

Charm Games

For more information, visit the Charm Games website at: www.charmgames.com

Subscribe to their YouTube channel: youtube.com/c/charmgames

Follow them on Twitter: @CharmGames

Like them on Facebook: Facebook.com/CharmGames

Play FORM Today

Oculus Rift Store: www.oculus.com/experiences/rift/1491102584268860/

Get it on Steam: store.steampowered.com/app/408520/FORM/

Cakewalk wants to tell your story!

Through blood, sweat and tears you’ve overcome obstacles to reach a level of success that you’re proud of. We want to hear your stories, and with your permission, we’d like to share them with our community.

We will not publish any of this information without your permission. If your story is selected, we will reach out to you via the email address you provide, and we will schedule a follow-up interview with you to learn more.

Tell us your story here!

Take Control of Your Mix with Mix Recall

Mix Recall is a powerful way to organize mixes within a project—Whether you want to have a mix without vocals or a version of the song using a different processing chain on the drums—Mix Recall is the perfect solution for these types of situations, but it can do more than that. Say you are handed a project from someone else using SONAR or you got a new plug-in you want to try out using a previously recorded song, Mix Recall can help you handle this as well by getting your project reset back to a neutral position.

Adding the Mix Recall Module

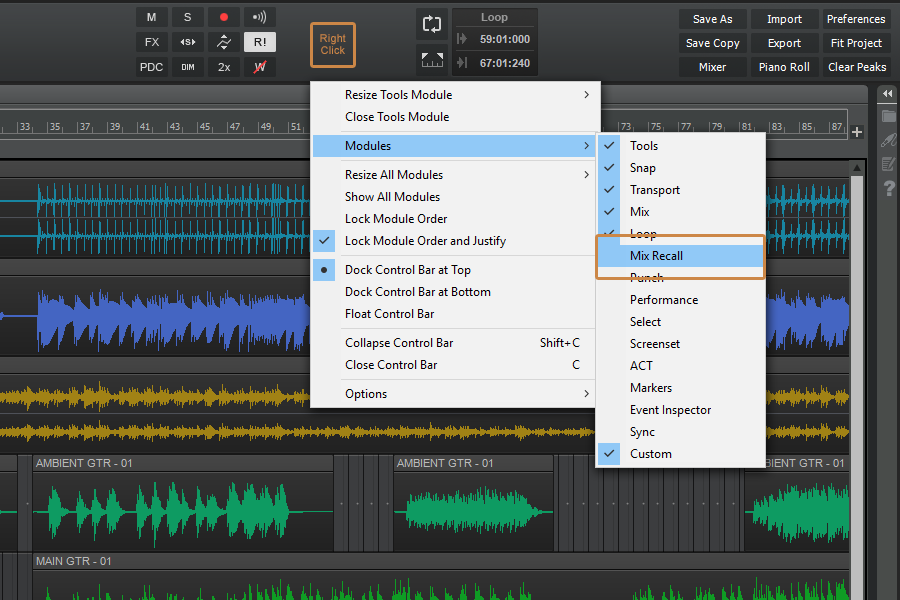
Check that you have the Mix Recall module available in the Control Bar. You can add it to the Control Bar if it’s not already there by right-clicking in a blank space and adding it from the menu.

Creating a Mix Scene

Start by creating a new Mix Scene with the current project setting using the [Save As New Scene] button.  This will allow us to make a change and then come back to the original point to see the difference.

Make a change to the mix by adjusting the volume on a couple of tracks or muting a track previously un-muted.

Click the [Save As New Scene] button on the Mix Recall module again to save these changes into another mix scene. Give this mix a unique name and save it. Now you can reload your previous mix and see the changes reverted back to where we started. Selecting the second mix scene with bring us back to the present state of the mix. You can also use the [Recall Previous Scene] button to toggle back and forth between 2 mix scenes or simply go back to the last mix scene you were at.

Resetting a Mix

Using a project you want to reset, click the drop down arrow on the Mix Recall module and select “Reset Mix…” from the menu. This will remove all automation envelopes, plug-ins, and reset the ProChannel back to the default modules along with any controls in SONAR.

That’s It! Now you can get back to working on your mix instead of trying to manage multiple saved versions of the same song or trying to manually remove each plug-in or automation envelope.

Advanced Techniques

  • Create a save point as you begin your mix once you have basic levels and panning so you can always go back and hear your project from the start.
  • Create save points within your mix to go back and see how it has progressed.
  • Save several iterations of a mix and bounce each when sending it to a client or friend. Here are some common iterations to save as Mix Scenes.
    • Vocal Up Mix (Plus 1-3dB)
    • Vocal Down Mix (Minus 1-3db)
    • No Vocals
    • Radio Edit Mix
  • Time box your mix by only giving yourself an allotted amount of time and dividing that up over what you need to do.  Save each stage as a Mix Scene to go back and look at your progress and how you did at each stage.

Mix Recall is available in SONAR Artist, Professional and Platinum

Creating Your Own Guitar Tone with TH3 in SONAR

TH3 Cakewalk edition allows for anybody with SONAR to have access to amazing guitar tones. It comes with loads of amps, cabinets, effects and even allows for changing the position of the mic. If you want to do stereo processing of effects to create a stereo delays or parallel processing by mixing two amps together, you can do that as well.

Where to start?

Insert TH3 on to your guitar track and make sure you are using the correct input and have the Input Echo button enabled to hear what is plugged into that input.

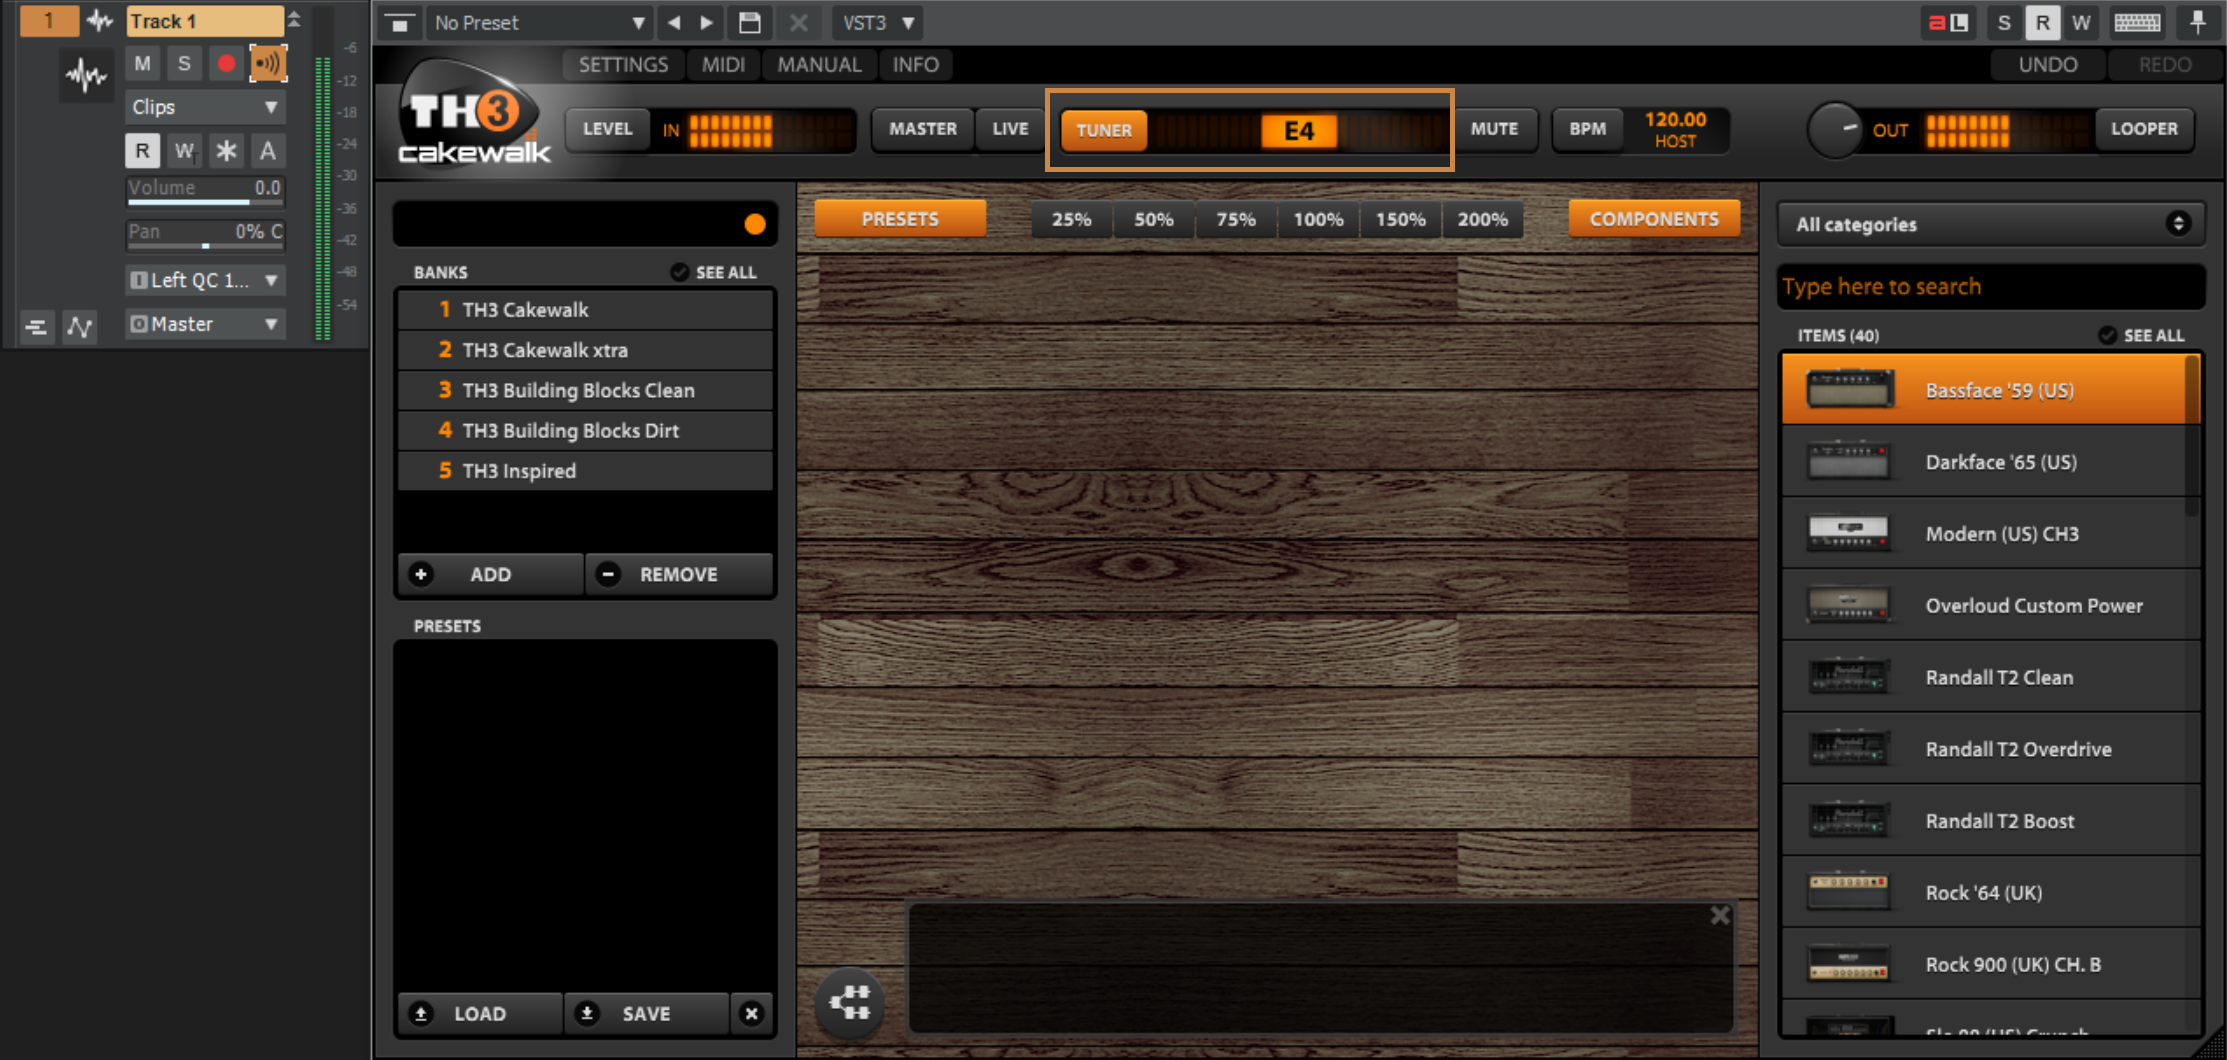
A good place to start after inserting TH3 on to your guitar track is to check your level into the plug-in and the tuning of your guitar.

Check your level:

Strum a big chord on your guitar to see how much signal is coming into the plug-in. There should be a healthy amount of signal coming in and no clipping in the red.

Tuning:

Play each string and adjust until you see the tuning pin is in the center for each string.

Auditioning Amps

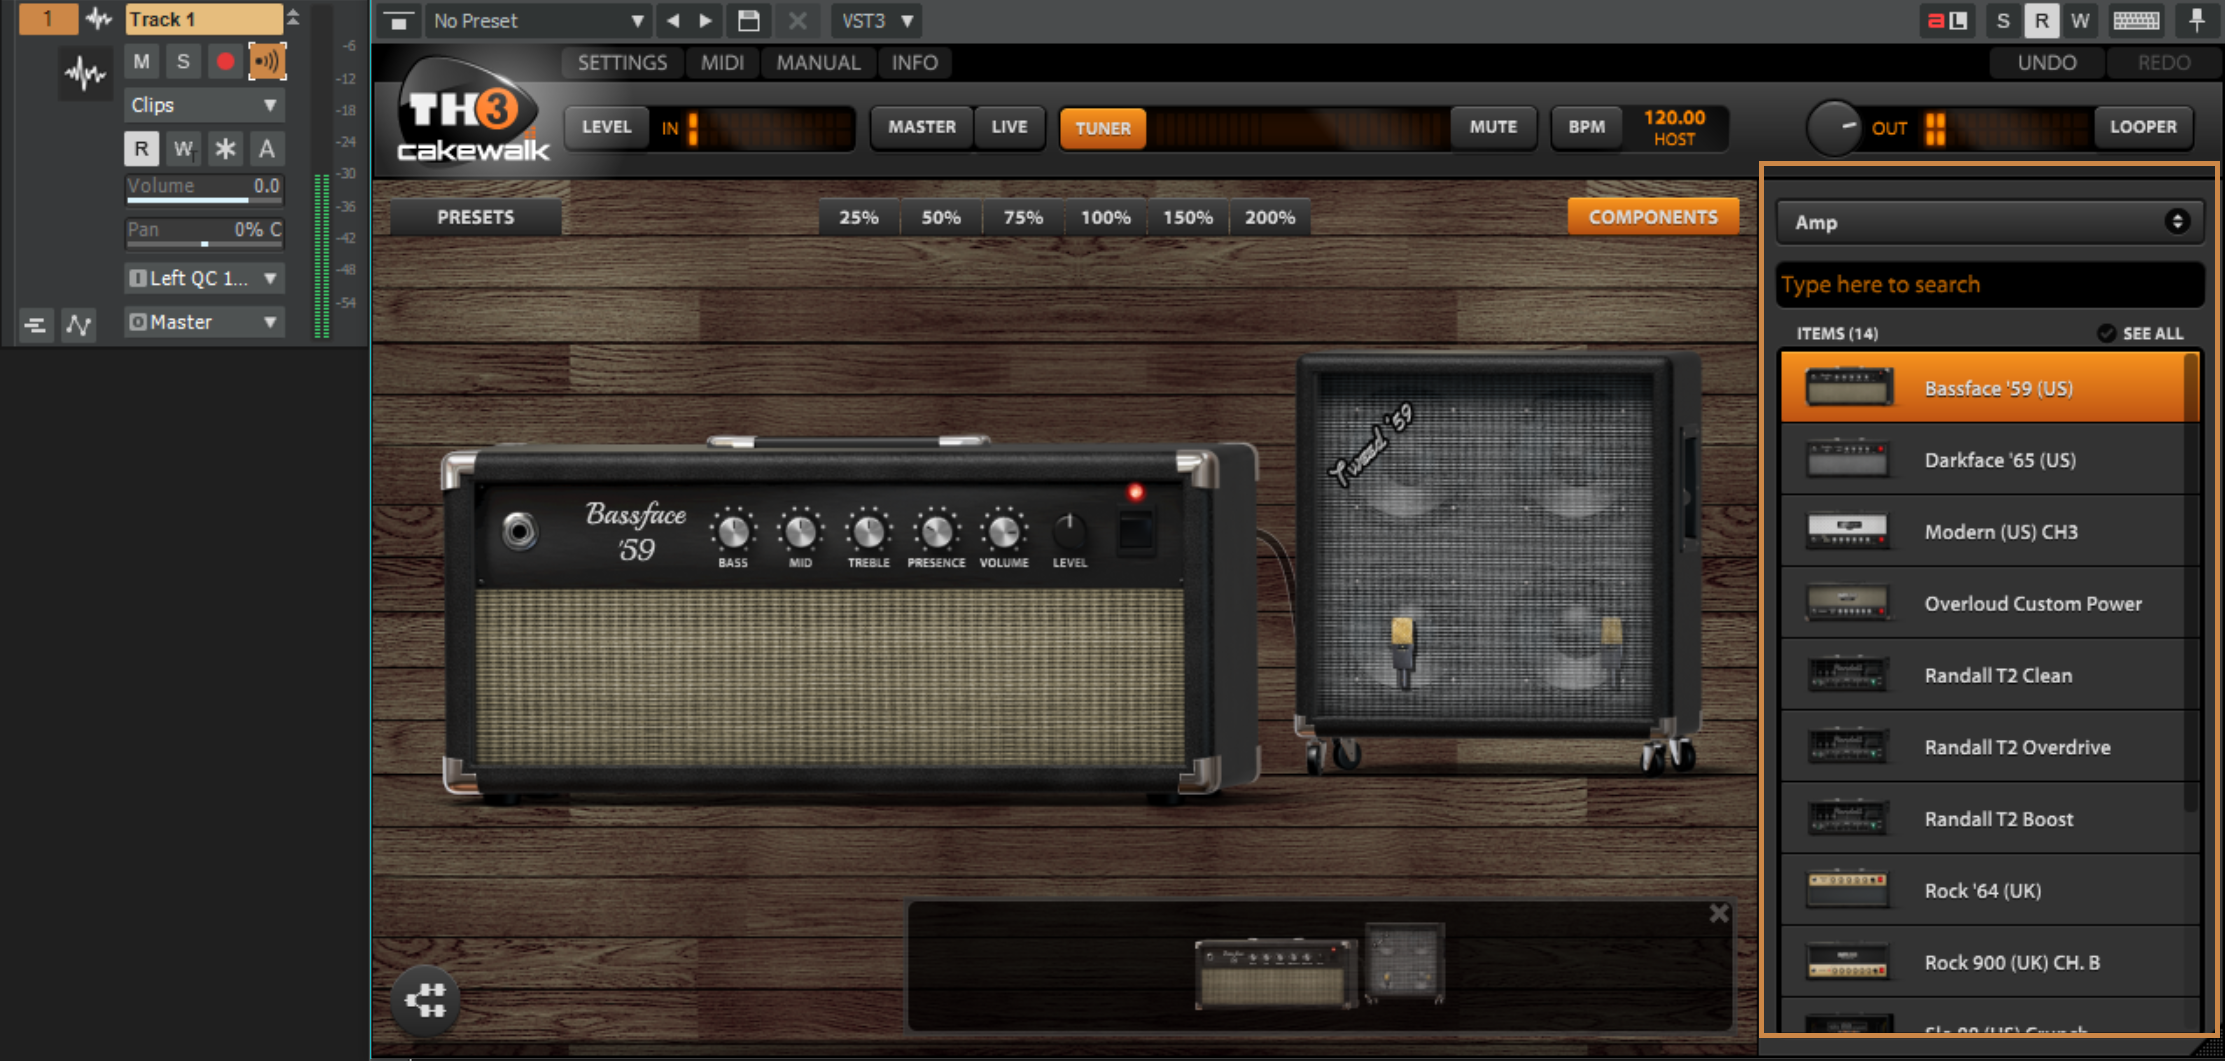
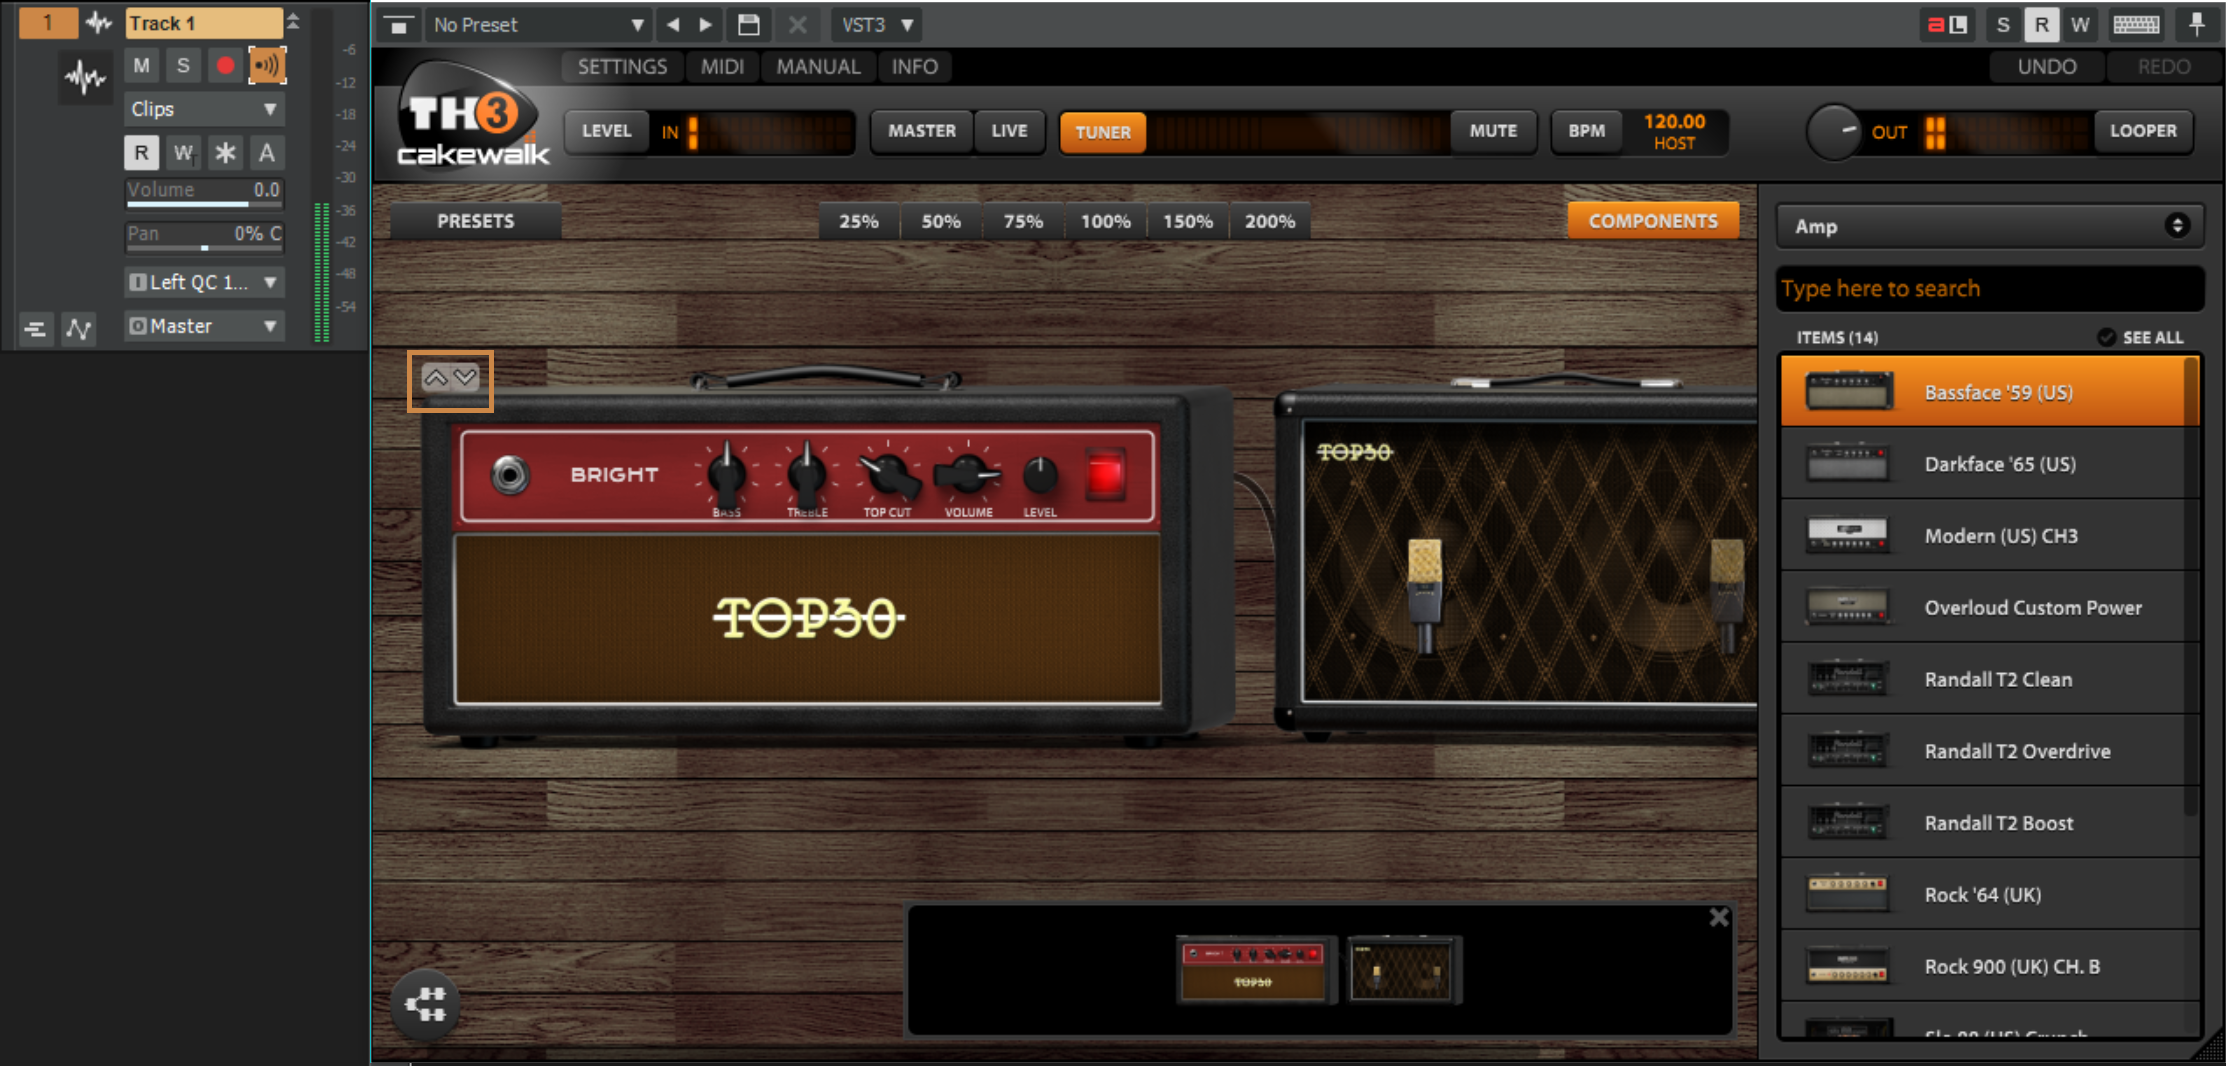
Open the [Components] section on the right if it is not already open and select the amps category from the list. Once you have that selected, you can then drag in the first amp at the top. You’ll be asked if you want to insert a matching cab, click [YES PLEASE!].

Give it a try! To audition other amps and cabs click the up and down arrows on the top left corner of the amp head or cab. Depending on what you are going for this is where you’ll want to pick out an amp that has some of the characters you are going for.

Here is a list of the included amps in TH3 Cakewalk along with the units they are modeled after.

  • Bassface ’59 – Modeled after the ’59 Fender Bassman
  • Darkface ’65 – Modeled after the ’65 Fender Twin
  • Modern – Modeled after the Mesa Boogie Dual Rectifier
  • Overloud Custom Power – Overloud Custom amp
  • Randall T2 – Official model of the Randall T2 head
  • Rock ’64 – Modeled after the Marshall JTM45
  • Rock 900 – Modeled after the Marshall JCM900
  • Slo 88 – Modeled after the Soldano x88r
  • THD Univalve – Official model of the THD Univalve Single- Ended Class A amplifier
  • Top30 – Modeled after the Vox AC30
  • Tweed Deluxe – Modeled after the Fender Tweed Deluxe
  • Bass SuperTube VR – Modeled after the Ampeg SVT-VR

Spice It Up Now

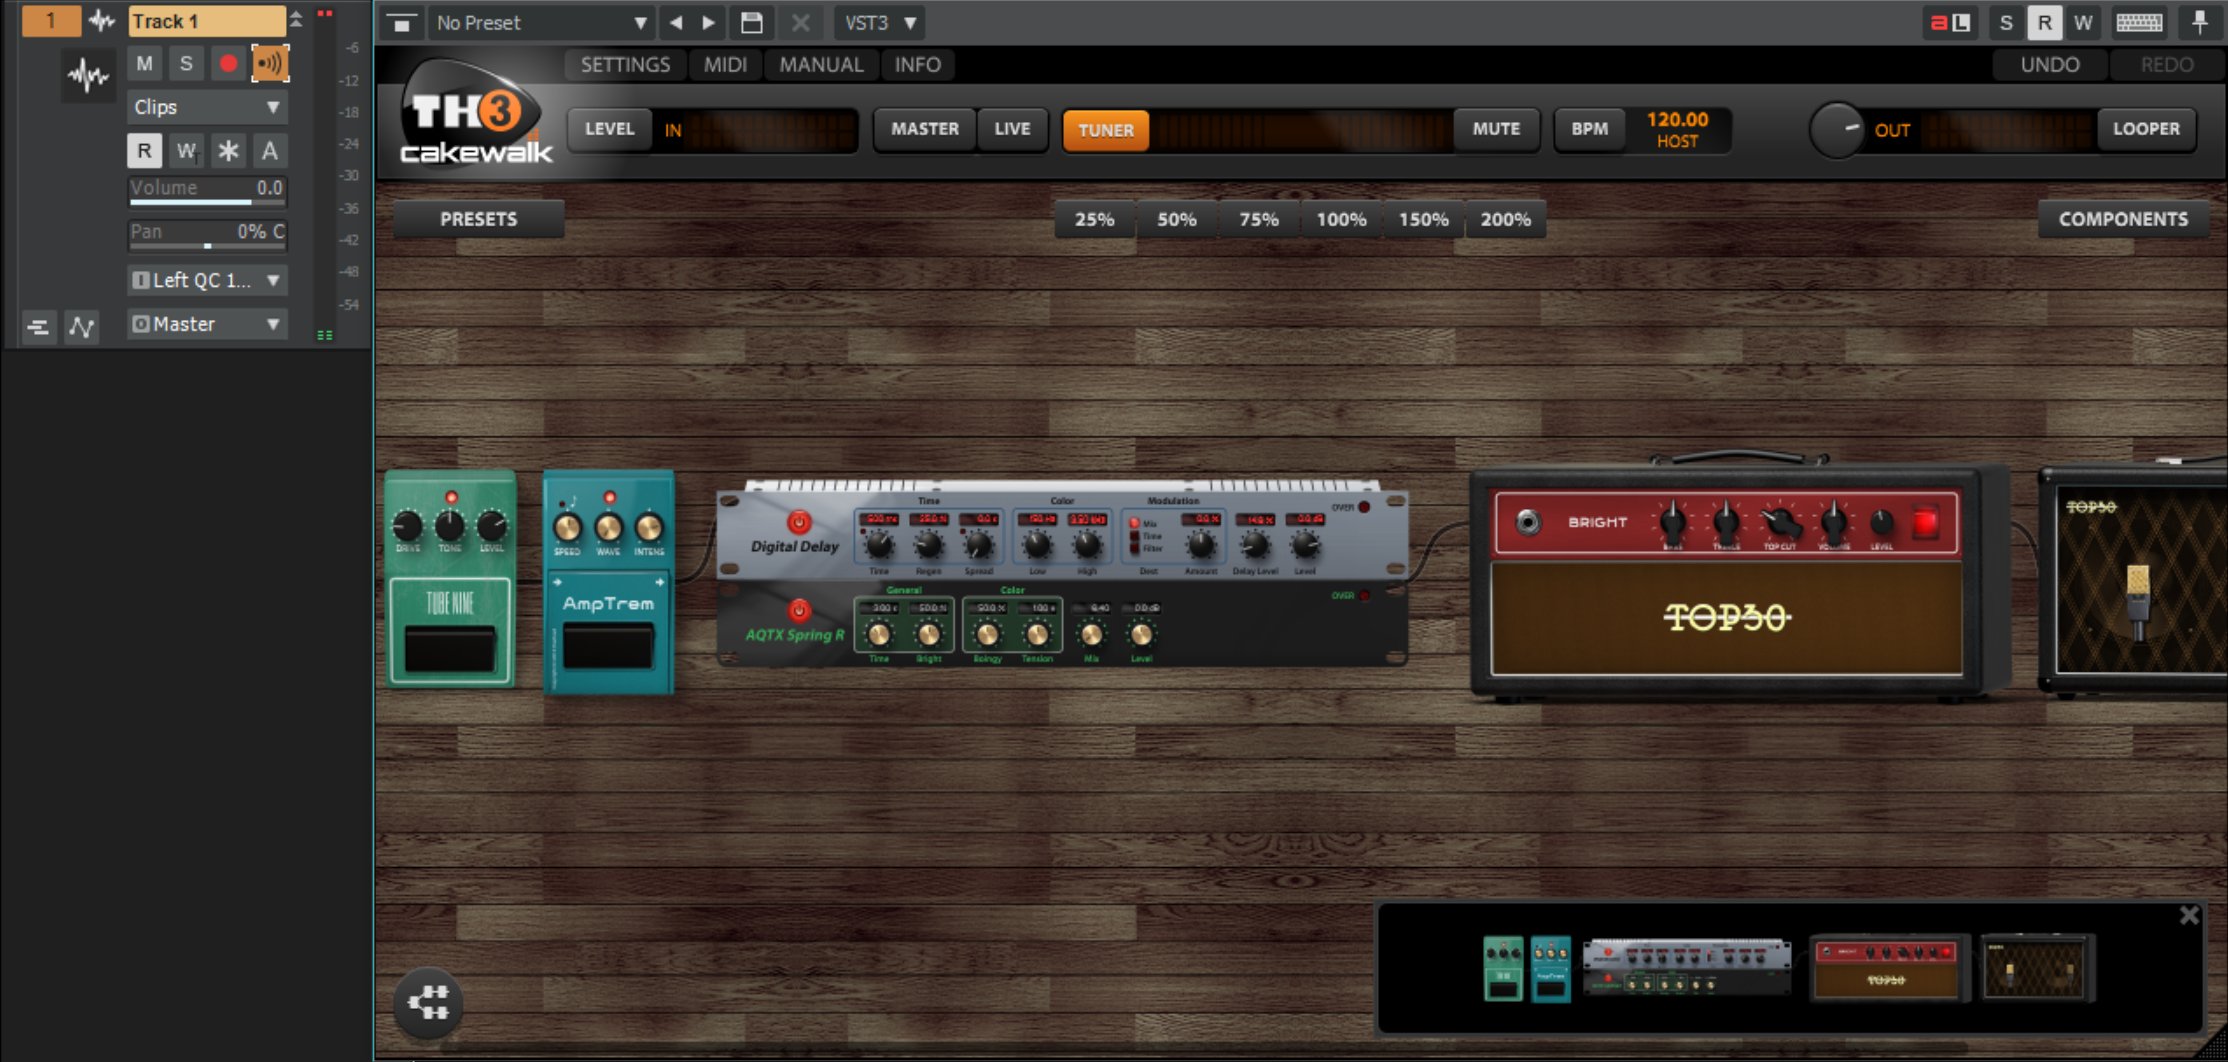
I’m going for a pretty classic tone that is mostly clean with a little bit of grit on it. I picked out the Top30 type head with a matching cab and will add an overdrive going into the amp. Go to the Components section again and select overdrive category. Drag in the TUBE NINE over before the amp. Dial in a some gain to taste using the “Drive” control and give it a whirl.

There are many other effects included with the TH3 Cakewalk edition, here is a compete list of everything you get.

  • TUBE NINE Overdrive
  • FatMuff Fuzz
  • FUZZRACE Fuzz
  • CHR-2 Chorus
  • Digital Delay
  • RSS Compressor
  • ANALOG FLANGER
  • Rich Flanger
  • 9-0′ Phaser
  • AQTX Spring Reverb
  • AmpTrem Tremelo
  • Auto-Wah
  • cry maybe Wah
  • Gate Expander
  • Volume

Mastering Space

Using spacial type effects like reverb and delay are critical in getting many of the classic guitar tones from the past. Here are some good rules to live by when getting started using reverb, delays and other spacey effects.

  1. Use modulation type effects like Chorus, Phasers, and Flangers toward the middle of your chain after distortions & overdrives.
  2. Use Delays after the Modulation type effects.
  3. Place reverbs at the end of your chain.

TH3 Cakewalk edition is included in SONAR Home Studio, Artist, Professional, and Platinum.

Using Melodyne to Create a Double in SONAR

Melodyne is not only a great way to tune vocals and still maintain their musical quality it can also be used for several other unique purposes like creating a tempo map from a live audio recording or extracting MIDI from audio. In this tutorial, we’ll be looking at using Melodyne to make things multiply for added thickness and depth.

What is doubling?

Double tracking is an audio recording technique where a performer sings or plays along to their own performance, to produce a “bigger” sound than can be obtained with a single voice or instrument. It is a form of overdubbing; the distinction comes from the doubling of a part, as opposed to recording a different part to go with the first. The effect can be further enhanced by panning one of the performances hard left and the other hard right in the stereo field.

Doubling Audio with Pitch

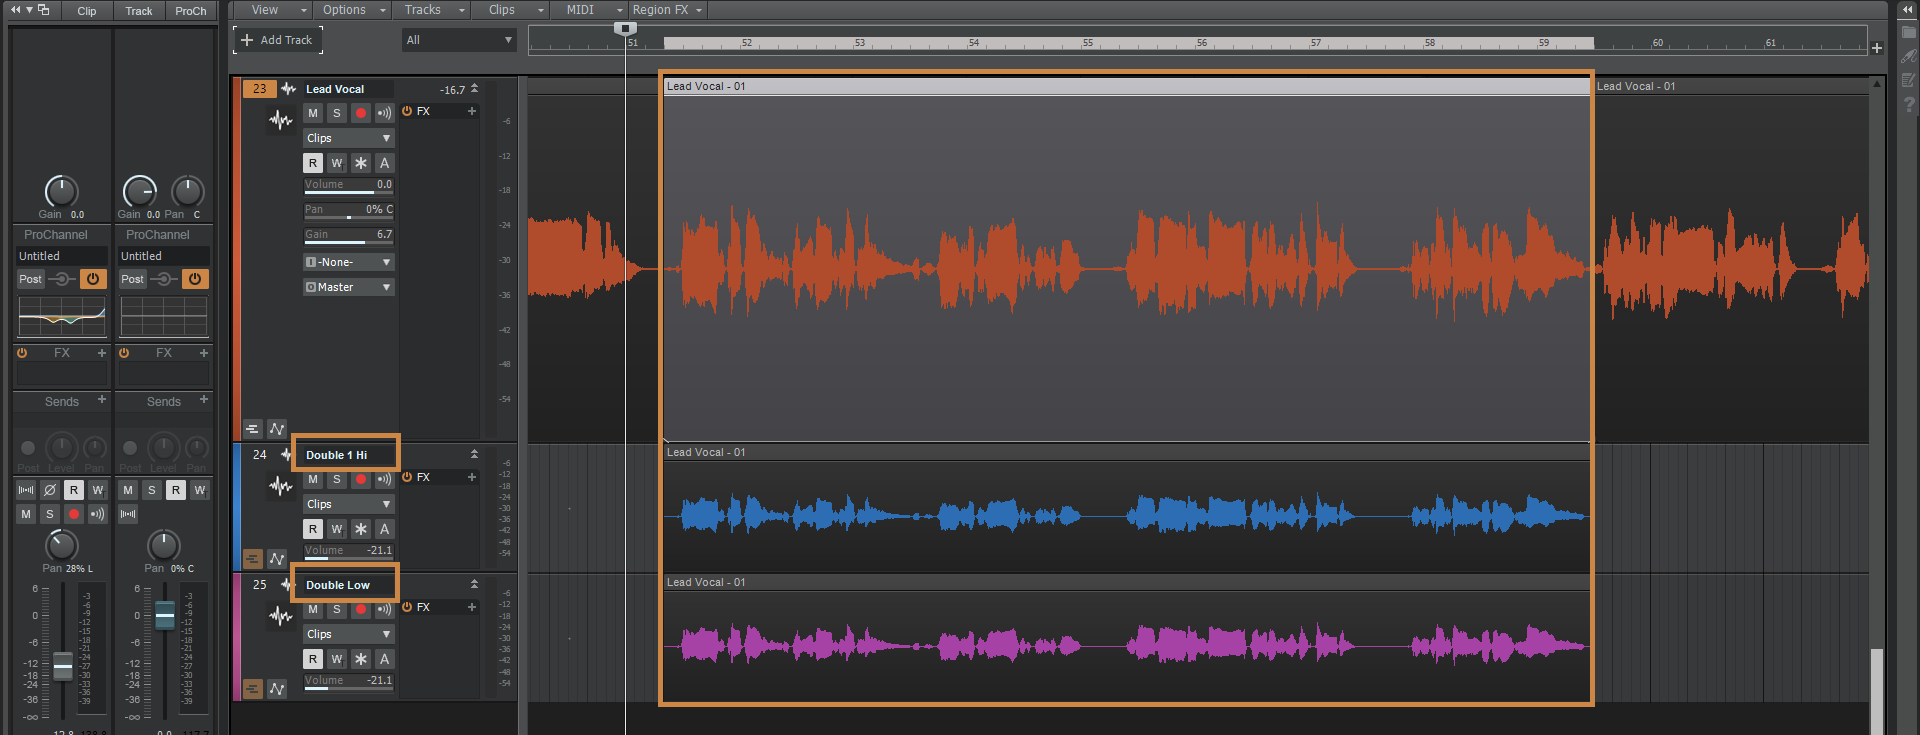
If you are working with a single vocal track and want to thicken things up, a classic technique is to create two copies of the original track and tune one track up and the other down very slightly. When mixed into the original track this will add additional texture and thickness to the vocal. To add width, simply pan each copy slightly off-center from the original track.

Open a project with a vocal track you want to double and click the Add Track button and make 2 additional audio tracks. Give each track a unique name and then hold down [Ctrl]+[Shift] to copy and lock the position and drag the vocal clip to each track to create both copies.

Doubling Audio with Pitch Inside SONAR Recording Software

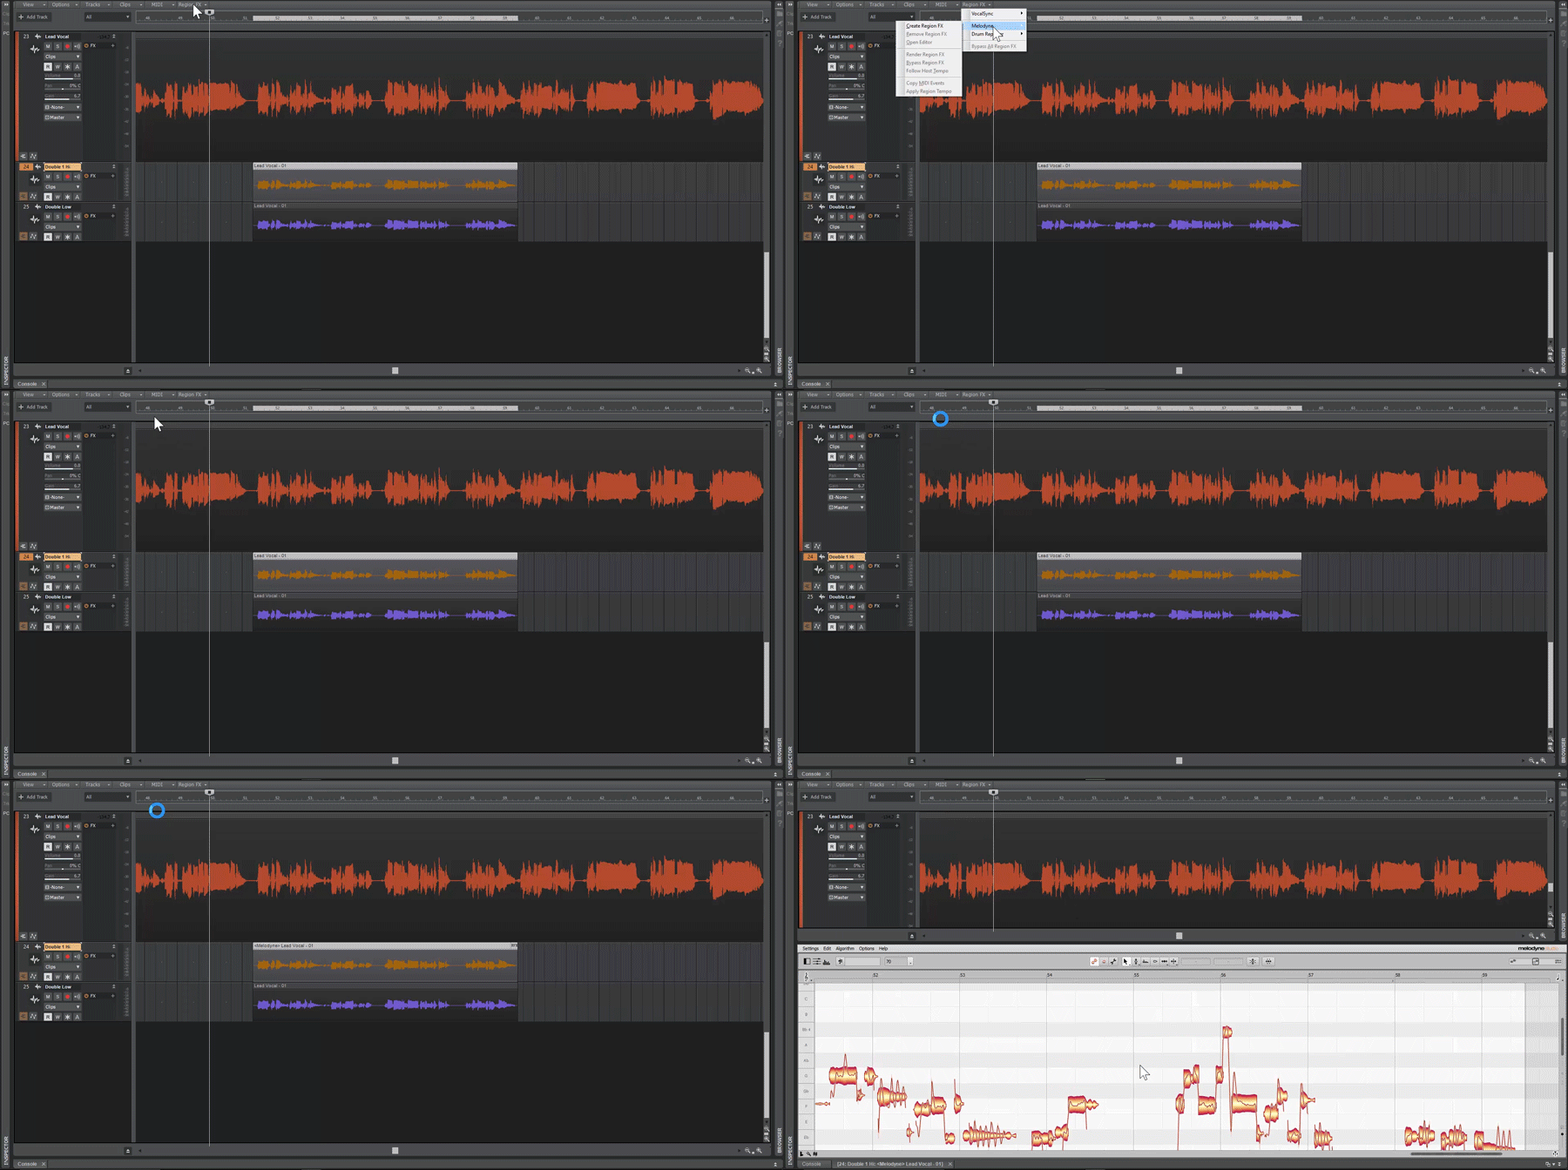
To create a Melodyne clip, click on the first copy and press [Ctrl]+[M]. Melodyne will open in the MultiDock. You can also use the Region FX menu and select Melodyne | Create Region FX.

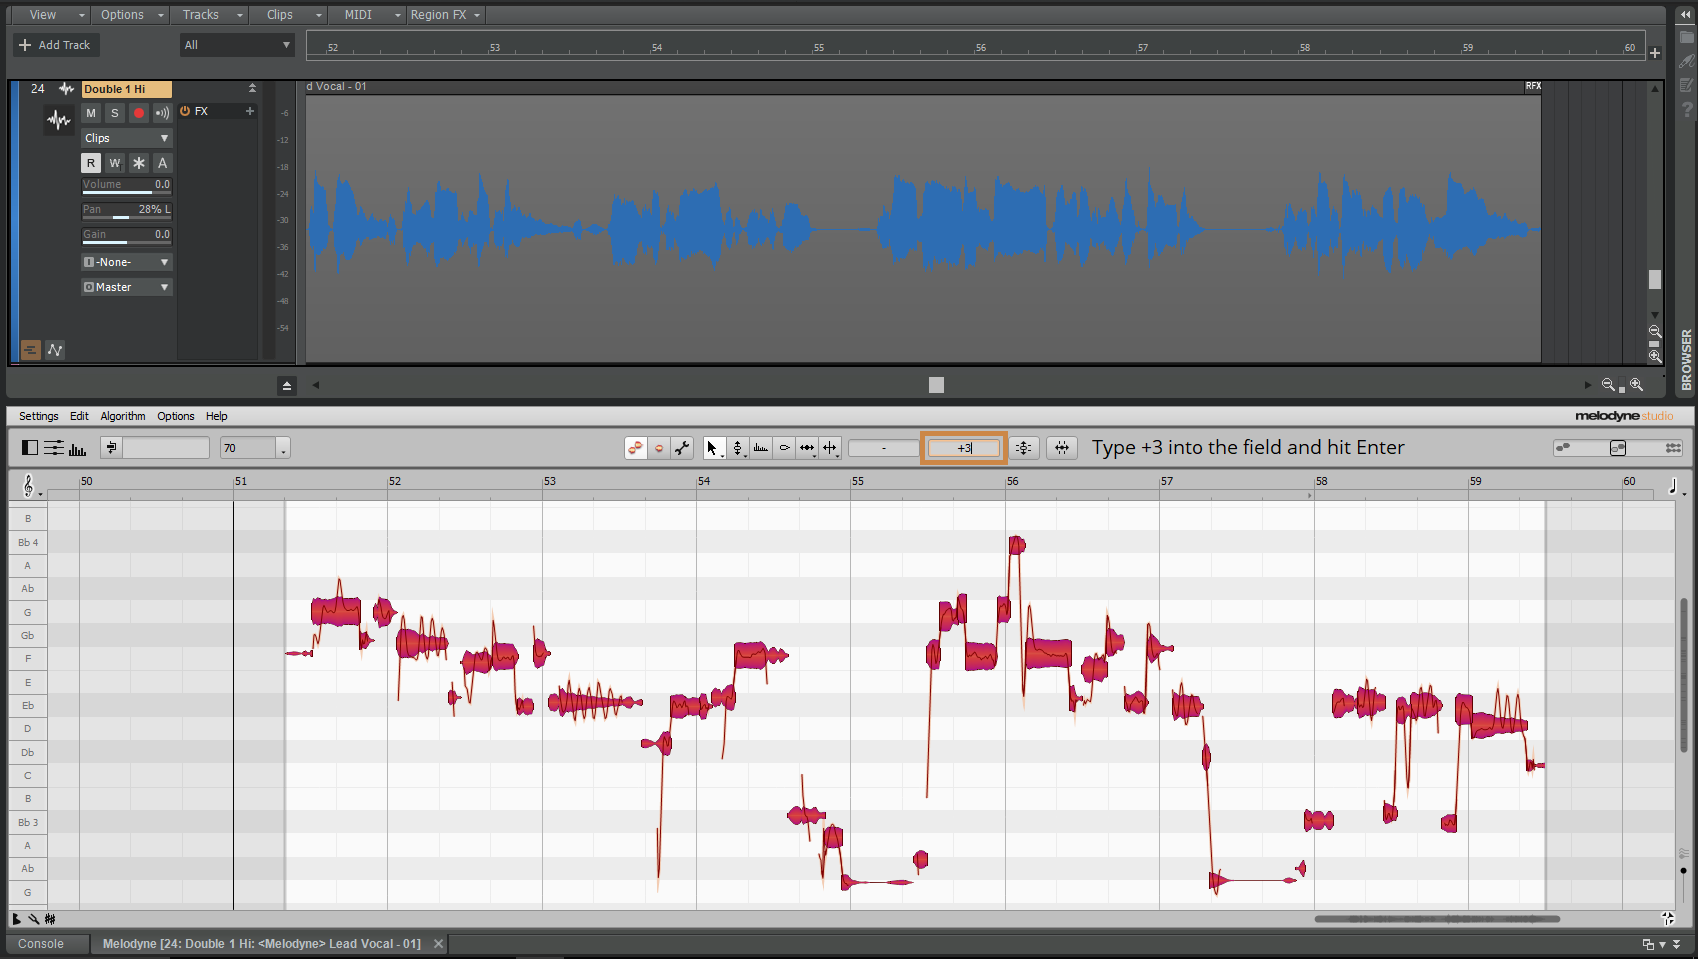
Select all the notes in the Melodyne window by clicking on one note then pressing [Ctrl]+[A]. Use the fine tuning control to tune the first track up by +3 cents. Double click in the area with the orange rectangle around it to type in the desired amount. Once you have entered the amount you can click away or hit [Enter] to apply.

Create Your Melodyne Clip

Repeat the steps for the second copy and then use the Inspector to mix both track in to taste. You can select both tracks at the same time and then use [Ctrl] to create a Quick Group. You’ll then have the ability to bring the volume Up / Down and mix it into the original track. Play around with the panning as well to get different amounts of width in the mix.

Pro Tips:

  • Use Pan to create additional width.
  • You can use the format control to create even more separation from the original.
  • Add additional processing to the doubles for other interesting sounds.

Doubling a Live Instrument with MIDI

More often than you can imagine producers want to hear an additional sound in a recording and those instruments or a player for them are not around. As a piano player, you have many options available to you with the use of virtual instruments and MIDI. What if you are a guitar player who wants to create a double on an instrument you don’t play or don’t own? You are in luck, with Melodyne and SONAR we make this a price of Cake.

* This process works best with single note lines but can also work well for simple chords or double stops as well.

Create a single note recording of a hook you want to double and use the Add Track button to create an instrument of your choice.

Using Melodyne You Can Create a Single Note Recording of a Hook

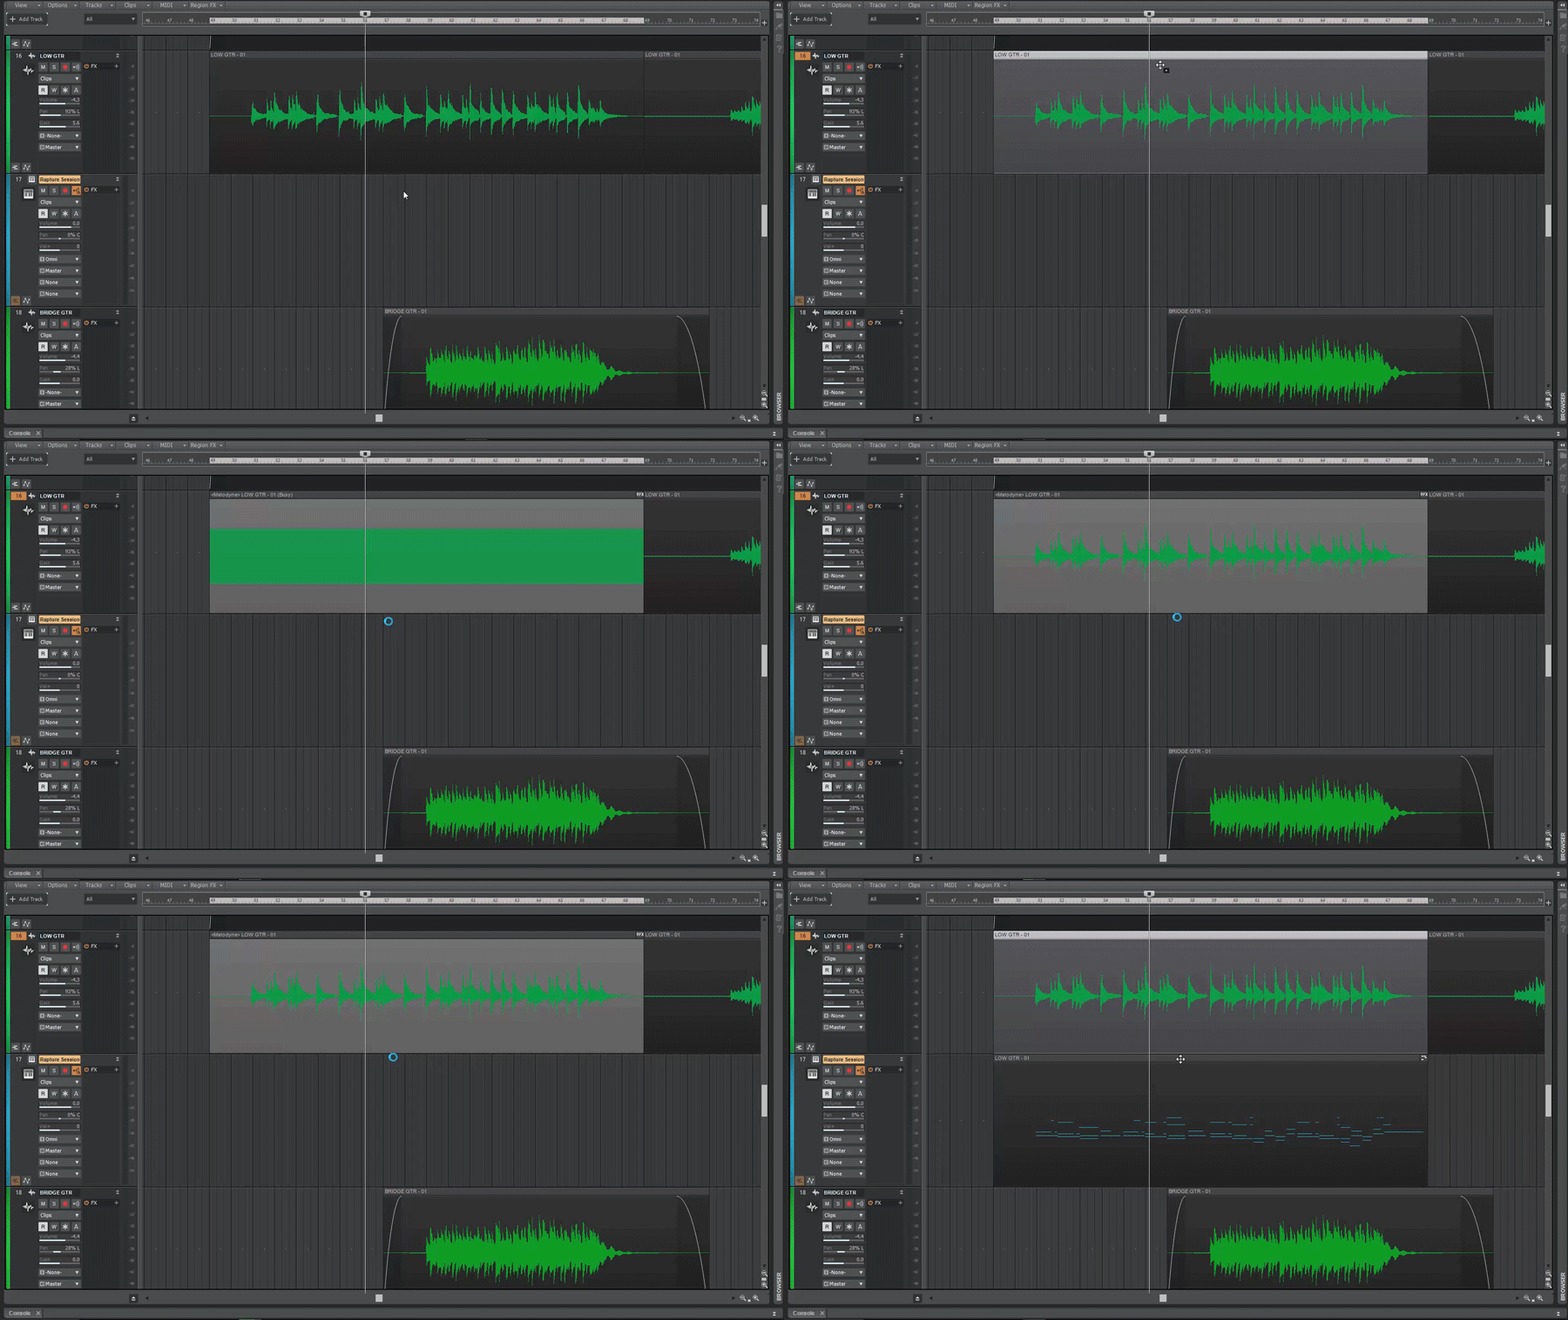
Hold down [Ctrl] and drag the audio clip to the Instrument track.  Watch as Melodyne automatically converts the audio to MIDI.  Double click the newly recorded clip to make any adjustments needed.

Make Adjustments in SONAR As Needed

Pro Tips:

  • Hold [Shift] while moving notes to maintain their original location in time.
  • Select all the notes and drag to a higher or lower octave.
  • Create a harmony by selecting a scale to snap to and then drag the notes up or down by a 3rd.

Melodyne Essential is included with SONAR Professional and SONAR Platinum. If you own SONAR Artist you can follow along using any demo of Melodyne from the Celemony Website.

Try SONAR Music Recording Software for 30-days

Building Your Own Professional Sound Panels – 5 Years Later

[Links to building the sound panels below]

Time flies when you’re having fun the old cliché saying goes.  For me, five years ago, I was in the trenches for a good week going down a rabbit hole not knowing exactly where I would end up.  I’m talking about sound panels – building sound panels that is; and if you’re anything like me, you’ve been in a few studios and loved the look and feel of those expensive looking ones on the walls.

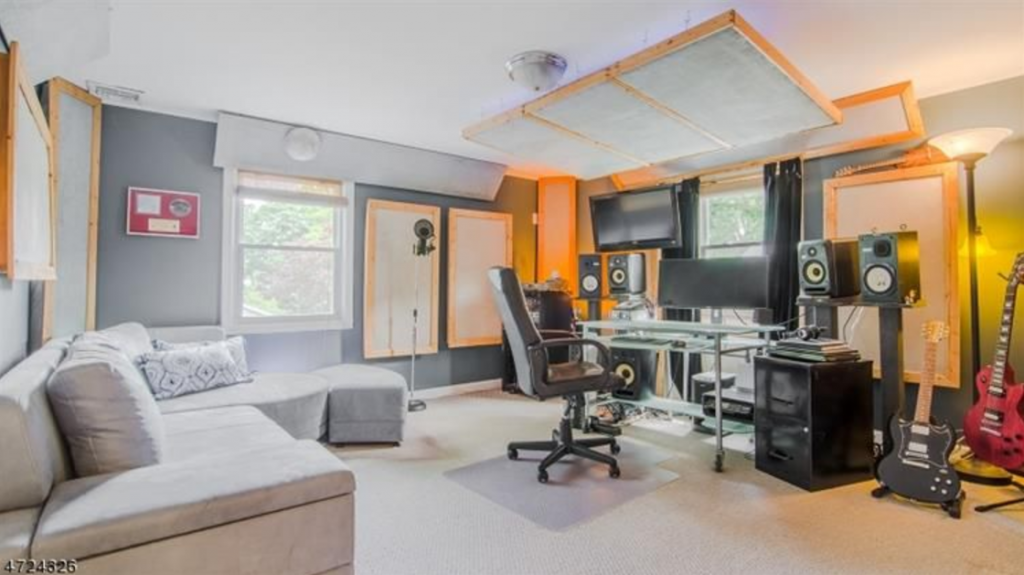
When I moved into our new house, my goal was to create a project studio where I could plain and simply put, have fun.  My jobs before Cakewalk at Elektra Records and Capitol Records allotted me enough pressure-cooker studio situations to last a lifetime, so this studio was about doing things I wanted to do, when I wanted to do them, and maybe also making some college money on the side for my boy Mack (now 8). Continue reading “Building Your Own Professional Sound Panels – 5 Years Later”

Q&A with True Sound Studios

Ryan Wiesner “Weezna” is the owner and operator of True Sound Studios outside of Buffalo, NY. He chooses SONAR Platinum to produce a range of music including Hip Hop, EDM, Pop, and Rock. We discovered Ryan from his YouTube channel and were impressed with his studio and with the videos he’s creating using SONAR. We got him to take a break from his rigorous recording and video creation schedule to talk to us about why he uses SONAR and how he’s integrated it into his hybrid digital / analog productions. Continue reading “Q&A with True Sound Studios”

Is the car test still relevant?

“My first mix sounds awesome in my car!”

Said no producer ever…

Every producer and mixer knows the struggle; the infamous car test. You know the drill. You print a near-perfect mix in your home studio and then bounce it with the label, “FINAL MIX_wav”  and send it to your phone. You can feel the excitement, energy and anticipation of releasing your masterpiece into the world…and then you step into your car.

The nervous sweat drips down your back and your ears are clogged from hours of non-stop mixing. You press play and immediately regret not going to law school. OK…maybe it’s not that bad but straight from the bat you know your mix isn’t translating well in your car stereo or even the cheap earbuds that came with your phone. You are not alone.

Why does my mix sounds so terrible in my car? Continue reading “Is the car test still relevant?”

Bluetooth MIDI Is Here And Why It's Important For You

[youtube https://www.youtube.com/watch?v=99mneukqSkI&w=750&h=420]

A new way to enter MIDI

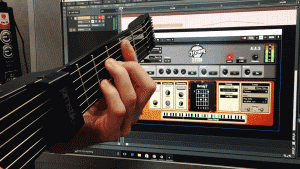
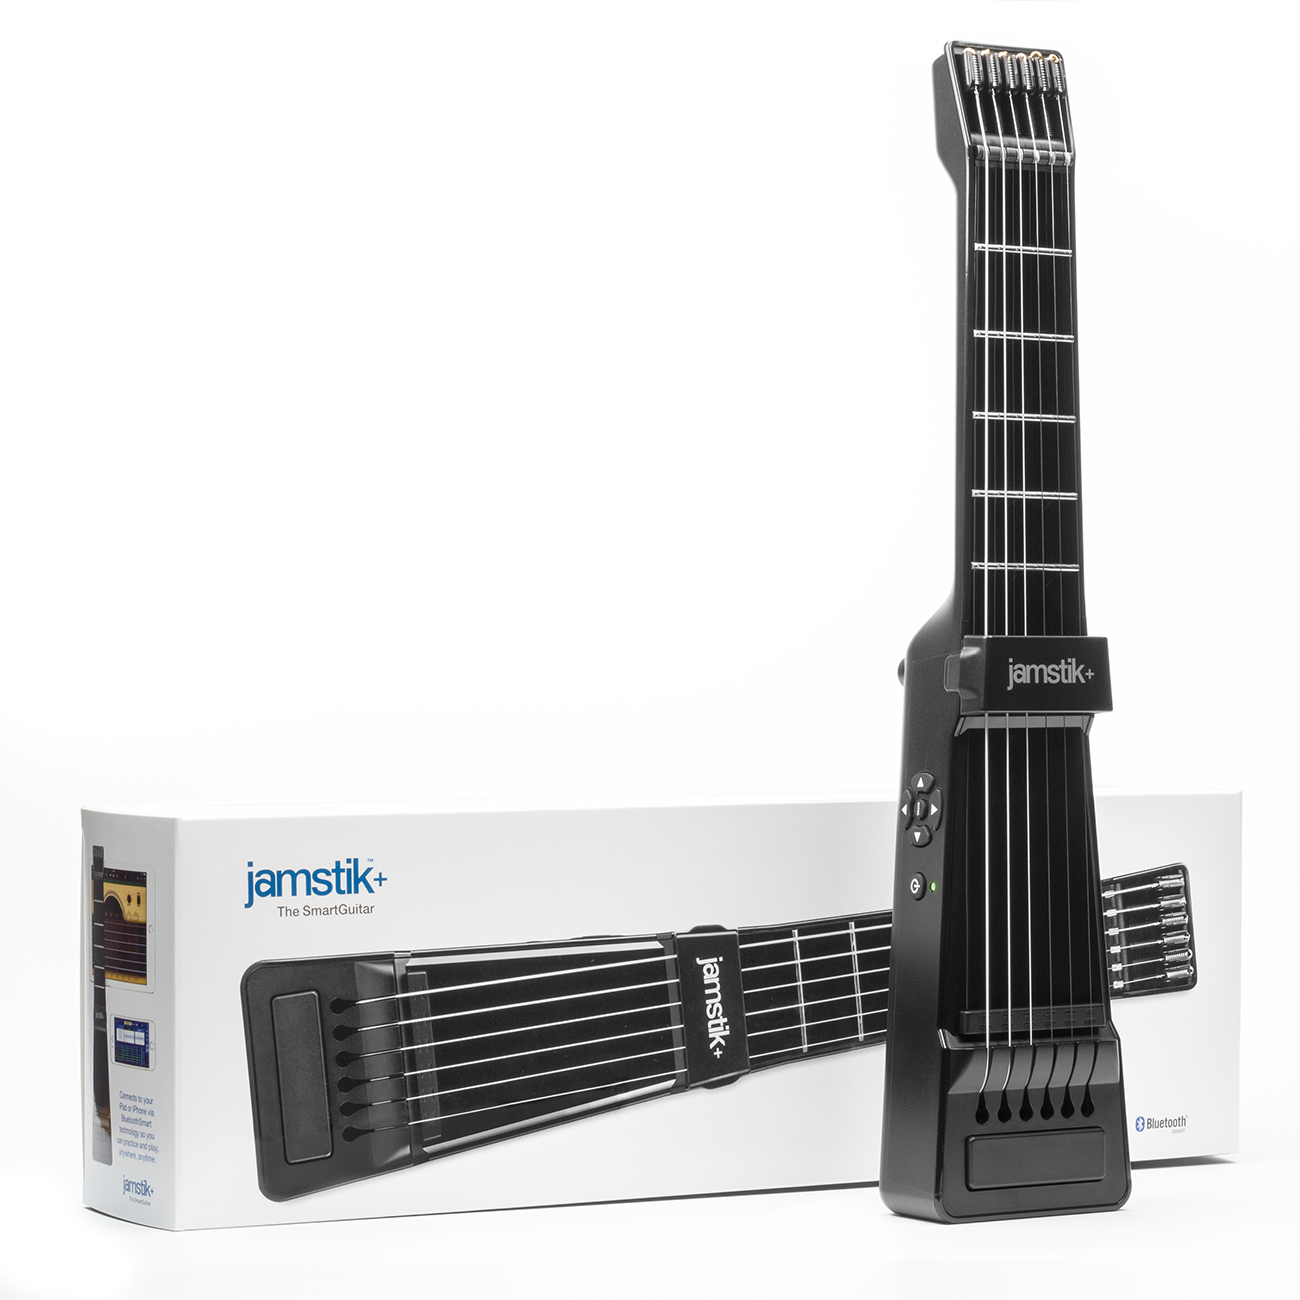
Greetings! My name is Mike Green, Music Product Specialist at Zivix, we make the jamstik+ portable SmartGuitar & PUC+ wireless MIDI link. I’m primarily a guitar player, and in my 15+ years of musical composition, MIDI has enabled me to write and record quickly. In full disclosure; I’m a lousy keyboardist. The jamstik+ and Bluetooth MIDI’s availability for Windows 10 has revolutionized what used to be a point-and-click endeavor. Now I can use virtual instruments in Cakewalk’s SONAR software controlled by the jamstik+ digital guitar so I can enter in data wirelessly via Bluetooth MIDI – using the guitar skills that come most naturally to me.

Tracking MIDI with the jamstik+ in SONAR Platinum

Jamstik+ & SONAR Platinum is a killer combo for the studio.

A hit with pro and amateur musicians, the jamstik feels like a traditional guitar neck and works with your favorite MIDI apps and DAWs.  Music notation, composition or accompaniment is easy with the Jamstik+ and Sonar Platinum Edition.

The jamstik+ is a great MIDI controller, and my favorite bundled virtual instruments in SONAR are:

  • Strum Session 2: This was an added bonus I did not expect, a built-in guitar modeller! Overall, I’m very impressed with the simple UI. There’s a plethora of modifiers to make your own presets with, and even a chord-finder as an added benefit. Make sure to take a listen to the short track I made featuring the “acoustic” preset (video is at the top of the blog post).
Using Strum Session’s Chord Finder with the jamstik+
  • Cakewalk Sound Center: This Soft-Synth includes a nice variety of tones.  There is a limit to what parameters you can tweak for each sound, but most of these sounds are good right off the bat.  

Make Sure Your PC is Bluetooth 4.0 Compatible.

With recent updates in the Windows 10 OS, SONAR’s DAW takes advantage of using Bluetooth 4.0 Low Energy (BLE) to connect Bluetooth enabled MIDI devices. Now, almost all operating systems have this capability, so the performance is only going to get better from here, and more controllers will start “Roli” ‘ing in (haha). Check the specs on your PC (look for Bluetooth in Device Manager) to see if your PC is Bluetooth 4.0 compatible. If not, you can always try various BLE Dongles like this one by Asus.

Connecting is easy

  1. Pair to Windows 10
  2. Open SONAR
  3. Enable your MIDI Device In/Out Check-boxes in Preferences
  4. Select your Soft-Synth
  5. Play!

Use the PUC+ To Connect Other MIDI Controllers via Bluetooth

I should also mention if you’re looking to connect an existing MIDI keyboard, check out the PUC+ Wireless MIDI interface. It’s an easy way to cut the cables from your rig (for your electronic drum-kits, keytar, or even syncing/switching effects on our DAW). After seeing more and more innovative controllers at Winter NAMM 2017, one thing is clear — BLE MIDI isn’t going away anytime soon.

Keep An Eye Out For More Bluetooth Instruments

With the rise of mobile music apps, we are seeing the need for cool controllers that fit the lifestyle of musicians. In Jordan Rudess’s tech talk at NAMM, he put a strong emphasis on tablets being expressive instruments—with one drawback: no tactile feedback on the glass.  This is where controllers like the Jamstik+ come into play. A portable, configurable controller in a guitaristic form-factor. Stay tuned for more from Zivix this year!

Learn more at jamstik.com

Zivix is currently running a promo deal with Cakewalk users for 10% off your order on jamstik.com – Make sure to enter discount code: SONAR10 at checkout!

The Miracle of Mid-Side EQ: Rock Your Mixes and Masters

by Craig Anderton

Sure, the LP EQ is a great linear-phase, stereo EQ. But it was designed for mid-side processing as well as conventional stereo, so let’s explore what mid-side processing is about, and why it’s so important.

LP EQ BASICS 

You can add up to 20 nodes, and each can have one of the following responses:

  • Low shelf
  • High shelf
  • High pass
  • Low pass
  • Peak boost/cut


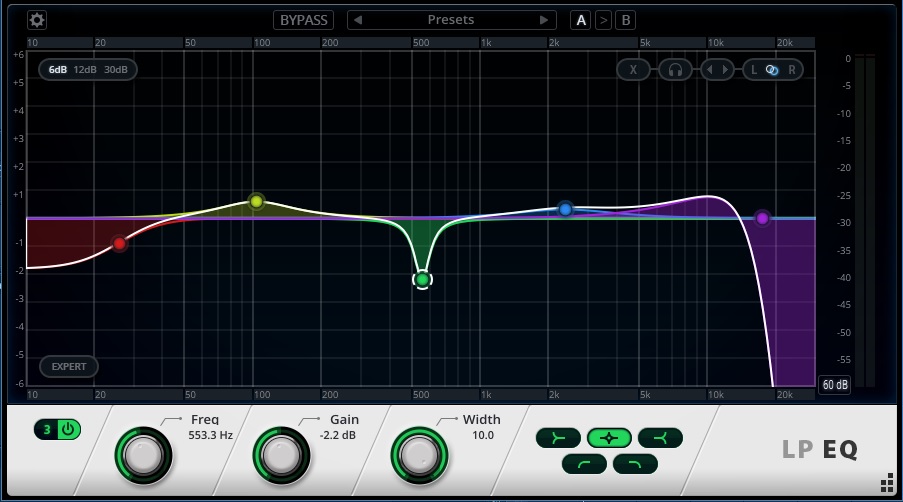
The LP EQ allows up to 20 nodes
The LP EQ allows up to 20 nodes, which can choose from five responses.

However, there’s some intelligence when adding nodes; for example if you double-click to enter a node close to the highest possible frequency, the LP EQ will insert a lowpass filter. At a somewhat lower frequency, there’s a shelving response (although you can of course change these default responses to whatever you like). Drag nodes horizontally to change the frequency or up/down to vary amplitude; a right-click + drag on a node alters the width, as does using the mouse scroll wheel on a selected node.

You can ctrl+click, or draw a marquee around, multiple nodes to select them, but there’s an interesting twist. Suppose a node is set to boost, and another to cut. If you select both, then click on the one that boosts and drag it downward, the amount of boost will decrease. However the one that’s cut will start boosting. This complementary motion allows increasing or decreasing the overall emphasis easily; for example, if you think you went too far with the amount of EQ and want to pull it back, this reduces all aspects equally.

If all the selected nodes either boost or cut, then their amplitudes vary together.

These basics give a flavor of the features, but there’s much more—so click on the UI to give the LP EQ the focus, then press F1 to call up the comprehensive documentation.

MID-SIDE EQ PROCESSING

Mid-side processing encodes a stereo track into two separate components: the center becomes the “mid” component in the left channel, while the stereo track’s right and left elements become the “side” component in the right channel. You can then process these components individually, with automatic decoding back into stereo.

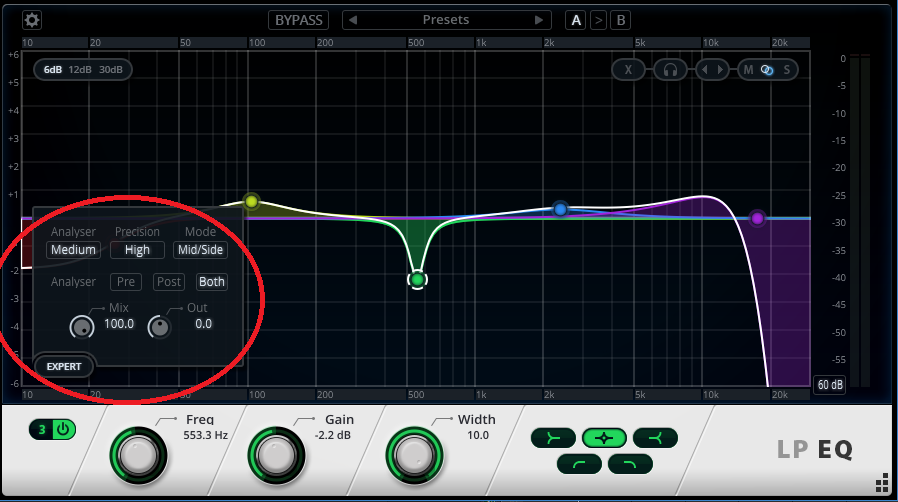
To get started with mid-side processing, click on the LP 64’s Expert button and under Mode, choose Mid/Side. For best results, set the precision to High. This results in the most latency but the highest accuracy, which is important because with mid-side processing, you don’t want any phase shift or sample misalignment—that will interfere with the decoded stereo imaging.

the LP EQ's Expert Mode access Mid-Side processing
The LP EQ’s Expert Mode is the key to doing mid-side processing with EQ. Also note the Mix control for parallel processing.

Processing can be independent for the mid and side components (as it is for the left and right channels in conventional stereo applications). You assign a node to the appropriate component by clicking on the node, and then clicking on M or S (toward the LP EQ’s upper right corner). Here are a few possible applications.

  • With mastering, you can get “inside the file” to do pseudo-remixing on a stereo track. One typical application is giving a slight boost to the higher-frequency side components to provide a bit more “air” and a wider stereo image.
  • If you’ve been seduced by vinyl’s comeback, remember that it’s crucial to center the bass and minimize bass excursions in the sides. With mid-side EQ processing, you can reduce the bass in the sides, and if needed, increase bass a bit in the center. Even if you’re not mastering for vinyl, taking this technique further can give a super-anchored, “center-channel” bass sound.
  • Drums with lots of room ambience can benefit from a bit of upper mids in the sides for extra definition, and a little bit of lower mids in the center to accent the kick.
  • If a synth bass has a wide image that “steps on” other instruments, you can bring down the bass in the sides.
  • For taming reverb, set a node to Mid, select the high pass curve, and slide it all the way to the right to take out essentially everything. Then you can shape the remaining reverb with the side EQ, while chasing the away from the center, where it can muddy the bass and kick.

THE VALUE OF THE MIX CONTROL 

But…how do you know whether you’re really making an improvement to the sound or not? The LP EQ includes a Mix control (accessed in the Expert section) so you can vary the mix from full EQ to no EQ. Yes, parallel processing for EQ…very handy, and even better, the Mix control can be automated (like virtually all other parameters, including display characteristics and bypass).

You can also switch quickly between two different EQ settings with the A/B comparison function.

Granted, there’s no shortage of EQ plug-ins, but the LP EQ truly brings something new to the party. If you’re not familiar what mid-side processing can do with EQ, there’s no better way to find out than with the LP EQ.