30% off – Blue Cat Audio Mixing Plugin Special

Bluecat Audio
Save 30% off mixing tools from Blue Cat Audio
We have teamed up with Blue Cat Audio to offer exclusive savings for Mixing Month.  These plugins are a great addition to SONAR and will help you visualize, analyze, automate, process, and sculpt the perfect mix. Specials end April 30th!

Shop today:

Shop all Blue Cat Audio Plugins

Mixing with the Console Emulator

Mixing with the Console Emulator

Snake oil, or useful processor? Read on, and find out

by Craig Anderton

Console Emulator plug-ins are controversial. First, a lot of people are convinced they don’t really make a difference. Second, there’s the philosophical question of whether emulating a console is a good thing—after all, you’re emulating imperfections. And third, there’s the question of which console you want to emulate.

However, before you can judge whether a console emulator is going to be useful, you need to know how to use it correctly…so let’s investigate.

About Console Emulation

There are legitimate reasons why analog consoles can sound different compared to mixing “in the box,” and also, legitimate reasons why some might consider these differences desirable. Technically speaking, there are two main differences compared to digital summing.

First, analog circuitry has inherent non-linearities (or in less polite terms, distortion). As a signal goes through multiple analog stages, these non-linearities add up although the end result can still be extremely low-level. Because there are differences between the left and right channels, this tends to “widen” the image and create the appearance of a wider soundstage. If the distortion is relatively high, as can be the case with older consoles, distortion generates harmonics in the audio spectrum’s upper range. With increased highs, and given that highs are more directional, this can widen the sound even further.

Second, consoles often use audio transformers and it’s not an overstatement to say that transformers are some of the most complex signal processors ever introduced into a signal chain. What’s more, the transformer’s characteristics are dependent on the circuitry that surrounds it—such as the source impedance, capacitive loading, resistive loading, and the like. For example, the external circuitry may damp some of the “ringing” that occurs when passing square waves through audio transformers. Transformers also generate distortion (primarily odd-order) that’s highest at lower frequencies. While the effect of all of these variables is subtle, many people like the sonic characteristics transformers can impart to a signal. Overall, good transformer implementations provide a somewhat “fatter” low end, and can add “warmth.”

Inserting Cakewalk’s Console Emulator

As with any processor, there are no rules if you want to get creative—so take the following as personal preferences, not as “rules” that must be followed.

Prior to mixing, I’d recommend inserting a Console Emulator Channel plug-in (CEC for short) last in the ProChannel for every track, and a Console Emulator Bus plug-in (CEB for short) in the master bus. The easiest way to do this is with the Quick Grouping command: in the Console view, open a ProChannel in a non-selected track. Then while holding the Ctrl key, right-click within the ProChannel, select Insert Module, and choose Console Emulator Channel; this places the CEC last in every audio track. You’ll need to insert the CEB in the master bus manually, as Quick Group works only across similar track types.

To ensure that the CEC is last in the chain, place the ProChannel post-FX bin (right-click in a blank space or effect header in the ProChannel, then select Post FX Bin—see Fig. 1).
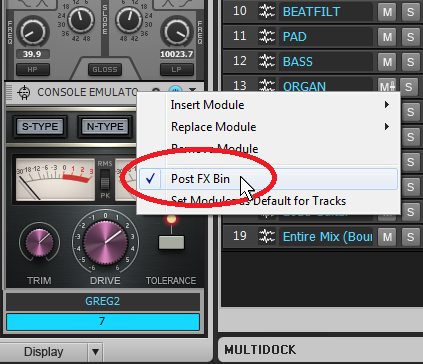
Fig. 1: Placing the ProChannel post-FX bin, and inserting the Console Emulator plug-in as the last effect in the ProChannel, guarantees that all effects in the track will go through the Console Emulator.

Continue reading “Mixing with the Console Emulator”

Mixing Tips: Ten Nasty Mixing Mistakes

Not happy with your mixes? One of these reasons might be why

By Craig Anderton

Mixing is tough enough as is, but avoiding the following mistakes just might help the process go a little more smoothly—and give you audibly better results.

1. Mixing in a lousy monitoring environment

If you mix in a room with horrible acoustics or use inaccurate speakers that do tricks like hype the bass, your mix is doomed. You may think it sounds fine, and it might, because you’re compensating for the monitoring deficiencies. But as soon as you get the mix outside of your environment, it will likely sound dreadful.

To solve this problem, strive to use speakers that emphasize accuracy. They may not flatter your music that much, but that’s the point: If your mix sounds great over accurate speakers, it will at least sound decent over other speakers.

Proper acoustic treatment is ideal, but may not be possible. IK Multimedia’s ARC can help with fixing your acoustics (normally I see little value in “room tuning,” but IK’s system is quite effective). Also consider buying a really good set of circumaural headphones, and use them as a reality check compared to your speakers. Just remember that headphones give a particular “flavor” of reality that accentuates ambience and stereo separation; their main use in this case is evaluating the amount of bass because room acoustics aren’t a factor. However if you use something like Beatz, that won’t help—you want headphones designed for monitoring, not consumers.

2. Too much reverb or too little ambience

Some people seem to think that adding lots of reverb will compensate for a problematic part. Actually, all it does is give you a problematic part with too much reverb. Mitigating factor: If you’re doing a 60s revival/tribute recording, then make sure you do use too much reverb if you want to be authentic.

On the other hand, an overly dry sound doesn’t do you any favors either. We usually hear music in an acoustic environment of some kind, so adding in audio like room mics on drums (Fig. 1) can create a much more realistic and satisfying mix.

Fig. 1: Take advantage of the room mic option in Addictive Drums to give a more “real” feel.

Note that with recorded drums that already have some ambience, you can often make the existing ambience more prominent by putting the drums through the Concrete Limiter. By reducing the peaks Continue reading “Mixing Tips: Ten Nasty Mixing Mistakes”

SONAR X3 Clinic by Craig Anderton – Berklee Online

In case you missed the Berklee Online Webinar with Craig Anderton (March 31st, 2014) – here is the video in it’s entirety! Craig outlines some of his favorite topics including:

  • The MIDI advantage for songwriting
  • Using loops for both songwriting and EDM
  • Speeding up workflow to prevent “inspiration atrophy” (effects chains, track templates, browser techniques, etc.)
  • Creating your own mixer architecture
  • Using “spot” timing correction to tighten timing without destroying feel
  • How to make amp sims sound great (e.g. effects chains)
  • Mastering in SONAR

Learn more about SONAR X3

SONAR X3: Producing Drum Samples (Video Series)

In the midst of recording a whole record it’s always a good idea to take some samples of the drum set so that you can replace and reinforce the drums later on in mixing. Here is an 11-part video series that shows you how to apply some basic EQ, Compression, and Editing techniques to get your drum samples to sound pro within SONAR X3.

Microphone Tips: What is a Polar Pattern?

The Polar Pattern of a microphone determines how the microphone perceives sound 360 degrees around the capsule and ultimately helps engineers decide on a microphone’s use and application. Some microphones have multiple polar patterns while others are designed for one specific pattern. Understanding the sound of any microphone is very important, especially when harnessing that knowledge on a session that has a multi-mic’d instrument.

How to read these patterns

These graphs are read from the top down. 0 degrees is the front of the microphone and Continue reading “Microphone Tips: What is a Polar Pattern?”

Subtractive EQ Part 4: Bass

Miss part 1? Read Subtractive EQ – Snare Drum.

Bass
The bass in this track caters to fans of the early Metallica era.  Bassist Cliff Burton popularized this distorted sound on such tracks as (Anesthesia) Pulling Teeth.  It’s important to blend this type of bass tone into the bottom of the guitars.  In this mix the guitars and the bass become a single unit ebbing and flowing with one another at certain points through the song.

Understandably one can assume that there was much processing done to this track before it’s transfer into SONAR.  It’s important to capture the sound before you start mixing so that your mixing process is not a patch-job.

This tone is aggressive and piercing to the ear.  A significant way to know that this instrument needs attention is by the aural fatigue that you may experience while soloing this track and listening to it rather loudly for more than 10 seconds.  I aimed to adjust the bass track to fit like a glove under the mix by applying a HPF at 78Hz with a steep bandwidth setting.  The amount of bass here needs control. Using a compressor to control the sound would be redundant because of how much overdrive was applied to this track.  The overdrive has ultimately eliminated any trace of strong transients.

Lastly, there is another dip in the EQ around 2.2kHz.  This adjustment reduces some of the aforementioned piercing sound. Any harsh tones in this register will be too overbearing in the mix.

Blue Cat Audio Analysis Plugins – Worth A Closer Look

The highly flexible, unique Blue Cat Audio plugins are now available at the Cakewalk Store. Find out how these critically-acclaimed plugins make comparing your audio tracks to reference material and to each other a breeze and how nearly any component—peaks, RMS, crest factor, even isolated frequency bands—can become a key signal for advanced sidechaining.

Blue Cat’s Analysis Pack
At first glance, the plugins in the Blue Cat Analysis Pack seems fairly self-explanatory: Blue Cat’s DP Meter Pro is a digital peak meter, Blue Cat’s FreqAnalyst Multi and Blue Cat’s FreqAnalyst Pro are spectrum analyzers, Blue Cat’s Oscilloscope Multi renders waveforms and Blue Cat’s StereoScope Multi and Blue Cat’s StereoScope Pro are stereo image visualizers. Their included histograms, 3D and 2D spectrograms, envelope graphs, XY and different views may be no surprise, either. However, what their names do not make clear is their capability to generate control data from the dynamics and spectra of your audio. Use them with a dynamics processor to get nearly infinite sidechaining possibilities.

Blue Cat Analysis Pack
Image © Blue Cat Audio

You may be wondering what the difference Continue reading “Blue Cat Audio Analysis Plugins – Worth A Closer Look”