Sometimes EQ is more about “sonic sculpture” than anything else
by Craig Anderton
One of the most important aspects of mixing is using EQ to “carve out” a specific frequency range for instruments so they don’t conflict with each other. If instruments have their own sonic space, it’s easier to hear each instrument’s unique contribution, which increases the mix’s clarity.
Dan Gonzalez did a great series for the Cakewalk blog on subtractive EQ, and how cutting frequencies can help create a better a mix; this is more of a complementary article about how I carved out EQ for various instruments in a cover version of the song “Black Market Daydreams” (by UK songwriter Mark Longworth). All the displays are set for +/-6dB.
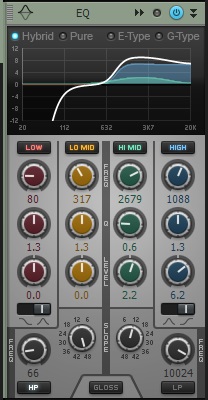
Choirs: Using a low-shelf response to cut starting at the midrange gives the choir more brightness and “air.” This way it sort of floats over the mix. The same approach works well for ethereal pads, and lets you mix them a little lower to make space for other sounds. Also note that I couldn’t resist throwing a little Gloss in there…

Try the QuadCurve EQ in the SONAR X3 Producer Free Trial
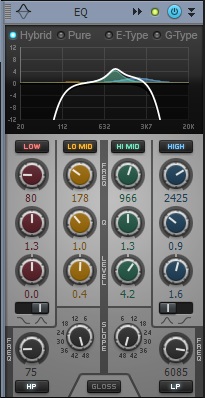
Guitar power chord: Enabling the high pass and low pass filters creates a broad bandpass in the midrange area where there’s not a lot of energy from the other instruments. The 1kHz peak emphasizes the “meat” of the guitar. This kind of technique can also work with other thick sounds, like large (as opposed to ethereal) pads.

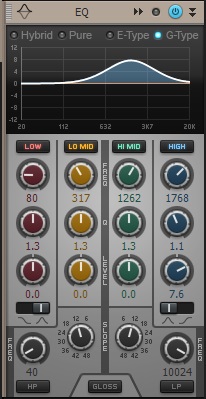
Vocals: The ear is most sensitive in the 3-4kHz range. Giving a slight boost to vocals in this range lets you mix them lower yet have them cut better. You have to be very careful not to boost too much, though, as these frequencies can make vocals harsh.
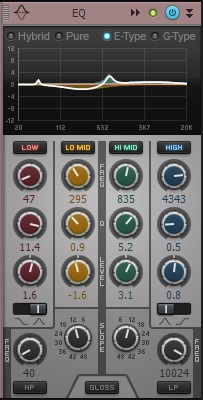
The following curve is what I used for my voice when close-miking with a dynamic mic. The boost may seem extreme, but my voice is naturally more “mellow” so I need the extra brightness for intelligibility; the sharp low frequency cut minimizes plosives caused by the close-miking, yet retains the warmth from the proximity effect.
Cutting the same frequencies with other instruments can also make the voice stand out better. For example with a singer/songwriter playing acoustic guitar, I’ll often cut the guitar subtly in the 3-4 kHz range when the singer is singing, and boost it when there’s no vocal. You don’t perceive a change because that part of the spectrum has the same energy in both cases. I wouldn’t recommend my vocal curve for everyone, but it works for me.

Acoustic guitar: Some instruments benefit from a shallow, fairly broad parametric cut around 300-400Hz. This is a range where many instruments overlap, and when added together make a “muddy” or “tubby” sound. Cutting the lower mids a bit also makes the highs and lows stand out more. I also do this with some material when mastering to give the overall mix more clarity.
The following screen shot shows EQ for acoustic guitar. In addition to the midrange cut, I’ve boosted the brightness a bit so the level can sit lower in the track, brought up the range around the low E string, and added a sharp low-frequency cutoff to minimize “boom” from the body.

Drums: This was a premixed loop. There’s a bit of a bump to bring out the kick, a shallow dip in the lower mids to tighten the sound, and the snare on these drums had a nice “ring” so the midrange peak brings that out. There’s also a very slight boost to the highs to make the high-hat more prominent. These may appear to be subtle changes, but remember that because this was a premixed loop that they’re affecting every element of the kit—kick, toms, snare, and cymbals.

Bass: In this song, the bass added more of a melodic component then a rhythmic one. The boost may seem excessive, but there’s not a lot of energy from the bass up there, and this amount of boost emphasized the pitch—particularly because in this case, I added some saturation to bring out the melody and give more “growl.”

Also note that timing can make a huge difference in the “bass vs. kick differentiation” issue. Advancing the bass track by a few milliseconds compared to the kick emphasizes the melody and makes the bass seem louder. Delaying the bass track by a few milliseconds compared to the kick emphasizes the rhythm and makes the drums seem louder (even though in both cases, there are no level changes happening).
Those are just a few examples of how to use EQ to juggle the frequency spectrum for various instruments within a mix. Of course every song is different; these examples are specific to a particular song and arrangement. However, the principles are pretty basic—the whole point is to do whatever is necessary so every instrument is contributes to the overall mix instead of fights with it.
Learn More about the QuadCurve EQ in SONAR X3 Producer
Try the QuadCurve EQ in the SONAR X3 Producer Free Trial


One Reply to “How to EQ: Carving Out The Right Sound For Your Mix”
Comments are closed.