SONAR Quick Tip: Save time tweaking levels with Quick-Grouping

Grouping is one of the most powerful tools you can use during both the tracking and mixing process, but SONAR X2 offers up Quick-Grouping as an alternative method for making quick adjustments to your levels.

Let’s say you have mic’d up a drum set and you have been working diligently on the balance.  Without realizing it you are completely clipping your Master Bus, don’t worry this happens to the best of us. The first thing that comes to mind is making a group to correctly adjust all your levels at once. This involves assigning each parameter to a group and then eventually turning that group off and on again when you need to make small adjustments.

Instead of doing that, try the following Quick Groups feature:

  • Select all of your tracks using CTRL+A
  • Hold CTRL
  • This makes a temporary group of your selected tracks
  • Move 1 fader
  • The rest will follow suite and keep the fidelity of your balance

Try SONAR X2 free for 30-days and check out this easy-to-use feature.


SONAR Quick Tip: Changing The Default Preset For A Plug-in – by Scott R. Garrigus

After adding effects to a folder (in the Cakewalk Plug-in Manager), you can also specify default presets for each effect. Right-click an effect in the folder and choose Properties.

In the Item Properties dialog box, choose a preset from the Default Preset menu.

Click OK. Now when you insert the effect into a project, it will automatically default to the preset you selected. See pages 12 to 15 in SONAR X2 Power! for more information about customizing plug-in menus. 

Blue Cat Audio Analysis Plugins – Worth A Closer Look

The highly flexible, unique Blue Cat Audio plugins are now available at the Cakewalk Store. Find out how these critically-acclaimed plugins make comparing your audio tracks to reference material and to each other a breeze and how nearly any component—peaks, RMS, crest factor, even isolated frequency bands—can become a key signal for advanced sidechaining.

Blue Cat’s Analysis Pack
At first glance, the plugins in the Blue Cat Analysis Pack seems fairly self-explanatory: Blue Cat’s DP Meter Pro is a digital peak meter, Blue Cat’s FreqAnalyst Multi and Blue Cat’s FreqAnalyst Pro are spectrum analyzers, Blue Cat’s Oscilloscope Multi renders waveforms and Blue Cat’s StereoScope Multi and Blue Cat’s StereoScope Pro are stereo image visualizers. Their included histograms, 3D and 2D spectrograms, envelope graphs, XY and different views may be no surprise, either. However, what their names do not make clear is their capability to generate control data from the dynamics and spectra of your audio. Use them with a dynamics processor to get nearly infinite sidechaining possibilities.

Blue Cat Analysis Pack
Image © Blue Cat Audio

You may be wondering what the difference Continue reading “Blue Cat Audio Analysis Plugins – Worth A Closer Look”

EDM Production: How To Customize Z3TA+ 2's Stock Arpeggios

Z3TA+ 2 comes packed with a massive pool of MIDI programs that power it’s internal Arpeggiator, but why stick to the stock programs when you can make your own?
Here’s how:
  • Open Z3TA+2 and activate the Arpeggiator Section
  • Right-Click on the sequence in the arpeggiator and make sure the following are checked
  • Auto Disable Pattern When Dragged to Host
  • Auto Fit Patterns to One Measure When Loaded
  • Load one of the Arpeggios from the Pattern menu
  • Drag and Drop the Arpeggios right into SONAR X2
  • Edit the MIDI Clip to your liking
  • Go to File > Save As
  • Select MIDI 0 in “Save as type”
  • Go to C:\Cakewalk Content\Z3TA+ 2\MIDI Arpeggios and Save it
  • Load it into Z3TA+2’s Arpeggiator by going to Pattern > Load MIDI File…

Wanna try Z3TA+2 for free?  Download the 30-Day Trial of this incredible synthesizer.

EDM Production: Creating Industrial Drums with Session Drummer 3

SONAR X2 Producer’s versatile drum production tools allow you to get creative with your sound. Want to push the limits of EDM or get that mid-90’s industrial vibe from your tracks? Check out this Quick Tip on how to process your drums utilizing the stock ProChannel effects and Session Drummer’s Tune Parameters.

  • On your Session Drumer track, load PC76 – U-Type Compressor
  • Set Input to 18db
  • Attack 0.5-1.0 ms
  • Fast Release 500 ms
  • Ratio set to Infinite or “All Buttons in Mode”
  • Set Output so that you are not overloading
  • Activate Console Emulator for more saturation
  • Activate the Softube Saturation Knob set this to 2-3 o’clock and set the type of saturation to “Keep Low”
  • Activate Breverb Prochannel. Set the parameters to a rather short Room Reverb

Drums are now over-saturated and over-compressed

Now that you have the basic foundation for a distorted/saturated/pumpy/electronic drum sound lets Mangle it.

  • Activate Write Automation on the Session Drummer Track in the Track View
  • Open the interface for Session Drummer  and go to the Mixer View
  • Activate the Write Automation within the Session Drummer VST Plugin
  • Play the track and move the “Tune” knob (with your mouse or your MIDI controller) for the High Hat in rhythm to create tuning aliasing. This will be labelled “Tune 03” in your automation.
  • Once this is done minimize the interface for Session Drummer  
  • Within the Track Pane using the Edit Filter go to Automation > Session Drummer x64 1 > Tune 01 (Kick Drum Tune Knob)
  • Select the Draw Tool and draw in some nodes that closely match the same curves and structure as the automation we just laid down.
  • Open the Automation Lanes to see the automation data side by side

Deactivate the Write Enable buttons just incase you are no longer going to automate any more parameters

  • As you do this feel free to adjust your compression, saturation, tuning, tempo, and automation to fully customize

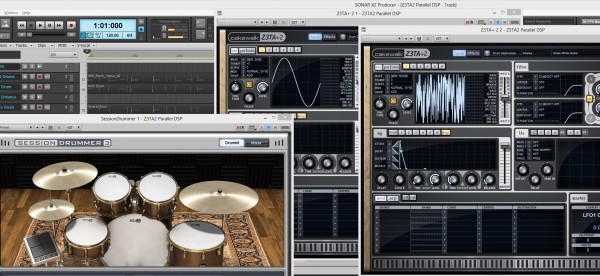
EDM Production – Enhance Your Drums with Z3TA+ 2

Did you know Z3TA+ 2 comes stock with a Sine Wave Generator and a White Noise Generator? Both can be used to enhance your Kick and Snare Drums.

  • Insert two instances of Z3TA+ 2.
  • Copy your drum sequence to both Z3TA+ 2 tracks. 
  • Isolate the Kick on one track and the Snare on the other. 
  • Setup the first Z3TA+ 2 to generate a Sine Wave for the Kick. 
  • Setup the second Z3TA+ 2 to generate White Noise for the Snare. 
  • Adjust the Amplifier Envelope to match the duration of each hit. 
  • Within Z3TA+ 2 add Reverb, Compression, and EQ. 
  • Mix in under your existing Drum Loop.

Learn more about Z3TA+ 2

Try Z3TA+ 2 for Free