 A common question I get asked when doing J.A.M. Sessions, webinars, and other events, is how to setup parallel compression in SONAR. The next asked question is usually what parallel compression is and why it should be used.
Parallel compression is a mixing technique most commonly used on drums where one signal is split into two allowing them to be processed separately, or in parallel, and mixed together.
Typically a drum bus will be split into two drum buses where one drum bus will be compressed heavily and the other drum bus will be compressed lightly, if at all.

The reason for doing this is that heavy compression on drums can sound good but can also cause a major loss of transients and attack. Blending heavily and lightly compressed drum buses yields the best of both worlds.
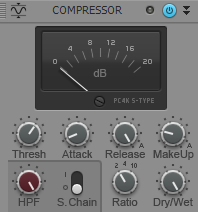
There are a few ways to set up parallel compression in SONAR X1 Producer Expanded so I will show you how I do it using quick grouping, effects sends, multiple busses, and the ProChannel’s PC4K S-Type Bus Compressor.
Below are the steps to setting up parallel compression on drums in SONAR.
 1.) Route all drum tracks to a single bus. To do this quickly, select all of the drum tracks, hold Ctrl to engage Quick Grouping, and then change the output of any one of the tracks to New Stereo Bus.
2.) Next, name the new bus Par Comp Heavy or something similar to indicate it will be the bus with heavy parallel compression.
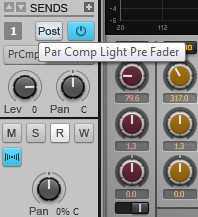
3). On the Par Comp heavy bus, insert a send to New Stereo Bus.
4.) Name this new bus Par Comp Light or something similar to indicate it will be the bus with light, or no, parallel compression.
 5. Change the send from Post fader to Pre fader by turning off the Post button. Now you have independent control over the two buses.
6.) Next, create a new bus and name it Drums. This bus is a down-stream bus that the two parallel compression buses will be routed to.
This allows flexibility for routing certain drum tracks, like cymbals or overheads, directly to it so as to not be overly compressed which is a way to avoid the wavering, pumping sound of overly compressed cymbals within a heavily compressed drum mix. This also allows you to process and balance the overall drum mix within the project without moving the two parallel compression buses relative to each other.
7.) Now route the two Parallel Compression buses to the Drum Bus.
 8.) Open the ProChannel on the two parallel compression buses. Start by soloing the Par Comp Heavy bus and dialing in a lot of compression with the PC4K S-Type Bus Compressor. I like to set the Attack to a very fast setting, the Ratio to 10, and Release to Auto. Then I’ll use the Threshold to compress from between 10-20db, or even more depending on how crunchy I want it to sound.
Then solo the Par Comp Light bus and dial in a very light amount of compression, or leave it dry if you prefer to blend it dry with the Par Comp Heavy bus.
 9.) Finally, mix the Par Comp heavy and Par Comp Light buses to taste by adjusting their levels relative to one another. Then use the Drum bus to balance the overall drum mix within the project.
Hopefully the technique above helps your drums sound bigger, punchier, and better than ever. Learn more about drum production today by checking out our Drum Production Master Classes on CakeTV.

