Ryan Wiesner “Weezna” is the owner and operator of True Sound Studios outside of Buffalo, NY. He chooses SONAR Platinum to produce a range of music including Hip Hop, EDM, Pop, and Rock. We discovered Ryan from his YouTube channel and were impressed with his studio and with the videos he’s creating using SONAR. We got him to take a break from his rigorous recording and video creation schedule to talk to us about why he uses SONAR and how he’s integrated it into his hybrid digital / analog productions. Continue reading “Q&A with True Sound Studios”
Is the car test still relevant?
“My first mix sounds awesome in my car!”
Said no producer ever…
Every producer and mixer knows the struggle; the infamous car test. You know the drill. You print a near-perfect mix in your home studio and then bounce it with the label, “FINAL MIX_wav” and send it to your phone. You can feel the excitement, energy and anticipation of releasing your masterpiece into the world…and then you step into your car.
The nervous sweat drips down your back and your ears are clogged from hours of non-stop mixing. You press play and immediately regret not going to law school. OK…maybe it’s not that bad but straight from the bat you know your mix isn’t translating well in your car stereo or even the cheap earbuds that came with your phone. You are not alone.
Why does my mix sounds so terrible in my car? Continue reading “Is the car test still relevant?”
The Miracle of Mid-Side EQ: Rock Your Mixes and Masters
by Craig Anderton
Sure, the LP EQ is a great linear-phase, stereo EQ. But it was designed for mid-side processing as well as conventional stereo, so let’s explore what mid-side processing is about, and why it’s so important.
LP EQ BASICS
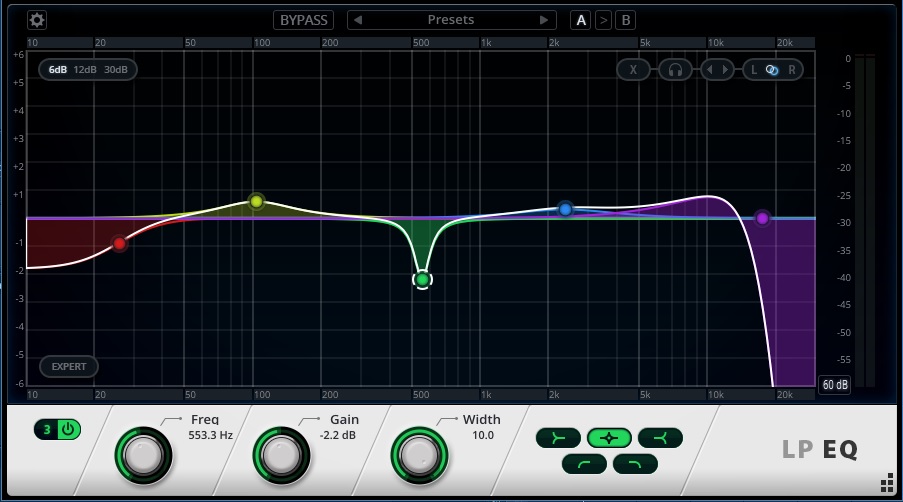
You can add up to 20 nodes, and each can have one of the following responses:
- Low shelf
- High shelf
- High pass
- Low pass
- Peak boost/cut

However, there’s some intelligence when adding nodes; for example if you double-click to enter a node close to the highest possible frequency, the LP EQ will insert a lowpass filter. At a somewhat lower frequency, there’s a shelving response (although you can of course change these default responses to whatever you like). Drag nodes horizontally to change the frequency or up/down to vary amplitude; a right-click + drag on a node alters the width, as does using the mouse scroll wheel on a selected node.
You can ctrl+click, or draw a marquee around, multiple nodes to select them, but there’s an interesting twist. Suppose a node is set to boost, and another to cut. If you select both, then click on the one that boosts and drag it downward, the amount of boost will decrease. However the one that’s cut will start boosting. This complementary motion allows increasing or decreasing the overall emphasis easily; for example, if you think you went too far with the amount of EQ and want to pull it back, this reduces all aspects equally.
If all the selected nodes either boost or cut, then their amplitudes vary together.
These basics give a flavor of the features, but there’s much more—so click on the UI to give the LP EQ the focus, then press F1 to call up the comprehensive documentation.
MID-SIDE EQ PROCESSING
Mid-side processing encodes a stereo track into two separate components: the center becomes the “mid” component in the left channel, while the stereo track’s right and left elements become the “side” component in the right channel. You can then process these components individually, with automatic decoding back into stereo.
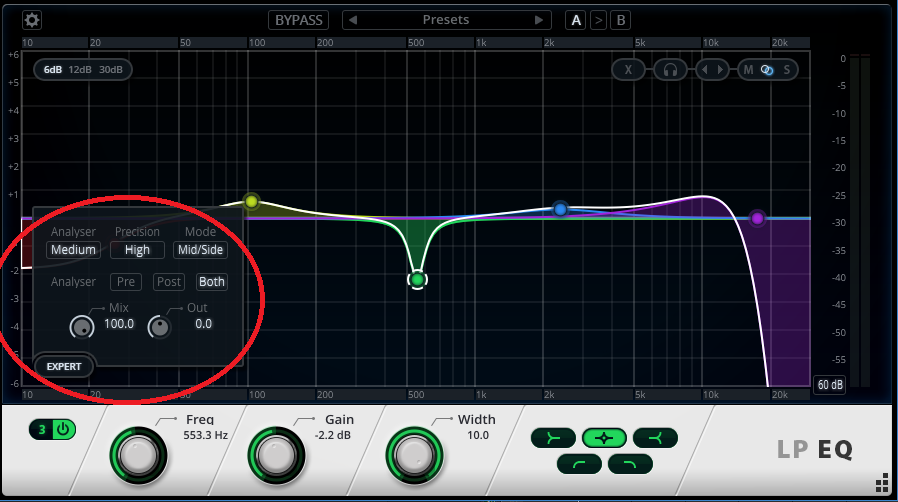
To get started with mid-side processing, click on the LP 64’s Expert button and under Mode, choose Mid/Side. For best results, set the precision to High. This results in the most latency but the highest accuracy, which is important because with mid-side processing, you don’t want any phase shift or sample misalignment—that will interfere with the decoded stereo imaging.

Processing can be independent for the mid and side components (as it is for the left and right channels in conventional stereo applications). You assign a node to the appropriate component by clicking on the node, and then clicking on M or S (toward the LP EQ’s upper right corner). Here are a few possible applications.
- With mastering, you can get “inside the file” to do pseudo-remixing on a stereo track. One typical application is giving a slight boost to the higher-frequency side components to provide a bit more “air” and a wider stereo image.
- If you’ve been seduced by vinyl’s comeback, remember that it’s crucial to center the bass and minimize bass excursions in the sides. With mid-side EQ processing, you can reduce the bass in the sides, and if needed, increase bass a bit in the center. Even if you’re not mastering for vinyl, taking this technique further can give a super-anchored, “center-channel” bass sound.
- Drums with lots of room ambience can benefit from a bit of upper mids in the sides for extra definition, and a little bit of lower mids in the center to accent the kick.
- If a synth bass has a wide image that “steps on” other instruments, you can bring down the bass in the sides.
- For taming reverb, set a node to Mid, select the high pass curve, and slide it all the way to the right to take out essentially everything. Then you can shape the remaining reverb with the side EQ, while chasing the away from the center, where it can muddy the bass and kick.
THE VALUE OF THE MIX CONTROL
But…how do you know whether you’re really making an improvement to the sound or not? The LP EQ includes a Mix control (accessed in the Expert section) so you can vary the mix from full EQ to no EQ. Yes, parallel processing for EQ…very handy, and even better, the Mix control can be automated (like virtually all other parameters, including display characteristics and bypass).
You can also switch quickly between two different EQ settings with the A/B comparison function.
Granted, there’s no shortage of EQ plug-ins, but the LP EQ truly brings something new to the party. If you’re not familiar what mid-side processing can do with EQ, there’s no better way to find out than with the LP EQ.

