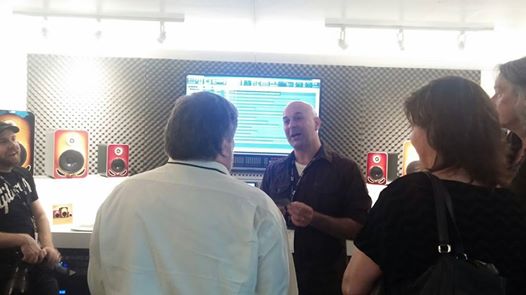
Video from Winter NAMM 2015

NAMM

Highlights from Winter NAMM 2015
NAMM was our first opportunity to show off the new SONAR line to the public, and the reception was nothing short of spectacular. To handle the crowds, products were demoed at three locations—the Gibson, TASCAM, and Hal Leonard booths. We met artists, press, and of course many, many customers—and we were equally happy to thrill long-time Cakewalk supporters as well as bring new users into the fold.

Cakewalk NAMM 2015

We wish everyone could experience the excitement of NAMM, but to give you a taste just click the links below to see demos and interviews from the show floor. And—there’s also a sneak peek of the new David Bendeth Signature Series Compressor.

Dan Gonzalez demos the new features in SONAR

Audiofanzine gets a demo of the new SONAR

Keyboard magazine interviews Craig Anderton on Membership

Engineer/Producer, John Paterno shows off Overloud REmatrix

Sneak peek at new David Bendeth Signature Series Compressor


Basics: Five Questions about Latency and Computer Recording

Get the lowdown on low latency, and what it means to you

By Craig Anderton 

Recording with computers has brought incredible power to musicians at amazing prices. However, there are some compromises—such as latency. Let’s find out what causes it, how it affects you, and how to minimize it.  

1. What is latency? When recording, a computer is often busy doing other tasks and may ignore the incoming audio for short amounts of time. This can result in audio dropouts, clicks, excessive distortion, and sometimes program crashes. To compensate, recording software like SONAR dedicates some memory (called a sample buffer) to store incoming audio temporarily—sort of like an “audio savings account.” If needed, your recording program can make a “withdrawal” from the buffer to keep the audio stream flowing. 

Latency is “geek speak” for the delay that occurs between when you play or sing a note, and what you hear when you monitor your playing through your computer’s output. Latency has three main causes: 

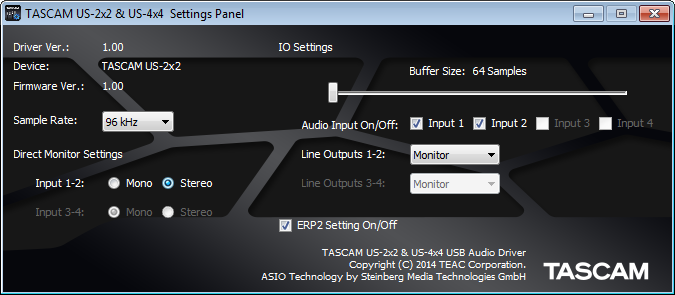
  • The sample buffer. For example, storing 5 milliseconds (abbreviated ms, which equals 1/1000th of a second) of audio adds 5 ms of latency (Fig. 1). Most buffers sizes are specified in samples, although some specify this in ms. 

 Fig. 1: The control panel for TASCAM’s US-2×2 and US-4×4 audio interfaces is showing that the sample buffer is set to 64 samples. 

  • Other hardware. Converting analog signals into digital and back again takes some time. Also, the USB port that connects to your interface has additional buffers. These involve the audio interface that connects to your computer and converts audio signals into digital signals your computer can understand (and vice-versa—it also converts computer data back into audio).
  • Delays within the recording software itself. A full explanation would require another article, but in short, this usually involves inserting certain types of processors within your recording software. 

2. Why does latency matter? Continue reading “Basics: Five Questions about Latency and Computer Recording”

Meet the Bakers: Craig Anderton

If you want to know about me, including multiple probably surprising facts, One Louder magazine did a pretty comprehensive interview just before I joined Gibson. In fact I’m surprised I was asked to participate in “Meet the Bakers,” because I’m really just an honorary baker…but apparently all these software guys need someone with hardware experience to change light bulbs and fix the microwave, and that would be me. So we’ll just cut to the chase, and deal with the bullet points. Oh, and don’t forget to check out my latest music videos at http://www.youtube.com/thecraiganderton. It’s an eclectic collection, to say the least…from cover versions to French Antilles dance music to EDM to hard rock to a live ambient performance written as a sleep aid for my daughter.

Doing a festival gig with Brian Hardgroove from Public Enemy, as the hard rock two-piece EV2. Eddie Kramer called us “The Black and White Stripes.” I’m quite sure he considers me the white one. Continue reading “Meet the Bakers: Craig Anderton”

7 Steps to Cleaning Up Your "ACT" with Hardware

by Craig Anderton

ACT (Active Controller Technology; in SONAR) is a powerful protocol, and its complexity can be sufficiently daunting that some people never take advantage of it. However, one of the rarely-considered advantages of a powerful protocol is that it’s often powerful enough to be used in a more basic way. So if you’ve wanted to take advantage of ACT without having to reach for the aspirin, you’re in the right place.

The conventional approach to ACT is using templates that let you apply hands-on control to various instruments and effects. This usually implies having a dedicated controller, spending some time setting up assignments and creating templates, and so on. However, you can also treat ACT more like a “controller scratch pad” that’s easy, efficient, and works with just about any MIDI controller. It’s the ideal solution for when you simply want some hands-on control without having to venture very far into left-brain territory.

Step 1: Choose Your Controller

One of my favorite ACT controllers is Native Instruments’ discontinued Kore 2 controller. The industrial design is first-class, it’s built solidly, and there’s enough functionality for what we need. Another advantage is that when NI stopped supporting Kore, the eBay prices took a major tumble. Although the examples in this article are based on Kore, please note that the same principles apply to virtually any MIDI controller.

Step 2: Grab Your Software

Many controllers have dedicated drivers, so if needed, make sure you have the latest. NI still offers the 32/64-bit Kore 2 Controller Driver 3.0.0 and the latest NI Controller Editor, which you can download for free from their site. Follow the instructions when installing, or you’ll wonder why the controller doesn’t work.

(Note: With the Kore 2 controller, you may first be greeted with an unusable bright red display. No worries: Hit Kore 2’s F2 button, navigate to Set, hit Enter, and use the navigation buttons and data wheel to control the Contrast and Backlight parameter values.)

The Controller Editor for NI’s Kore lets you specify various characteristics of the Kore 2 controller. In this picture, a button is being assigned to output a trigger when pushed down.

Various controllers may have options—such as assigning buttons to a latch, toggle, or trigger mode. Many of them have editors; Kore 2’s is somewhat more sophisticated than many others, but again, the principles are the same. In the case of Kore you open the Editor, select Kore Controller 2 from the drop-down menu, and use the Edit button in the Templates tab to choose New. This creates a general purpose MIDI control template. (While you’re at it, I recommend assigning the eight main buttons associated with the pots to Trigger, and action on Down. For a shift button, assign the monitor [speaker icon] button to Gate, again with action on down. Go to the file menu, and save the configuration as “Sonar ACT.ncc.”)

Step 3: Set Up SONAR

Your controller communicates with SONAR via MIDI, so go to the Continue reading “7 Steps to Cleaning Up Your "ACT" with Hardware”

Do you have too many song ideas? The Matrix View can help.

by Dan Gonzalez

Do you suffer from having too many musical ideas than you know what to do with? The Matrix View is great way to throw all of your riffs, licks, and leads into one place to mess around with song arrangements and structures.

How does it work?

The Matrix View operates under SONAR’s second audio engine. It’s the same audio engine that allows you to preview and play loops from the Media Browser. This non-linear playback engine is what is utilized during your performances in the Matrix View. All you really have to do to get started is drag audio from SONAR into the Matrix. It will populate a cell and then automatically route to the audio tracks you have set in the Track View. Click on the cell and then you can jump around the interface triggering different musical ideas. When you have multiple cells in one column you can trigger an entire column as well.

Try out the Martix View for free – Download the SONAR X3 Producer Free Trial

Where do I begin?

Grab some of your ideas – if they are loops then you have even more flexibility when changing tempos. If you want some great loops to work with then be sure to pick up these free loops that Craig Anderton supplied for us during Guitar Month. Continue reading “Do you have too many song ideas? The Matrix View can help.”

Vocal Month: Creating Vocal Harmonies with Melodyne Essential

Can’t quite hit the high or low notes? Melodyne usually can.

by Craig Anderton

If you don’t have a wide vocal range, you have to choose a vocal’s key very carefully—the low parts can’t go below your range, and if you’re going to hit the harmony notes, you have to pay attention to where the highest notes fall as well. Unfortunately the voice sometimes loses power when you start hitting your lower limits, but if you choose the best possible range for your lead vocal then you may have a hard time hitting the harmony’s high notes. What’s a singer to do?

My solution is to choose the optimum key for the lead vocal, then reach for Melodyne Essential to synthesize the harmonies. Most of the time I can hit the harmonies so I’ll sing them “for real” and bring in Melodyne as needed, but I’ve also found merit to using Melodyne to generate the harmony even if I can hit the notes—it gives a different character that works well in some musical contexts.

Creating Harmonies

Generating harmonies requires some manual effort, but it’s worth it.

1. Clone the lead vocal.

2. Create a Melodyne Region FX for the clone.

3. Solo the lead vocal and clone (Dim Solo can be useful for this application so you can hear the vocals in context).

4. Start adjusting the clone’s blob pitches to create the harmony (Fig. 1).

Fig. 1: Thanks to a paint program’s transparent layers, colorization, and cut and paste, this shows the harmony line (blue) superimposed on the lead vocal.

Usually the easiest way to do this is by ear, but if you’re theory-minded, you can always apply those rules to determine which pitches to use for the harmonies.

Additional Tips

I highly recommend choosing Edit > Pitch Grid > No Snap and adjusting the harmony pitch by ear. Snapping doesn’t always produce the most musical results.

Also, check out my article Easy Automatic Double Tracking with Melodyne Essential, which describes how to add slight timing and pitch variations to do automatic double tracking. Applying the same technique to the harmony line prevents it from “shadowing” the lead vocal, and helps the harmony establish itself as an independent entity.

There’s a video on my YouTube channel that uses Melodyne Essential for creating both ADT and the harmony effects described in this article. In fact, there’s only one vocal track in the entire song; all the others were derived from it using Melodyne.

Finally, I demoed this technique during the video I did at Berklee College of Music last March. You can see the video here.

Happy harmonizing!

BETTER TOGETHER: TRY SONAR X3 AND MELODYNE FOR FREE!

Vocal Month: Easy Automatic Double Tracking (ADT) with Melodyne Essential

There’s a great ADT program lurking within Melodyne Essential

by Craig Anderton

So is Celemony’s ADT (Automatic Double Tracking) program any good? If you have Melodyne Essential, you can find out for yourself—because it’s the same program. Yes, hidden within SONAR X3‘s Melodyne Essential is a very cool ADT effect that’s extremely effective with vocals.

Introduction

Double-tracking is the process of singing a second vocal on top of a main vocal to “thicken” the overall sound. It’s impossible to sing a vocal exactly the same, so there will be slight timing and pitch differences that add interest and depth. Automatic Double Tracking produces this effect electronically, which can give more control over the double-tracked vocal. While there are dedicated plug-ins to give the ADT effect, Melodyne has all the tools needed to do this. I’d go so far as to say Melodyne can produce one of the best electronically generated ADT effects I’ve heard.

The Melodyne ADT effect works best with vocals where you haven’t already added extensive pitch or timing correction. As an aside, I never do a “wholesale” quantization of notes; to my ears, removing the “incorrect” pitch variations in a vocal actually create a less compelling performance. Instead, I manually correct only those notes that actually sound “wrong.” Even then, I don’t always quantize exactly to pitch. Music is about tension and release, and subconsciously, you’ll often sing a little flat or sharp (tension) and end up on pitch (release). Making all the pitches “perfect” removes this emotional component.

As an analogy, conside B. B. King’s guitar playing. He often bends a flatted 7th not quite up to pitch. By not resolving the note, instead of completing the phrase it leads you into the next one. Timing and pitch variations are an essential part of music, so don’t overdo the correction.

Setup

It’s easy to set up the ADT effect with Melodyne.

1. Clone the vocal to which you want to add the ADT effect.

2. Right-click on the cloned click and create a Melodyne Region FX.

3. Select all the notes in the vocal.

4. Turn up Correct Pitch Center to about 60% (Fig. 1).
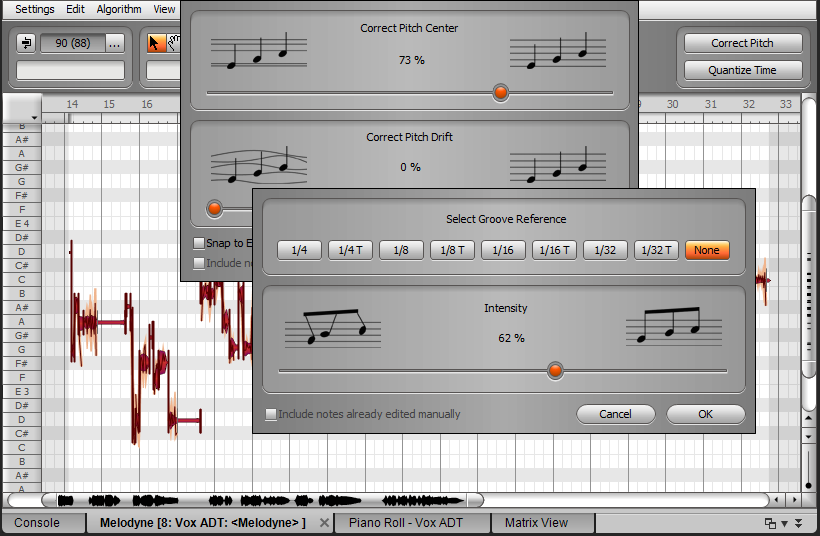
Fig. 1: Correcting pitch and  timing subtly on a cloned vocal track can produce an automatic double-tracking effect.

5. Turn up Quantize Time Intensity to about 60% (Fig. 1).

6. Evaluate the ADT effect, and tweak the pitch and timing correction amounts as appropriate.

Generally you don’t want too much pitch or timing correction—just enough to be different from the main vocal.

Mixing ADT Vocals

When mixing, centering the two vocals tends to maximize the similarities to chorusing; the vocals sound somewhat more diffused, which works well for “gentler” material. Panning them slightly oppositely (about 30% right and 30% left) can give a more spacious sound in stereo.

With sparser mixes, centered panning often fits best while the somewhat spread sound helps the vocals have more presence in dense material, like hard rock with lots of distorted guitar. However, these aren’t “rules” as ultimately, the song itself will dictate which works best in the final mix.

Give this technique a try—I think you’ll be as surprised as I was about how effectively it provides an authentic, convincing ADT effect.

BETTER TOGETHER: TRY SONAR X3 AND MELODYNE FOR FREE!

SONAR X3 QUICKTIP: MAKE YOUR VOICE THICKER (STUDIO & PRODUCER)

How to EQ: Carving Out The Right Sound For Your Mix

Sometimes EQ is more about “sonic sculpture” than anything else

by Craig Anderton

One of the most important aspects of mixing is using EQ to “carve out” a specific frequency range for instruments so they don’t conflict with each other. If instruments have their own sonic space, it’s easier to hear each instrument’s unique contribution, which increases the mix’s clarity.

Dan Gonzalez did a great series for the Cakewalk blog on subtractive EQ, and how cutting frequencies can help create a better a mix; this is more of a complementary article about how I carved out EQ for various instruments in a cover version of the song “Black Market Daydreams” (by UK songwriter Mark Longworth). All the displays are set for +/-6dB.

Choirs: Using a low-shelf response to cut starting at the midrange gives the choir more brightness and “air.” This way it sort of floats over the mix. The same approach works well for ethereal pads, and lets you mix them a little lower to make space for other sounds. Also note that I couldn’t resist throwing a little Gloss in there…

Try the QuadCurve EQ in the SONAR X3 Producer Free Trial

Guitar power chord: Enabling the high pass and low pass filters creates a broad bandpass in the midrange area where there’s not a lot of energy Continue reading “How to EQ: Carving Out The Right Sound For Your Mix”

Mixing Tips: Ten Nasty Mixing Mistakes

Not happy with your mixes? One of these reasons might be why

By Craig Anderton

Mixing is tough enough as is, but avoiding the following mistakes just might help the process go a little more smoothly—and give you audibly better results.

1. Mixing in a lousy monitoring environment

If you mix in a room with horrible acoustics or use inaccurate speakers that do tricks like hype the bass, your mix is doomed. You may think it sounds fine, and it might, because you’re compensating for the monitoring deficiencies. But as soon as you get the mix outside of your environment, it will likely sound dreadful.

To solve this problem, strive to use speakers that emphasize accuracy. They may not flatter your music that much, but that’s the point: If your mix sounds great over accurate speakers, it will at least sound decent over other speakers.

Proper acoustic treatment is ideal, but may not be possible. IK Multimedia’s ARC can help with fixing your acoustics (normally I see little value in “room tuning,” but IK’s system is quite effective). Also consider buying a really good set of circumaural headphones, and use them as a reality check compared to your speakers. Just remember that headphones give a particular “flavor” of reality that accentuates ambience and stereo separation; their main use in this case is evaluating the amount of bass because room acoustics aren’t a factor. However if you use something like Beatz, that won’t help—you want headphones designed for monitoring, not consumers.

2. Too much reverb or too little ambience

Some people seem to think that adding lots of reverb will compensate for a problematic part. Actually, all it does is give you a problematic part with too much reverb. Mitigating factor: If you’re doing a 60s revival/tribute recording, then make sure you do use too much reverb if you want to be authentic.

On the other hand, an overly dry sound doesn’t do you any favors either. We usually hear music in an acoustic environment of some kind, so adding in audio like room mics on drums (Fig. 1) can create a much more realistic and satisfying mix.

Fig. 1: Take advantage of the room mic option in Addictive Drums to give a more “real” feel.

Note that with recorded drums that already have some ambience, you can often make the existing ambience more prominent by putting the drums through the Concrete Limiter. By reducing the peaks Continue reading “Mixing Tips: Ten Nasty Mixing Mistakes”

SONAR X3 Clinic by Craig Anderton – Berklee Online

In case you missed the Berklee Online Webinar with Craig Anderton (March 31st, 2014) – here is the video in it’s entirety! Craig outlines some of his favorite topics including:

  • The MIDI advantage for songwriting
  • Using loops for both songwriting and EDM
  • Speeding up workflow to prevent “inspiration atrophy” (effects chains, track templates, browser techniques, etc.)
  • Creating your own mixer architecture
  • Using “spot” timing correction to tighten timing without destroying feel
  • How to make amp sims sound great (e.g. effects chains)
  • Mastering in SONAR

Learn more about SONAR X3