Introduction
Z3TA+ 2’s synth engine can generate sounds that stretch across multiple genres. By utilizing Z3TA+ 2’s advanced modulation matrix we can shape just about everything, even drums sounds.
Sine Wave Kick Drum
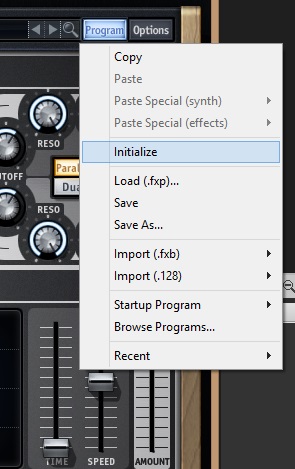
Start by initializing your patch. This will return the synth to all of it’s defaults so that you can start from scratch with the sound.
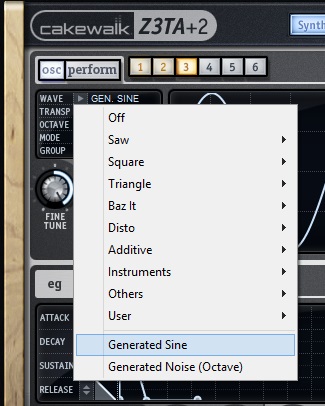
Kick Drums requires a lot of low end. Within Z3TA+ 2 you can produce this kind of controlled low end by using the Sine Waves that are available in the OSC section. We are going for a saturated low end, so make sure to add 3 Sine Waves.
Let’s split up the 3 Sine Waves into Middle, Right, and Left. In order to do this we must first activate the Filter Section, select the “Link” button and turn the Pan knobs on either filter. They will pan in opposite directions.
Afterwards, we can use the Filter Bus on each OSC section to pan the oscillators. Panning two opposing oscillators and then using the “Fine Tune” to slightly detune them will produce a nice wide stereo effect. Do this to both OSC 1 and OSC 2 and keep OSC 3 centered and not de-tuned.
We covered the value of this technique in – Creating a simple Bass Synth.
Enter the Mod Matrix
An envelope is a way of adding dynamics and shaping to your synthesizer. Creating a kick drum has quite a bit of “thud” at the beginning and then ramps downward quickly and only sustains for barely a second. Assigning a envelope to control the pitch of the Sine Wave will give it the proper shape that we need.
Our first line of the Modulation Matrix will start with EG1 and look like the following:
EG1 > 100% > (No Curve) > (No Control) > OSC1 Pitch
- Adjust every parameter to 0.00s except for Time and Release.
- Set Time to 2.08 seconds
- Set Release to 0.02 seconds
The second line of the Modulation Matrix is virtually the exact same as the first, except make sure that Source is EG2 and Destination is set to OSC2.
EG2 > 100% > (No Curve) > (No Control) > OSC2 Pitch
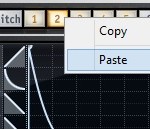
Copy and Paste the EG1 to the EG2 to save on some time. We want both Envelopes to be identical so that the stereo images does not sway to one side.
To add some variation to the synth’s sound I varied the Time parameter of EG3 to be a little shorter than both EG1 and EG2. So the 3rd line of the Modulation Matrix ends up looking like this:
EG3 > 100% > (No Curve) > (No Control) > OSC3 Pitch
Adjust the Time parameter in EG3 is set to 0.79 seconds, which is a bit shorter than both EG1 and EG2. If you adjust this parameter you’ll start to hear the differences in what this parameter can do to the sound.
Why is this different?
Lastly, for all 3 Envelope Generators, I adjusted the Time curve on each EG to be an “Exponetial” shape – where the curve starts slowly and then speeds up toward the end. The Linear curve shown here on Sustain, Release, and Attack was a bit too slow for the sound I was going for. The same goes for the Logarithmic curve. Experiment with the different curves and you’ll see what I mean. None of them have the right “kick” sound like the Exponential Curve.
AMP EG
The general AMP has the Time parameter set to .68 seconds with a Linear Curve type. This keeps the overall sound of 3 sounds from exceeding .68 seconds.
Adding some Attack
The next step is finding the right filter to add some attack to the kick sound. For now I have a simple 12 dB/OCT LPF filter setup. The Cutoff is set to about 12k and the Reso is is maxed. We’re adding this Filter to create a small sense of thwack to the kick drum and modulating it by way of the Mod Matrix.
The 4th line of the Mod Matrix looks like this:
EG4 > 100% > Fast + > (No Control) > All Filters Cutoff
Move to EG4 and set every parameter to 0 except for Time. Time can be set as low as 0.01 seconds. You really just need to make sure that you are getting a small “clicking” sound and then you’ll have the amount of attack required for the kick. It may not sound like much at first, but it definitely adds to the sound once you drop in audio effects.
Your Kick should start to sound like this:
Effects
Switch to Z3TA+ 2’s effects page and you can add variations of effects chains to enhance the sound. Here is the Kick with some Compression added.
Next, add some distortion to the sound for a bit of grit.
Lastly, throw on an EQ with a speaker mode and make some adjustments.
You can virtually use any of these effects to shape the kick any way you like.
Download the Z3TA+ 2 Free Trial
Check out more Production Tips with Z3TA+ 2 on The Cakewalk Blog:
| Z3TA+2 – CREATING A SIMPLE BASS SYNTH | CUSTOMIZING Z3TA+ 2′S STOCK SET OF ARPEGGIOS | DID YOU KNOW Z3TA+ 2 CAN ENHANCE YOUR DRUM SEQUENCES? |


