DEVELOPER NOTES – SONAR X3 TOAST NOTIFICATIONS (UI Enhancement)

Introduction

With headline features such as comping and VST3 plugin support, it might be easy to overlook some of the more modest improvements in SONAR X3, which can nevertheless make a big difference to your workflow.

So, aside from the headline grabbers, what else has X3 got to offer?

Well, the user interface has had its fair share of attention too, and that’s what this article is about – highlighting an interesting new UI feature that might otherwise slip under the radar.

Let’s take a look at this simple, yet significant improvement, that’s designed to minimize unwanted interruptions.

Too much ‘dialog’?

As we all know, good software gets out of the way and lets you get on with what you do best. Sadly, it’s rarely that simple, particularly with large, fully featured applications like SONAR X3. Sooner or later, the software will need to draw your attention to something.

And it usually happens when you least want it to!

When you’re ‘in the zone’, there can be few things more irritating than unwanted popup messages. Messages that don’t simply distract you, but actually interrupt whatever you happen to be doing by demanding an immediate response. Such messages are usually referred to as ‘dialog boxes’ (on Windows at least), and the user must respond to them before being allowed to continue:

Some dialogs are necessary, important even (like the one above); but for all the useful, relevant questions an application might ask you, there are probably just as many you could do without!

The fact is, dialog boxes interrupt workflow, and should therefore be used sparingly.

So what to do? What if SONAR wants to draw your attention to something that might be important, but could just as easily be considered spam (depending on your point of view)? Why not let the user decide how urgent something is, and action it, or ignore it, as they see fit?

That’s where ‘toast notifications’ come in.

Anyone for toast?

When you start SONAR X3, you may notice (depending on your settings) something similar to this at the bottom right of the screen:

On first inspection it would appear that the VST Scanner has changed a lot in X3! Well, that’s not actually the VST Scanner.

It’s a ‘toast notification’. Continue reading “DEVELOPER NOTES – SONAR X3 TOAST NOTIFICATIONS (UI Enhancement)”

Hidden Gem: The Blue Tubes Stereo Imager [SONAR X3 Studio & Producer]

Now in SONAR X3 Studio and Producer we’ve included a wonderful hidden gem.  The Blue Tube Stereo Imager is a spatial plugin that allows you to widen and narrow out your mixes with a simple slide from left or right.

This type of effect can be useful in situations where you need to A-B mixes quickly in mono.  Some one would say “I can just use the pan pots or stereo interleaved switch” but the beauty of this plugin is that you could use this plugin in both a musical and technical fashion. Continue reading “Hidden Gem: The Blue Tubes Stereo Imager [SONAR X3 Studio & Producer]”

SONAR X3: Exploring Your New EQs

SONAR X3 comes with an array of brand new EQ plugins. All of them have their own purpose sound and functionality. A great new feature within SONAR X3 is the ProChannel QuadCurve EQ Zoom & Analyzer as well. Using both of these you can truly get an idea of how each one works and how it affects your audio signal.

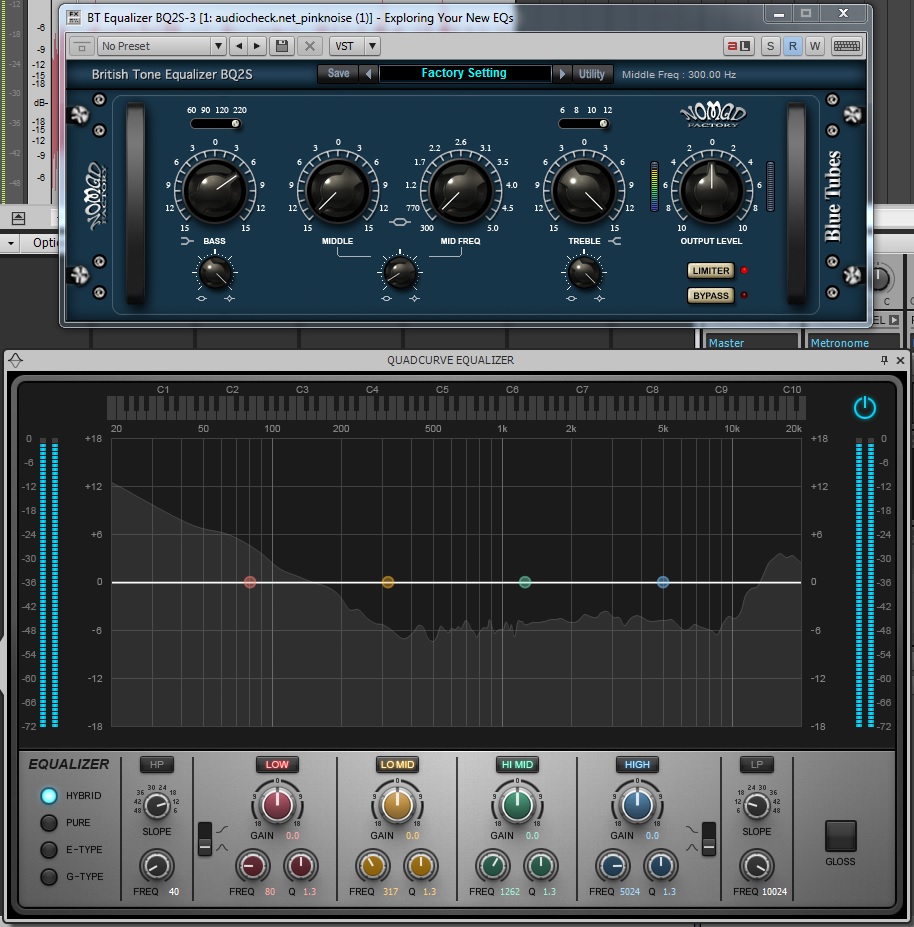
I’ve sent some pink noise through the new QuadCurve EQ & Zoom’s Analyzer so that you can see how the settings are affecting the full frequency spectrum.

The first one is the British Tone Equalizer. This is a 3-band EQ with a Low Shelving Band, Midrange Band, and a High Shelving Band. All have variable bandwidths.

You can see in the diagram below that, even though this appears to be a rather simple EQ, it’s middle adjustment is perfect for instruments that sit in the mid-range.

Both the high-shelving and low-shelving frequency adjustment are not as complex, but would be ideal for carving out their respective frequencies in both the high and low spectrum.

The Bandaxall EQ is a quickly and easy two band EQ with fixed frequency cut offs. This is perfect for Continue reading “SONAR X3: Exploring Your New EQs”

SONAR X3 Quicktip: Setting Up Your Addictive Drums

Addictive Drums is the brand new drum synth available in SONAR X3 Producer. The sounds, fast load times, internal mixing, and abundant groove clips makes this possibly the only drum synth you’ll need to use from now on.
There are a couple ways to insert this new synth into SONAR X3 Producer. The first way is to insert Addictive Drums as a simple instrument track.

  • Within SONAR X3 Producer go to the Media Browser and select the “Synth Tab”
  • Click the + button and go to VST 2 and/or Addictive Drums


SONAR X3 Workflow Tip: Organize with Color Customization

Organization during a session is a skill that should come second nature to any engineer or artist. Some aspiring engineers are reluctant to see the value in organization until they receive a session that has a track count higher than their usual intake. One of the best tips that just about anyone can benefit from is organizing your tracks by color.

Color organization is a new feature within SONAR X3 and supports just about any shade you need to organize your tracks.

By hovering under the number of the track Continue reading “SONAR X3 Workflow Tip: Organize with Color Customization”

Convert Audio to MIDI in SONAR X3

Converting Audio to MIDI has never been easier. Now in SONAR X3 Studio and Producer, Melodyne Essential with deep ARA integration makes it a very simple process.

  • Open up SONAR X3 Studio or Producer
  • Go to the Media Browser and make sure you are on the “Media” tab – Selecting the letter B on your computer keyboard will open and close this view.
  • The drop-down menu below “Media” will give you the different content options for SONAR X3.
  • The “Move up one level” button allows you to move backwards through the file hierarchy of your computer. Selecting this 2 times will bring you to your Cakewalk Projects folder.
  • Use the Media Browser to locate a mono audio file.
  • Once located simply drag and drop it onto a MIDI Track.
  • You can also drag an audio clip from an audio track onto a MIDI track.

Conversion will occur.

All this is made possible with the newly integrated ARA technology from Celemony.

Learn more about ARA and SONAR X3.

Did You Know That BiFilter2 is a Sound Designer's Dream?

When installing SONAR X3 Producer your eyes may have sailed across a plugin by Tone2 called “BiFilter2”. This program is more than just a filter, its a sound designer’s dream. It’s simplicity is misleading at first glance, but once you open up the hood of this plugin you’ll be grateful of it’s existence.  This filter has everything from basic EQ cutoffs, Comb Filtering, to even FM filtering.

Most of the time plugins of this nature are limited to the filter type being set as a preset and then the user having the ability to automate and modulate the different parameters within that preset. BiFilter on the other hand allows you to radically switch between filter types without hassle and even automate distortion types all within a single automation lane.  Essentially, one could use a single BiFilter per track and switch distortion filter types without stacking up on multiple plugins or introducing unwanted CPU usage.

BiFilter alone is worth cracking open and listening to.  Once you hear this unbelievable plugin every template you make will have one pre-loaded into your FX Bin.

Learn more about Bifilter 2 and SONAR X3 here.

SONAR X3 Quicktip: Gating unwanted noise using the NEW logical gate/expander GX622

Using the new Blue Tubes Logical Gate/Expander you now have yet another incredible tool for your day to day projects. A pretty common problem that happens when recording an entire band is noise bleed from other instruments when one stops and another is still playing.  In this particular case there is quite a bit of drums leaking  in the quiet parts between chord stops of this piano part.  Some would argue that throwing a Gate on there can make your signals sound robotic and choke your signal if not set correctly. So, let’s go through a step by step way of setting up your Gate setup correctly.

How to make your Kick and Snare sound more aggressive using compression

Compression can be used in many different formats but one of the most useful methods is for adding an aggressive sound to your Kick and Snare. A typical compressor’s settings involve Threshold, Attack, Ratio, and Release.

  • Threshold is a setting in decibels. Once it senses that audio surpasses the set decibel level it activates the compressor.

  • Attack is a measurement in milliseconds for how fast the compressor should begin compressing audio that exceeds the set threshold.

  • Ratio is the amount of gain reduction applied to the compressed signal.

  • Release tells the compressor how fast to stop compressing the signal once the threshold is no longer exceeded.


By setting the Attack and Release times relatively fast it allows for each drum’s initial hit to sound and then afterwards reduce the audio transient in gain. From our ears’ perspective, each hit sounds more aggressive.

Pictured above: The ProChannel in SONAR X2 Producer.  Try it free!

9 Life Lessons That I've Learned as a Freelance Producer

1. Never be the reason why things are taking forever. If mixes, stems, vocal comps, or those types of things take longer, then so be it; but make sure it’s because you were waiting on the artist and not the other way around.  The people that wait on you are the artists who carry your good name.  You don’t want your name associated with rolling eyes and snickering remarks.  You depend on your work to get more work, and that is honestly how this business goes.

2. You can always learn more about the process, about the experience, about the mic positioning, about the way you handle an artist, or how you handle yourself.  Maybe you figured out how many hours you can stay up straight without noticing the time go by.  Or, maybe this time you were able to consciously sit back and say “Ok guys, that’s a wrap, we’re not getting any more done tonight.” If you have an ego, make sure that it’s because you have a few Grammys in your back pocket and not because you’ve been “around.” Never stop learning and you will continue to hone your skills as a producer and an individual.

Dan in Studio3. Pre-production is key to making deadlines.  It all happens to us, sometimes there are things that just take a backseat and never get done.  The singer you thought was going to be your saving grace was actually slacking off because you were blinded by your “trust” in his/her ability to prepare things on their own time. There are occasions where unforeseen things will happen and it’s inevitable that your prospective finish date will get delayed. Sometimes your artist is having a hard time and is going through some personal things that can’t be resolved immediately.  It’s your job as the producer to carry on and get things done the best you can in the time frame that is given.

4. Get your personal life in order first before you go off and think you can spend a week in the studio.  Make sure you know that you can be gone for long hours at a time and that you aren’t just leaving someone hanging out to dry on something else you were working on.  The worst thing that can happen is that you have to leave the studio for a personal reason . “Oh, I have to pay my rent – be right back” will not cut it, and will most likely result in losing the gig.

5. Ask yourself, “Do I really like what I’m working on,” because if you don’t, then you won’t care about it enough.  Once you stop caring about something you let things fall through the cracks.  You let yourself cut corners where obvious issues stand.  Sometimes you let yourself completely crash and burn and start to wonder what happened in the beginning that caused a massive spiral of bad events.  Was it because you didn’t care enough?  Was it because you didn’t ask yourself some honest questions about how you feel?  Take a night and sleep on those massive decisions. They are what define you and your work.

6. Take a step back and acknowledge what you will gain from your next project or your next big endeavor. Think about what every project is going to do for you in 5 years and then make a decision. Do you think your next big project will make you look bad? Do you think your next big project is a stepping stone or just a paycheck?  What do you think you could learn?  These are questions that you need to weigh.

7. You’re going to make big mistakes no matter what you do or how you swing it.  At one point in time you’re going to miss a fine detail, blast someone’s ears in the studio, say the wrong thing to the wrong person, or offend someone without knowing it.  This might even cost you the gig. The point is that you learned from this experience and more importantly, it will never happen again.

8. Plan your budget out as early as humanly possible.  Don’t just say “Yeah, studio time is going to cost ‘this much,’ my tracking fee is ‘this’ per hour.” No, sit back and write out every fee, every move, every drop of gas down so that you have a realistic idea of how to get from point A to point B. How do massive productions that tour around the world for years at a time stay profitable? It’s because of a budget. Live by it. Figure out how your artist or group is going to spend it. Once the money runs out it’s more or less coming out of your pocket. See “3” for more details on that.

9. Figure out your end game and don’t let anything stand in it’s way.  It only takes a few small tweaks to your life to get you one step closer to your ideal job.  Do them one at a time and don’t stress if you make a mistake early on.  That’s part of the learning process. You can’t look at your life and directly compare it to where you want to be, that’s just overwhelming and unrealistic.  What you can do is find a professional who is doing exactly what you want to be doing and learn from them. Listen to their records, email them, read their blogs, and listen to their interviews.