Basics: Five Questions About Using Stompboxes with SONAR

by Craig Anderton

Plug-in signal processors are a great feature of computer-based recording programs like SONAR, but you may have some favorite stompboxes with no plug-in equivalents—like that cool fuzz pedal you love, or the ancient analog delay you scored on eBay. Fortunately, with just a little bit of effort you can make SONAR think external hardware effects are actually plug-ins.

1. What do I need to interface stompboxes with SONAR? You’ll need a low-latency audio interface with an unusd analog output and unused analog input (or two of each for stereo effects), and cords to patch these audio interface connections to the stompbox. We’ll use the TASCAM US-4×4 interface because it has extra I/O and low latency, but the same principles apply to other audio interfaces.

2. How do I hook up the effect and the interface? SONAR’s External Insert plug-in inserts in an FX bin, and diverts the signal to the assigned audio interface output. You patch the audio interface output to a hardware effect’s input, then patch the hardware effect’s output to the assigned audio interface input. This input returns to the External Effect plug-in, and continues on its way through the mixer. For this example, we’ll assume a stompbox with a mono input and stereo output.

3. What are correct settings for the External Insert plug-in parameters? When you insert the External Insert into the FX bin, a window appears that provides all the controls needed to set up the external hardware.

  • Send. This section’s drop-down menu assigns the send output to the audio interface. In this example, the send feeds the US-4×4’s output 3. Patch this audio interface output to your effect’s input. (Note that if an output is already assigned, it won’t appear in the drop-down menu.)
  • Output level control. The level coming out of the computer will be much higher than what most stompboxes want, so in this example the output level control is cutting the signal down by about -12 dB to avoid overloading the effect.
  • Return. Assign this section’s drop-down menu to the audio interface input through which the stompbox signal returns (in this example, the US-4×4’s stereo inputs 3 and 4). Patch the hardware effect output(s) to this input or inputs.
  • Return level control. Because the stompbox will usually have a low-level output, this slider brings the gain back up for compatibility with the rest of the system. In this example, the slider shows about +10 dB of gain. (Note: You can invert the signal phase in the Return section if needed.)

4. Is it necessary to compensate for the delay caused Continue reading “Basics: Five Questions About Using Stompboxes with SONAR”

Basics: Five Questions about Audio Specs

By Craig Anderton 

Specifications don’t have to be the domain of geeks—they’re not that hard to understand, and can guide you when choosing audio gear. Let’s look at five important specs, and provide a real-world context by referencing them to TASCAM’s new US-2×2 and US-4×4 audio interfaces. 

First, we need to understand the decibel (dB). This is a unit of measurement for audio levels (like an inch or meter is a unit of measurement for length). A 1 dB change is approximately the smallest audio level difference a human can hear. A dB spec can also have a – or + sign. For example, a signal with a level of -20 dB sounds softer than one with a level of -10 dB, but both are softer than one with a level of +2 dB. 

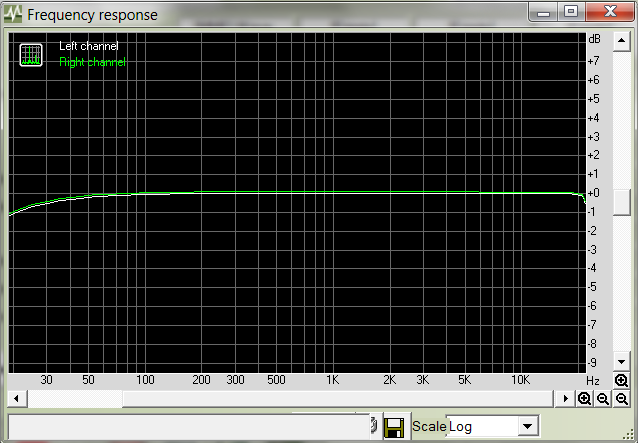
1. What’s frequency response? Ideally, audio gear designed for maximum accuracy should reproduce all audible frequencies equally—bass shouldn’t be louder than treble, or vice-versa. A frequency response graph measures what happens if you feed test frequencies with the same level into a device’s input, then measure the output to see if there are any variations. You want a response that’s flat (even) from 20 Hz to 20 kHz, because that’s the audible range for humans with good hearing. Here’s the frequency response graph for TASCAM’s US-2×2 interface (in all examples, the US-4×4 has the same specs).

This shows the response is essentially “flat” from 50 Hz to 20 kHz, and down 1 dB at 20 Hz. Response typically goes down even further below 20 Hz; this is deliberate, because there’s no need to reproduce signals we can’t really hear. The bottom line is this graph shows that the interface reproduces everything from the lowest note on a bass guitar to a cymbal’s high frequencies equally well. 

2. What’s Signal-to-Noise Ratio? All electronic circuits generate Continue reading “Basics: Five Questions about Audio Specs”

6 Mindblowing reasons to get SONAR X3 Producer

1. SONAR has redefined mixing in the box.

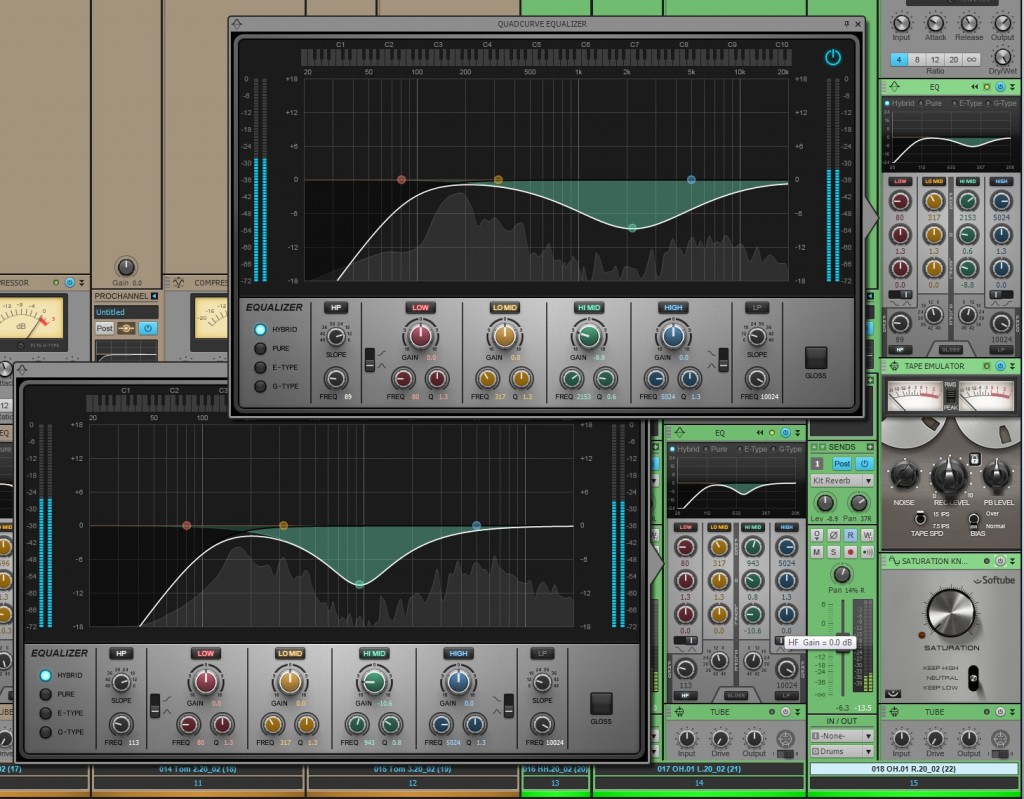
The ProChannel redefines the way you work with the Console View. Each audio track, instrument track, and bus comes with a complete modular strip of analog effects. Even the inspector allows the users to preview a selected track’s ProChannel strip right from the Track View. With the click of a button users can expand this analog mixing console and fully customize it by dragging around the modules, or loading up a ProChannel presets. Load up the Compressors, Tube Saturation, Reverb, Console Emulators, Tap Emulators, and the new QuadCurve EQ Zoom with Analyzer by simply right-clicking. SONAR’s ProChannel lends itself to an immensely visual experienceand to enhance this feature a step further Cakewalk introduced the fly-out panel for the Quad Curve EQ (SONAR X3 Producer Exclusive). Adding this allows users to see and modify their audio signals in real-time across a spectrum analyzer.

2. The best pitch correction software that exists is fully integrated.

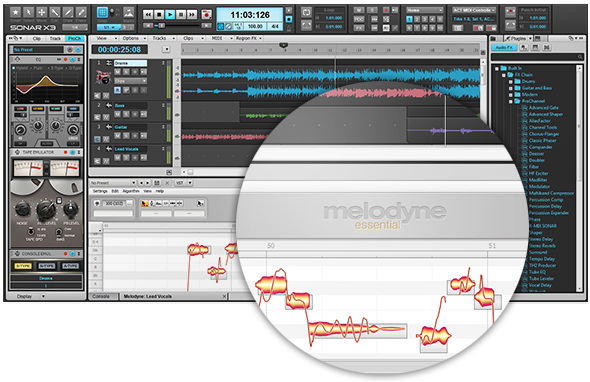
ARA technology is Celemony’s way of allowing DAW’s to host the functions of any audio edit capable plugin. ARA Integration means that Melodyne can now run as a fully integrated feature within SONAR X3. Yes, you read that correctly, SONAR X3 can now run the world’s best pitch correction as a native component and SONAR X3 Studio & Producer now include Melodyne Essential.

Melodyne interacts with the new Region FX clips in SONAR – allowing users to highlight any mono audio clip and apply Melodyne pitch correction. ARA’s high quality time stretching replaces the older time stretching capabilities run by AudioSnap and SONAR X3 has the ability to convert Audio to MIDI by simply dragging and dropping audio to a MIDI track. This deeply integrated technology makes SONAR perfect solution for complex pitch correction!

3. Floating windows get in the way, so SONAR solved that problem.

If you’re looking to purge your workflow of a cryptic DAW with an unsettling interface that is not conducive to a creative environment then you should really check out what SONAR’s been doing since the X-series overhaul. We’ve pretty much ended the floating window interface to bring users a more efficient musical experience. Our Smart Tools HUD can be accessed anywhere in the interface. Our main track view houses several different workflows that are a single click or shortcut away. Screen-sets lets you save window configurations and swap between them using your numerical keys. The list goes on and on and we’re continuing to make it better with more intuitive features.

4. It takes minutes to create something awesome.

There are programs that exist only to record and edit, and then there is SONAR – which is the major contender for the entire creative experience. Every part of SONAR’s MIDI and virtual instrument implementation allows users drag in, route, and start composing within seconds.

You can save your favorite instrument and track routing as track templates and load them into other projects without any hesitation. Complex routing tasks like a multi-track setup for Addictive Drums requires no thinking – just doing. Our synth rack stays separate from the Track View and Console view so that your processing plugins stay separate from your synthesis plugins. Organization, clarity, and not a second wasted, that’s why SONAR stays on top.

5. We don’t bundle useless plugins with SONAR.

In fact, we bundle some of the best software in the industry with SONAR. We’ve already covered the fact that Melodyne Essential comes with the product – but that doesn’t even scratch the surface. 

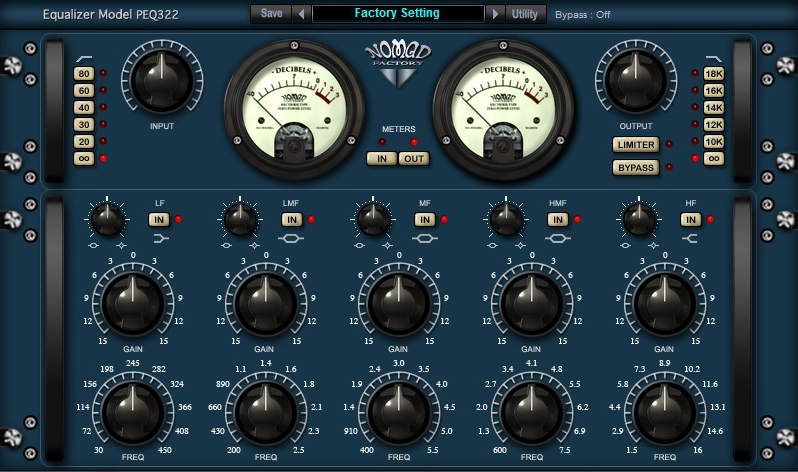
The Nomad Factory Blue Tubes bundle ships with SONAR X3 and contains as many dynamic, time-based, and eq-based plugins that you could ever need. We have astounding instruments from AAS: Strum Acoustic SONAR, and Lounge Lizard SONAR. Lastly, Addictive Drums – which will make you want to fire your drummer and spark your MIDI programming addiction. It doesn’t stop there, check out the full list of effects and get yourself on board with the future of the DAWs.

6. You’re not limited to a Track Count or Plugin Count.

There’s always that moment when you realize that your DAW has hit a brick wall with the amount of plugins or tracks that it can handle at once. SONAR doesn’t have that problem, in fact it goes above and beyond to give you the best 64-bit architecture, unlimited tracks, buses, and effects that money can buy. We even have surround sound support! No need to constantly submix your tracks or work in parts because you don’t have thousands of dollars to drop on a “pro-system”. Even at our $99 value we’ve taken out track and effects limitations and still retain flagship features like ARA and VST3.

Upgrade to SONAR X3 Producer today!

Still not convinced? Check out SONAR free for 30-days.

DAW Best Practices: How to use metering in SONAR

[Originally posted as a daily tip on the SONAR forums and reposted for viewers here on the blog.]

The Overachieving Meters

by Craig Anderton

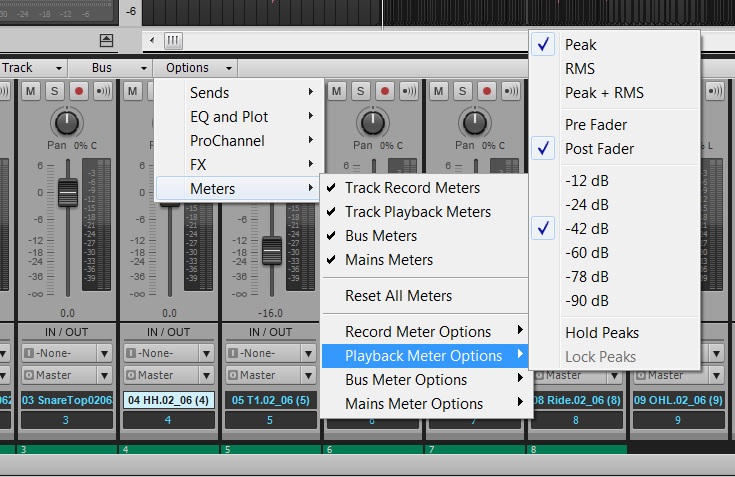
To change resolution for any audio meter, in any view, right-click on it and choose a range of 12, 24, 42, 60, 78, or 90 dB. Each meter can have its own range. With the Console view, I set the output bus meters to 12 dB to help gauge the approximate amount of loudness maximization that may be required. For example, if the meters make it to 0 but otherwise spend very little time in those upper 12 dB, then the track will probably need to be made “hotter” when mastering. For the Track View track meters, choosing the maximum resolution (90 dB) helps reveal if there’s noise at the lower range of an incoming signal.

Vertical or Horizontal Metering

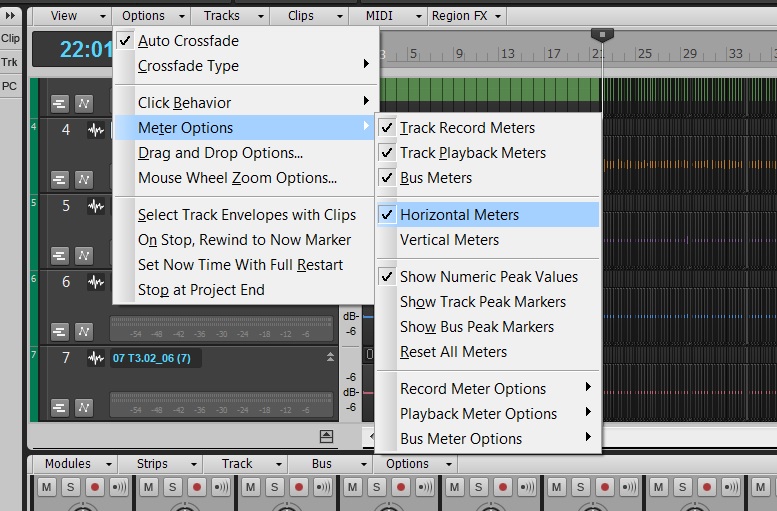
In Track View, the meters can be vertical or horizontal. Choose Options > Meter Options and select the desired option. When vertical, the meters behave more like activity/clipping indicators, because when you collapse the track to a short height, you basically see only activity and clipping. If you use the Console for mixing, this is a good choice because you can see more track parameters in the Tracks Pane, as the vertical meters don’t take up space along the bottom.

If you generally mix using the Track View rather than the Console, then you can extend the width of the Track Pane, enable horizontal metering, set them to a fairly wide playback range, and enjoy high-resolution metering. Also under Options > Meter Options, you can specify the Record, Playback, and Bus meter characteristics. Choose from Peak, RMS, or Peak+RMS (my favorite choice) response, whether playback meters are pre- or post-fader, and whether bus meters are pre-fader, post-fader, or pre-fader and post-FX.


These settings are independent from equivalent meter settings for the Console view. You can also choose whether peaks are held or locked (I recommend checking both), as well as show Peak Markers. These indicate the highest point in the track and can be extremely useful when mastering.

This kind of flexibility allows the Track and Console views to be far more than just two ways to view the same type of material. For example, the Console meters are probably better set to post-fader, so you can see at a glance which tracks are contributing the most amount of level. But in Track view, a pre-fader setting lets you monitor track activity so you can check whether a Track has signal, regardless of the fader position. The metering options are just one more reason why I tend to mix in Console view, but track and edit in Track View.

Want to check our SONAR? Try our 30-day free trial.

Studio Makeover Month: The Controller Freak Setup

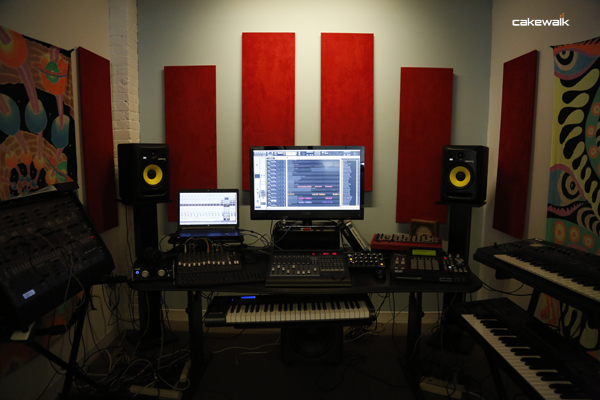
The Controller Freak is an on-the-road/off-the-road producer, sound designer, and analog enthusiast. His hands-on approach to digital music requires quite a few tactile surfaces for immediate and innovative musical ideas. He limits himself to this world because he finds that infinite possibilities can sometimes hinder his creative process. Keeping a solid sextet of different synthesizers spreads his ideas around equally. Moving, standing, sitting, and walking to different synthesizers is a part of the entire feel of his studio and how he stays in touch with his inner muse.

The Gear

The Controller Freak creates with a DAW and hardware that needs to be bridged by a dependable system. These days his work is mostly his own productions. To keep things mobile he opted to lay down some money on an HP Z-book 17” laptop. This high performance laptop can support multiple display formats (even Thunderbolt) Continue reading “Studio Makeover Month: The Controller Freak Setup”

Studio Makeover Month: The Ghostwriter Studio Setup

Meet the Ghostwriter – a professional songwriting machine working under contract to create music for mainstream acts and artists. He lives to create music in a simple and inspiring environment without any hiccups or interruptions. He needs a mobile setup that comes with him to collaborate with Artists, but powerful enough to craft song ideas into finished demos on tight deadlines. This Ghostwriter has to be able to do it all, and he gets results with SONAR X3 Producer.


The Gear:

The Ghostwriter has delicately carved out his set-up according to his Songwriting process. Everyone’s process is different but over the years he’s learned that songwriting is a skill that needs to be worked over and over again in different ways. He’s picked a powerful Dell M6800 Precision workstation as his main workhorse computer because of the expansive hard drive space, optical drive, large visual workspace, 8GB of memory, and long battery life. With 4 USB 3.0 ports, transferring and backing up his music takes a fraction of the time it does on his MacBook.

Songwriting can sometimes start with an idea that hits faster than he can reach for a recorder. Instead he flips on his Gibson inspiration cable, and works the idea out while his computer is booting up. This clever cable catches the direct signal of his guitar’s pickup and transfers it to an SD card. After that, he just pops out the card and copies it to his SONAR X3 Producer Continue reading “Studio Makeover Month: The Ghostwriter Studio Setup”

Studio Makeover Month: The Axeman Studio Setup


“The Axeman” is a guitar driven musician that has an appreciation for the heavier side of the music spectrum. He has a solo project they’ve been working on for years and years – slowly perfecting tone, demos, and musical compositions. He is always up for doing freelance work- so it’s important that he has a vast selection of gear and instruments to keep his clients coming back for more.


The gear:

The Axeman has a surprisingly mobile setup for the home studio. He lives a nomadic recording lifestyle because a lot of production these days involves traveling to various musician’s homes to work on preproduction and other intricacies of the record process. His expenses have gone into purchasing a Fractal Audio Axe-Fx Mark II to keep from carting around various Continue reading “Studio Makeover Month: The Axeman Studio Setup”

TOP 5 REASONS IT’S TIME TO UPGRADE YOUR MUSIC STUDIO COMPUTER

By Brian, PCAudioLabs

It’s your one day off, you sit down to make some music, and boom, your computer crashes. Then you start to think; how long have I had this thing? When you get that feeling, it’s time to look at a new music computer. We’re going to outline the top five reasons you should consider a new Windows computer for your music studio.

1.      You’re still running Windows XP

Windows XP was a great operating system, really, it was! But, Microsoft recently ended support for the well-known OS, and that means no more updates.  This also means your computer could be at risk to crash at any moment.  Additionally, many new Digital Audio Workstations, such as SONAR X3, don’t run on Windows XP.  It’s ok, it’s time to let go.  Windows 7 or Windows 8 offers a slew of new features that will make your music making experience easier.

2.      You’re not able to get work done as fast

It stands to reason that if you have a computer that is over five years old and wasn’t built by a music computer manufacturer, it’s probably going to run a little slower than you’d like.  Are your tracks taking longer to bounce down? Can’t run as many plugins as you used to? There’s only so much power you’re going to get out of an older computer that wasn’t built for audio, and that’s when it’s time to look at a new rig.

3.      Your workflow is suffering

When you spend more time troubleshooting than you do making music, that’s a bad thing.  We all know that time is limited, especially for being creative, and you have to make the most of your time. When you have to spend your time making your computer do what you want, instead of making music, your frustration goes up, and your creativity goes down.

The ROKBOX MC 64/64s can support up to 3 monitors! Think about what that could do for your workflow…

4.      You’ve outgrown your machine

Let’s face it, it happens. You get a computer, you put it to good use, but with time and growth, your needs outweigh what your computer is capable of.  Maybe you need to be able to record more tracks at once, or maybe you simply can’t do what you need with your current hardware.  It’s ok, that just means you’re growing as a creative, and it’s time to look for a new computer.

5.      Your current machine is loud, filled with bloatware, and doesn’t fit your studio.

Most off the shelf computers – meaning those from big box stores and websites – might seem like great deals on paper, but when you get them home, you find that your computer’s hard drive is filled with bloatware (did you really want all those demo antivirus applications? Yeah, we didn’t think so).  That is why your computer was cheap – lots of companies rented out space on your hard drive, and your Windows installation image isn’t really a true Windows image, which means you can’t even re-install Windows cleanly. Additionally, your computer is a lot slower due to all that bloatware, which means you won’t get anything done.

Off the shelf computers aren’t made with silence in mind, nor with the needs of a creative in mind.  They use sub-par components that mean your computer will be loud – which is hard when you need to record that perfect vocal cut.  You can’t replace many of those components, because they’re proprietary, which means you can’t purchase replacement parts.

You can have a PC designed for music that will fit nicely in any studio space with a PCAudioLabs ROKBOX Mobile MC laptop!


What about Support? If you have an issue with your music software, you can’t call a big box computer manufacturer and ask them for help – they simply won’t help you.  That can be pretty frustrating when you need answers.

Finally, off the shelf computers rarely fit the needs of the creative – literally. They’re not rackmountable, they don’t have the motherboard slots you need (like legacy PCI slots, for instance), and their case sizes can be limiting at the very least.  All of this leads to a less-than-stellar experience with a computer you paid good money for, expecting it to be great for audio production.


These are just a few reasons you should look at obtaining a new computer which has been certified for music production. If you answered yes to even one of these points, you might want to consider getting a new music computer so you can truly get back to being creative with your computer.


Craig’s Five Fave Studio Hardware Accessories

By Craig Anderton

Granted, it was hard to narrow it down to five. But these goodies have stood out over the past year as being essentials for my own studio, and they can contribute much to any studio makeover.

Uninterruptible Power Supply


I first became aware of the power of the UPS with ADATs. My ADATs used to do weird things, but stopped doing weird things after I bought a UPS. My friends with ADATs who didn’t have a UPS experienced weird things. Anecdotal evidence? Sure. But the first time a UPS keeps your project alive when some idiot drunk driver slams into a power pole and you lose your electricity, or you live where lightning is a frequent visitor, you’ll be glad you paid attention to this article and got a UPS. Just make sure you find one with sufficient power for your super-duper multi-core wonder box (and your monitor)—a lot of UPS devices in office supply stores are for little old ladies who use Pentium 4 computers only on Sundays to cruise the internet for recipes.

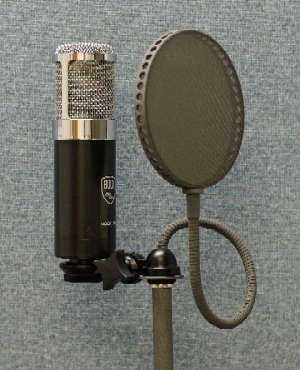
Pauly Superscreen Pop Filter

(Photo courtesy Las Vegas Pro Audio)

Yes, it’s expensive. Yes, it’s worth it. I do a lot of narration and close-mic my vocals Continue reading “Craig’s Five Fave Studio Hardware Accessories”