Z3TA+ 2’s powerful synth engine is capable of creating all kinds of different sounds. Creating your own EDM Kick Drum is a great way to learn how a synthesizer works – especially when it comes to routing. Check out this free video tutorial on creating your own custom kick drum in Z3tA+ 2.
The “Punch” Factor with Synthesizers
What exactly constitutes “punch”? Find out here
by Craig Anderton
We all know a punchy recorded sound when we hear it—but what exactly constitutes “punch”? It seems that perhaps punch is something that can not only be defined, but quantified.
This all started because years ago, I wondered why seemingly every musician agrees that the Minimoog has a punchy sound. Then, when I started playing a Peavey DPM3, several people commented that my bass patches had a punchy sound, “like a Minimoog.” Clearly, the technologies are totally different: one was analog, the other digital; one used voltage-controlled oscillators, the other sample playback. Yet to listeners, they both shared some common factor that was perceived as punchiness.
Analyzing a Minimoog bass line revealed something interesting: even with the sustain set to minimum, there was about 20-30 milliseconds where the sound stayed at maximum level before the decay began. There is no way to eliminate that short period of full volume sustain; it’s part of the Minimoog’s characteristic sound.
I then looked at the DPM3’s amplitude envelope and it exhibited the same characteristic—a 20-30 ms, maximum level period of sustain before the decay kicked in. Also, both instruments had virtually instantaneous attacks. Could this combination be the secret of punch?
For comparison, I then checked two synths that nobody considered punchy-sounding: an Oberheim OB-8, which is generally characterized as “warm” and/or “fat” but not punchy, and a Yamaha TG55. Both had fixed attack times, even with the attack control set to zero, that lasted a few milliseconds. I also recalled some experiments ex-Peter Gabriel keyboard player Larry Fast ran in the mid-70s, when he was curious how fast an attack had to be for a sound to be “punchy.” His research indicated that most listeners noticed a perceptible loss of punch with attack times as short as one or two milliseconds.
So it seems the secret of punch is that you need an extremely fast attack time, but you also need a bit of sustain time at maximum level. This sustain isn’t long enough to be perceived as sustain per se; it’s more of a psychoacoustic phenomenon.
Wondering if this same technique worked with other sounds, I took an unprocessed snare drum sound and tried to add punch by normalizing each cycle to the highest level possible for the first 20-30 milliseconds. Comparing the processed and unprocessed sounds left no doubt that the edited version had more punch.
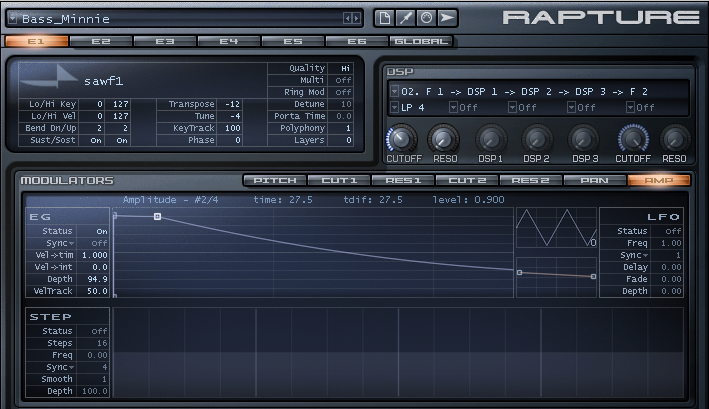
When I designed the Minimoog Expansion Pack for Rapture, I made sure that where appropriate, the envelopes had that characteristic Moog attack (Fig. 1). Note that the second node sustains the sound for 27.5 ms. Rapture’s tight attack time and ability to create “high-resolution” envelopes made it easy to add punch.
 Fig. 1: Adding the “punch” factor to a Rapture Minimoog patch. Continue reading “The “Punch” Factor with Synthesizers”
SONAR X3 / Melodyne Quicktip: Create Harmonies in a Region FX
If you liked this Quicktip Continue reading “SONAR X3 / Melodyne Quicktip: Create Harmonies in a Region FX”
Vocal Month: Creating Vocal Harmonies with Melodyne Essential
Can’t quite hit the high or low notes? Melodyne usually can.
by Craig Anderton
If you don’t have a wide vocal range, you have to choose a vocal’s key very carefully—the low parts can’t go below your range, and if you’re going to hit the harmony notes, you have to pay attention to where the highest notes fall as well. Unfortunately the voice sometimes loses power when you start hitting your lower limits, but if you choose the best possible range for your lead vocal then you may have a hard time hitting the harmony’s high notes. What’s a singer to do?
My solution is to choose the optimum key for the lead vocal, then reach for Melodyne Essential to synthesize the harmonies. Most of the time I can hit the harmonies so I’ll sing them “for real” and bring in Melodyne as needed, but I’ve also found merit to using Melodyne to generate the harmony even if I can hit the notes—it gives a different character that works well in some musical contexts.
Creating Harmonies
Generating harmonies requires some manual effort, but it’s worth it.
1. Clone the lead vocal.
2. Create a Melodyne Region FX for the clone.
3. Solo the lead vocal and clone (Dim Solo can be useful for this application so you can hear the vocals in context).
4. Start adjusting the clone’s blob pitches to create the harmony (Fig. 1).

Fig. 1: Thanks to a paint program’s transparent layers, colorization, and cut and paste, this shows the harmony line (blue) superimposed on the lead vocal.
Usually the easiest way to do this is by ear, but if you’re theory-minded, you can always apply those rules to determine which pitches to use for the harmonies.
Additional Tips
I highly recommend choosing Edit > Pitch Grid > No Snap and adjusting the harmony pitch by ear. Snapping doesn’t always produce the most musical results.
Also, check out my article Easy Automatic Double Tracking with Melodyne Essential, which describes how to add slight timing and pitch variations to do automatic double tracking. Applying the same technique to the harmony line prevents it from “shadowing” the lead vocal, and helps the harmony establish itself as an independent entity.
There’s a video on my YouTube channel that uses Melodyne Essential for creating both ADT and the harmony effects described in this article. In fact, there’s only one vocal track in the entire song; all the others were derived from it using Melodyne.
Finally, I demoed this technique during the video I did at Berklee College of Music last March. You can see the video here.
Happy harmonizing!
Vocal Month: Easy Automatic Double Tracking (ADT) with Melodyne Essential
There’s a great ADT program lurking within Melodyne Essential
by Craig Anderton
So is Celemony’s ADT (Automatic Double Tracking) program any good? If you have Melodyne Essential, you can find out for yourself—because it’s the same program. Yes, hidden within SONAR X3‘s Melodyne Essential is a very cool ADT effect that’s extremely effective with vocals.
Introduction
Double-tracking is the process of singing a second vocal on top of a main vocal to “thicken” the overall sound. It’s impossible to sing a vocal exactly the same, so there will be slight timing and pitch differences that add interest and depth. Automatic Double Tracking produces this effect electronically, which can give more control over the double-tracked vocal. While there are dedicated plug-ins to give the ADT effect, Melodyne has all the tools needed to do this. I’d go so far as to say Melodyne can produce one of the best electronically generated ADT effects I’ve heard.
The Melodyne ADT effect works best with vocals where you haven’t already added extensive pitch or timing correction. As an aside, I never do a “wholesale” quantization of notes; to my ears, removing the “incorrect” pitch variations in a vocal actually create a less compelling performance. Instead, I manually correct only those notes that actually sound “wrong.” Even then, I don’t always quantize exactly to pitch. Music is about tension and release, and subconsciously, you’ll often sing a little flat or sharp (tension) and end up on pitch (release). Making all the pitches “perfect” removes this emotional component.
As an analogy, conside B. B. King’s guitar playing. He often bends a flatted 7th not quite up to pitch. By not resolving the note, instead of completing the phrase it leads you into the next one. Timing and pitch variations are an essential part of music, so don’t overdo the correction.
Setup
It’s easy to set up the ADT effect with Melodyne.
1. Clone the vocal to which you want to add the ADT effect.
2. Right-click on the cloned click and create a Melodyne Region FX.
3. Select all the notes in the vocal.
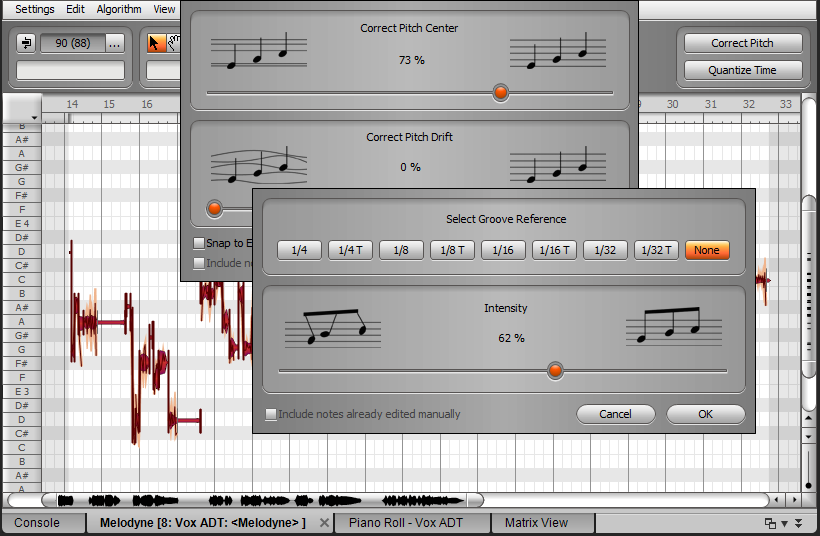
4. Turn up Correct Pitch Center to about 60% (Fig. 1).

Fig. 1: Correcting pitch and timing subtly on a cloned vocal track can produce an automatic double-tracking effect.
5. Turn up Quantize Time Intensity to about 60% (Fig. 1).
6. Evaluate the ADT effect, and tweak the pitch and timing correction amounts as appropriate.
Generally you don’t want too much pitch or timing correction—just enough to be different from the main vocal.
Mixing ADT Vocals
When mixing, centering the two vocals tends to maximize the similarities to chorusing; the vocals sound somewhat more diffused, which works well for “gentler” material. Panning them slightly oppositely (about 30% right and 30% left) can give a more spacious sound in stereo.
With sparser mixes, centered panning often fits best while the somewhat spread sound helps the vocals have more presence in dense material, like hard rock with lots of distorted guitar. However, these aren’t “rules” as ultimately, the song itself will dictate which works best in the final mix.
Give this technique a try—I think you’ll be as surprised as I was about how effectively it provides an authentic, convincing ADT effect.
BETTER TOGETHER: TRY SONAR X3 AND MELODYNE FOR FREE!
SONAR X3 QUICKTIP: MAKE YOUR VOICE THICKER (STUDIO & PRODUCER)
Mixing Tips: How to Use Reverb to Create Depth
Introduction
Mix engineers that have had their time behind a board can pick out the misuse of Reverb when they hear it. Just like with anything, applying the proper Reverb requires more time than just scrolling through the presets of the basic Hall, Room, and Plate algorithms.
Overview
 Music tends to have a significant three-dimensional experience to it. This concept requires the understanding of width, height, and depth. The best way to understand this is to find a pair of large studio headphones and listen to some billboard topping hits that have dense and complex instrumentation. Grab a sheet of paper and draw two lines intersecting as well as one diagonally through the middle. Label them “Width”, “Height”, and “Depth”. Make a few copies of this sheet and as you listen to the music observe where the instruments sit in the mix. Mark the Toms, Snare, Kick, Vocals, Guitars, Keys, Backing Vocals, Bass, Strings etc. in their respective places on this XYZ plane. Once finished compare and contrast the different songs you listened to and you may notice how different each song turns out. Take one of your own mixes and do the same. You may learn something about your own techniques.
What does this little Continue reading “Mixing Tips: How to Use Reverb to Create Depth”
Mixing Video Series: How to use Compression with the CA2A in SONAR X3
Mixing with Compression is an essential part to shaping and creating a great sounding track. In this video series I take you through a track-by-track video that shows you how to use compression on various types of instruments in SONAR X3 with the CA-2A T-Type Leveling Amplifier. You can use compression to control levels, enhance dynamics, and much more. Subscribe to our YouTube Channel and check out this series today.
Try SONAR X3 Producer
Try the CA-2A T-Type Leveling Amplifier
Mixing Tips: Know Your Signal Flow in SONAR
Signal Flow is an important concept to understand, and it may be easier to think about when presented with a diagram of how audio is passes through SONAR.
Inputs and Outputs – Easier than you think!
The first concept to understand is the relationship between Inputs and Outputs. There isn’t anything complex about the subject unless you over-think it. It is the underlying theme to just about anything within your Digital Audio Workstation. Always remember the following:
- Outputs: Always feed Inputs
- Inputs: Always fed by Outputs
Sometimes Outputs can be named “Outs or Sends” and sometimes Inputs are labelled “Ins or Returns.” If you’re a guitar player then you can associate this concept with the FX Loop that exists on the back of your amp. You use this to Send audio to your effects pedals and then back to your Amp’s Return.
First, let’s start where audio starts. Typically it begins with an instrument or audio file:
Upon opening SONAR many users will head straight to their Media Browser and Continue reading “Mixing Tips: Know Your Signal Flow in SONAR”
Mixing with the Console Emulator
Mixing with the Console Emulator
Snake oil, or useful processor? Read on, and find out
by Craig Anderton
Console Emulator plug-ins are controversial. First, a lot of people are convinced they don’t really make a difference. Second, there’s the philosophical question of whether emulating a console is a good thing—after all, you’re emulating imperfections. And third, there’s the question of which console you want to emulate.
However, before you can judge whether a console emulator is going to be useful, you need to know how to use it correctly…so let’s investigate.
About Console Emulation
There are legitimate reasons why analog consoles can sound different compared to mixing “in the box,” and also, legitimate reasons why some might consider these differences desirable. Technically speaking, there are two main differences compared to digital summing.
First, analog circuitry has inherent non-linearities (or in less polite terms, distortion). As a signal goes through multiple analog stages, these non-linearities add up although the end result can still be extremely low-level. Because there are differences between the left and right channels, this tends to “widen” the image and create the appearance of a wider soundstage. If the distortion is relatively high, as can be the case with older consoles, distortion generates harmonics in the audio spectrum’s upper range. With increased highs, and given that highs are more directional, this can widen the sound even further.
Second, consoles often use audio transformers and it’s not an overstatement to say that transformers are some of the most complex signal processors ever introduced into a signal chain. What’s more, the transformer’s characteristics are dependent on the circuitry that surrounds it—such as the source impedance, capacitive loading, resistive loading, and the like. For example, the external circuitry may damp some of the “ringing” that occurs when passing square waves through audio transformers. Transformers also generate distortion (primarily odd-order) that’s highest at lower frequencies. While the effect of all of these variables is subtle, many people like the sonic characteristics transformers can impart to a signal. Overall, good transformer implementations provide a somewhat “fatter” low end, and can add “warmth.”
Inserting Cakewalk’s Console Emulator
As with any processor, there are no rules if you want to get creative—so take the following as personal preferences, not as “rules” that must be followed.
Prior to mixing, I’d recommend inserting a Console Emulator Channel plug-in (CEC for short) last in the ProChannel for every track, and a Console Emulator Bus plug-in (CEB for short) in the master bus. The easiest way to do this is with the Quick Grouping command: in the Console view, open a ProChannel in a non-selected track. Then while holding the Ctrl key, right-click within the ProChannel, select Insert Module, and choose Console Emulator Channel; this places the CEC last in every audio track. You’ll need to insert the CEB in the master bus manually, as Quick Group works only across similar track types.
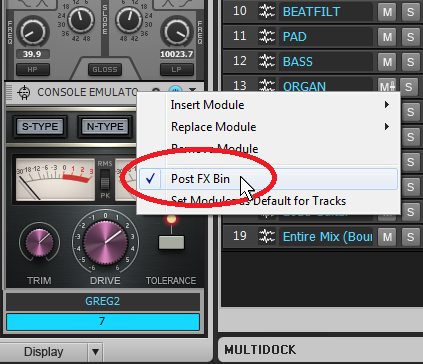
To ensure that the CEC is last in the chain, place the ProChannel post-FX bin (right-click in a blank space or effect header in the ProChannel, then select Post FX Bin—see Fig. 1).
Fig. 1: Placing the ProChannel post-FX bin, and inserting the Console Emulator plug-in as the last effect in the ProChannel, guarantees that all effects in the track will go through the Console Emulator.
SONAR X3: Producing Drum Samples (Video Series)
In the midst of recording a whole record it’s always a good idea to take some samples of the drum set so that you can replace and reinforce the drums later on in mixing. Here is an 11-part video series that shows you how to apply some basic EQ, Compression, and Editing techniques to get your drum samples to sound pro within SONAR X3.


