Have you ever wanted to start experimenting with different chords?
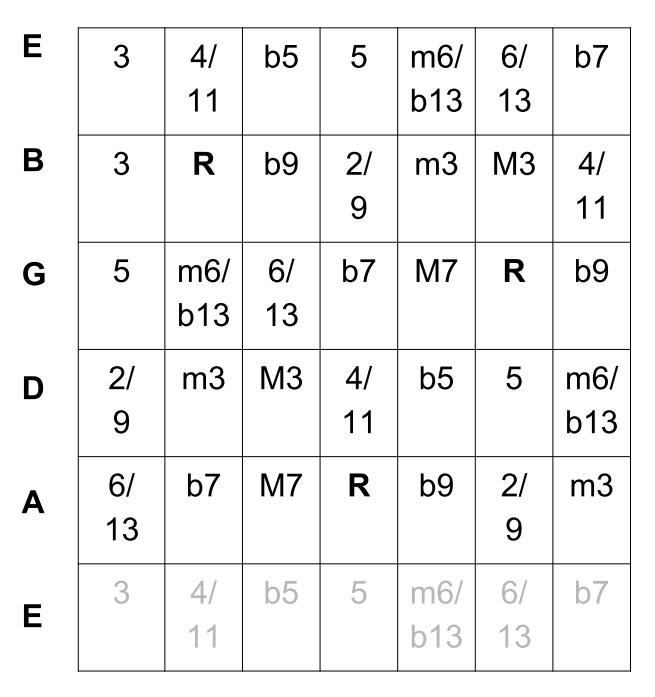
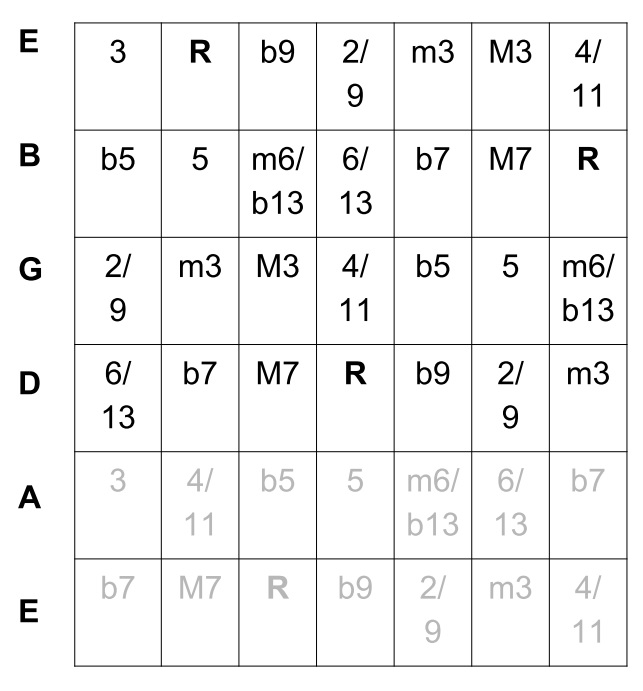
The charts outlined in this blog article take a bit of a different approach when constructing guitar chords and their shapes. It simplifies finding chord voicings by outlining the root notes and what intervals each neighboring fret represents.
Before examining the chord chart let’s talk about intervals and their meanings. An interval is the amount of distance between two notes. Both chords and arpeggios are made up of many different types of intervals. The following table outlines some intervals. Everyone has their own ways of naming chord intervals, but the basics are as follows:
Reading an interval on a staff starts from left to right, or bottom to top. All of these signs will help you understand what type of note you are reaching for when referring to the next part of this blog. Extensions are a big part of guitar playing so that is why I have included 9, 11, and 13 notes.
An Extension is any note above the 7th interval. These are mostly used in Jazz chord voices, so it is good to be aware of them when constructing advanced chords.
The chart below is read from the bottom 6th string up to the top 1st string much like guitar tablature. Each column represents a fret on the fretboard and each row represents a string. “R” refers to the root note and the rest of the guitar neck is relative to that initial fretting of “R”. So, if you pick any note on your guitar neck on the 6th string then this is where the rest of the intervals on the guitar neck lie.
Root starting on E String

I’ve modified this chart to work with 3 different strings.
Example 1: If you’re looking for a 7th chord shape with your root note on the 6th string then locate the note you want and refer to figure 1. Look at your fretboard and then reference this chart to understand where the 3rd, 5th, and 7th are located. If you’re root note was D then your chord will take the following shape:

Root starting on A String

Now, if you shift your root notes so that they start on the 5th fret the entire perspective of the chart changes slightly due to the major 3rd between the G and B strings.
Example 2: If you’re looking for a 7th chord shape with your root note on the 5th string then locate the note you want and refer to figure 2. Afterwards, apply the same thinking and you should have a shape turn out like this. Note, that the closest and easiest 5th to grab with this chord could be done with your thumb wrapping around the fret-board:

Root starting on D string

The same kind of shift happens here for the same reasons when moving the root notes to the 4th strings.
Example 3: This process can be applied to extensions as well. Say you want to find a quick and easy D 6/9 chord. Refer to figure 3 and you’re shape will turn out like this:

Why it’s useful?
You can take any position on the neck and apply this thinking. Subject it to memory and then practice your intervals and you’ll be reaching for those 4 part chords in no time.


One Reply to “Guitar Tips – Advanced Theories Behind Chord Structures”
Comments are closed.