Addictive Drums is the brand new drum synth available in SONAR X3 Producer. The sounds, fast load times, internal mixing, and abundant groove clips makes this possibly the only drum synth you’ll need to use from now on.
There are a couple ways to insert this new synth into SONAR X3 Producer. The first way is to insert Addictive Drums as a simple instrument track.
- Within SONAR X3 Producer go to the Media Browser and select the “Synth Tab”
- Click the + button and go to VST 2 and/or Addictive Drums
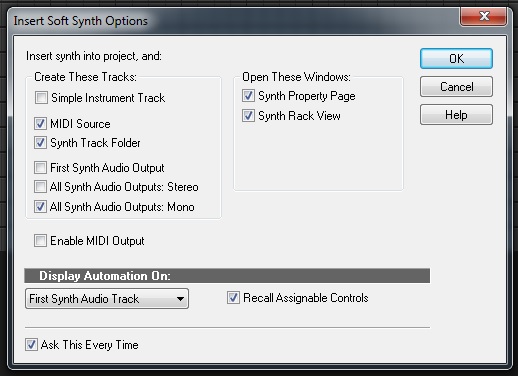
- Have the following boxes ticked:
- Simple Instrument Track
- Synth Property Page
- Synth Rack View
- Recall Assignable Controls
- Ask This Every Time
Select [Ok] and Addictive Drums will load.
This setup is especially useful in the situation where you want to drop in Addictive Drums quickly and not have to worry about losing any time during your creative process.
The second method for setting up Addictive Drums within SONAR X3 Producer is useful in event that you feel as though you need a bit more control over your drums sounds or you just want to mixdown drums like you would if you actually had a drummer present with multiple microphones setup in a studio.
- Within SONAR X3 Producer go to the Media Browser and select the “Synth Tab”
- Click the + button and go to VST 2 and/or Addictive Drums
- Have the following boxes ticked:
- MIDI Source
- Synth Track Folder
- All Synth Audio Outputs: Mono
TECH TIP: This is my recommended setting because this option causes SONAR to load a single audio track for each individual output of Addictive Drums. Addictive Drums has a single mono track for (in this order) Mains, Kick, Snare, Hat, X-tra, Toms, Overhead (Cymbals), Rooms, and Bus returns.
- Synth Rack View
- Recall Assignable Controls
- Ask This Every Time
17 Tracks will load and they will all be named “Addictive Drums” followed by their respective output. I would advise to rename each track as the following;
- Track 1: Mains L
- Track 2: Mains R
MIXING TIP: Mains L + R are here as an output and submix of your drums. Don’t delete this as it would come in handy for a parallel output used for compression, reverb, or anyother type of useful processing you can think of. This will save you time in the event you need to bus your drums.
- Track 3: Kick
- Track 4: Snare
- Track 5: Hat
- Track 6: X-tra
- Track 7: Tom 1
- Track 8: Tom 2
- Track 9: Tom 3
- Tack 10: Tom 4
- Track 11: OH (short for Overhead) L
- Track 12: OH R
- Track 13: Room L
- Track 14: Room R
- Track 15: Bus L
- Track 16: Bus R
Track 17 is where you will program your MIDI information and possibly drag and drop groove clips from Addictive Drums.
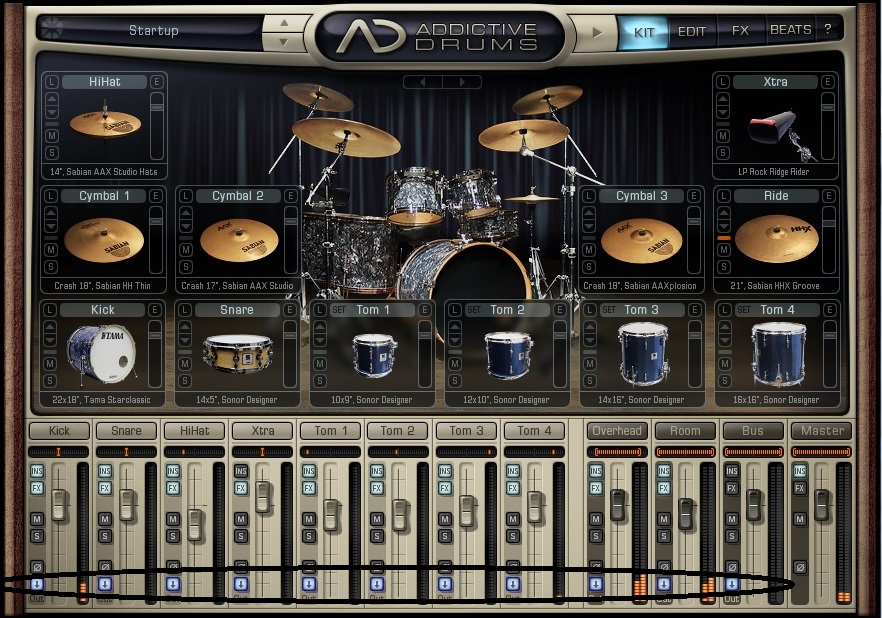
IMPORTANT: Lastly, make sure to open Addictive Drums and select the “Down Arrow” button on each track within Addictive Drums. These buttons route Addictive Drums’ individual drums to the outputs of the actual Synth.
After this feel free to take advantage of SONAR X3’s new track colors to help you organize your tracks so that you can switch between Console and Track View without losing your spot.


4 Replies to “SONAR X3 Quicktip: Setting Up Your Addictive Drums”
Comments are closed.