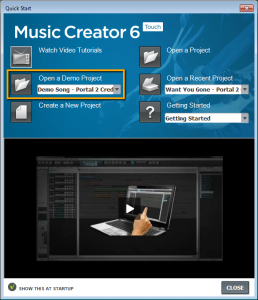
 Recently, Cakewalk worked with the great folks over at Valve to make our Music Creator 6 Touch software available to their community, and the onslaught of new “music creators” has been nothing short of amazing and inspiring. To kick off our promotion, we thought it would be a fun experience to recreate Jonathan Coulton’s cult classic “Want You Gone” from Portal 2 all in Music Creator 6 Touch (MC6t) – but the kicker is that we had 24 hours to do it in order to make the deadline for launch. In this case, not only was collaboration creatively beneficial, but it was also essential.
Getting the bed-tracks together was the first step, and you can read our previous blog here on how this all came together. Cakewalk’s Bill Jackson and Seth Kellogg spent time programming some great drum tracks, keyboards and guitars, and then I was able to easily embellish and add to the programming with loops, sounds and mixing. After the drums, bass, keys and guitars were in a good spot, it was time to figure out how we were going to capture the focal point of the song: THE VOCALS.
I had just finished a record with a great singer by the name of Jodi Good so she was my first logical phone call. As timing and luck would have it, she had just finished her video shoot for her first single (Definitely Different) in NYC and she had a 2 hour window to help pitch in. There were two hurdles: 1.) she could not make it out to my studio, and 2.) I had to get clearance for name, likeness and sound from her and her legal team for usage – not a problem 😉
 Luckily for me, I have a trusty Roland Quad-capture along with my iron-horse HP Elitebook running an Intel Core i7, so I literally jumped a train across town to Ultrasound “rehearsal studios” where Jodi does a lot of her practicing for live shows. I’ve recorded A LOT of vocals in my day (I sound like an old man) and I love a challenge – and a challenge it was. I had been to this place a long time ago, and it’s a great rehearsal spot, but recording vocals on a pretty soft electronic track… not so much. I was glad I was at least working with a great vocalist, and glad that the Quad-capture has a built in ground switch on the back!
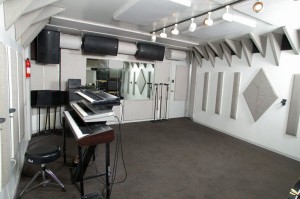 After walking around the room (actual room on left) and finding a good spot to have her sing, the first thing I did was engage the filter switch on my Audio Technica 4033a. This helped to cut the low end off from the rumblings of the other bands practicing in other rooms. I normally don’t use any filters when cutting vocals, I like to get that all sorted when mixing, but in this case it was necessary.
[MC6t recording tip – Microphones: If you get into recording vocals  with MC6, there are many affordable options available now. I suggest looking into condenser microphones. They will capture a lot more fidelity on the high end (treble) spectrum of vocals. It’s always good to capture as full of a sound as possible because you can always pull back frequencies when mixing – it does not work like that the other way around. If you use a low-grade microphone and you boost frequencies when mixing that were captured on that microphone, you may be adding noise that will not help your final product. You have to be a lot more careful mixing when you use low-quality microphones, so I suggest researching and spending a few dollars on a condenser (even a cheap one.)]
Tracking the vocals was interesting because we had the hurdles of time and location. I always use take lanes when tracking vocals, and this day was no different. However instead of working from 5 or 6 “takes,” I kept it to 3 since we were on time constraints. This enabled me to go back to my studio and “compile” a consistent lead vocal track out of the 3 takes on the take-lanes and also a “vocal double.”
I also usually split up the songs when tracking and sometimes even work backwards. It all depends on the song, but a lot of the times the last chorus needs to be strong, and by the time you get there the singer is out of gas. To compensate for this, I actually track the last verse first to get the singer warmed up, and then I track the last chorus. This way the end of the song has the strongest performance (or at least that is the theory,) but you can always easily move clips around in MC6t and arrange the performances however you want in the song.
 [MC6t recording tip – Use take-lanes to get a better vocal performance (or any other instrument performance for that matter): By capturing multiple performances on different take lanes (click left for larger image), you can combine the best parts into one performance – this is known in the production world as “comping.” After you record the performances in different take lanes, simply go back through and audition the phrases one at a time by using the solo and mute buttons in each take-lane. When you hear what you like, hold down SHIFT key (keeps it from moving horizontally) and highlight it with the Smart Tool selector and then drag it to a new track – your “Lead Vocal Comp.” Once you have all the pieces on one track, solo it and listen to see if and where you need to add fades; this will make the track sound more natural with the singers breathes and such. Once a complete track is compiled, you can highlight all the clips and right-click to select “Bounce to Clip(s)” in order to get one file (if needed). Another trick before bouncing-to-clips, especially if you have to send the track to someone for further editing, is to take the clip farthest to the left and drag it’s edge to the “Zero” spot on the timeline. This ensures that all the vocals will line up when imported into someone else’s system that has the same project file.]
After getting 3 great takes completed for the length of the song, we literally had 15 minutes to cut any background vocals. I had previously imported the original song into the sequence, so I was able to quickly get my head around what harmonies we needed. We rapidly got a take and a double of each part in 15 minutes and I can’t tell you how grateful I was at that moment that I was working with such an accomplished singer.
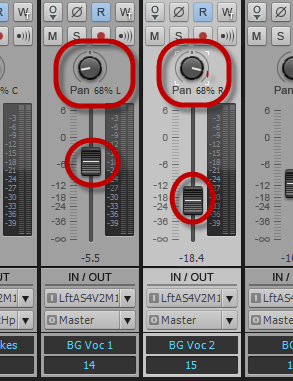 [MC6t recording tip – Recording backing vocals: If you have never tried adding backing vocals to a project there are a few things to keep in mind along with a few easy tricks. Backing vocals are meant to blend in with the other tracks, but making them sound different from the source lead vocals can be important as well. One thing I do if I am in limited space with limited gear is to simply track the backing vocals in another area of the room. I also move the singer off axis a bit from the mic and readjust my preamp. These two simple ideas can really get a backing vocal to work well in a mix. One other common technique is to double (or triple) all the backing vocals. Even if you think you don’t need them, it’s better to have more to work with. Sometimes I will have a stereo background vocal panned left and right (right image), but have one side very low for ambiance – which I will get into on the next part of this blog series – mixing. One last thing to think about is how to get the singer to “lock-in” with the lead vocal. This one is tricky sometimes and you have to experiment. With Jodi, I literally have just the drums and her lead vocal on playback with no other instruments. I have found this trick to be a life-saver on many occasions. Another trick is to have the singer take one side of the headphones off. Basically, experiment with anything that makes sense to make the lead singer feel comfortable and sing on point with the lead track – the goal is to have the vocals match up as much as possible when tracking so that you don’t have to spend a lot of time editing percussive sounds such as “T’s” and “P’s.”]
I got back onto a train and within a ½ hour I was in my studio putting together the lead vocal comp and the lead vocal double (I will explain this in the next “part 3 – mixing”), along with the background vocals. Once I got the best parts and phrases of all the takes compiled into one track, I then bounced down to a single and complete .wav file. I then sent the lead vocal comp over to Bill Jackson who went to work robotizing Jodi in Melodyne.
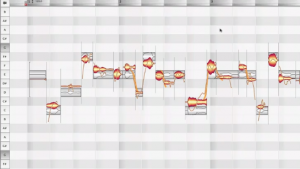 Bill Jackson – Cakewalk: “So, it’s a pretty simple trick in Melodyne. Jimmy sent me the raw vocal track as a .wav. I opened that file in Melodyne Editor and typed CTRL+A to select all. I grabbed the “Pitch Modulation Tool,” which is primarily used to manipulate vibrato. I double-clicked the selection to eliminate all vibrato, creating flat lines. This resulted in sudden robot voice. Then, I carefully listened through and adjusted especially unnatural sounding words and phrases by selecting them explicitly and using the pitch modulation tool to click and drag up, introducing a subtle amount of vibrato back in.”
 Once Bill finished his work on manipulating the vocal track, I simply dragged his rendition into MC6t from my desktop. It’s a great feature in MC6t that you can drag any audio tracks into a project and it will automatically create a new track for you – easy. Now that I had all the vocals completed the next logical step was for me to jump on a plane and mix this over the United States… 😉 stay tuned for “Part 3 – Mixing on the Fly – Literally.”

